Augmented Reality iOS Tutorial: Location Based
In this augmented reality tutorial, you’ll learn how to use your iOS users location to create compelling augmented reality experiences. By Jean-Pierre Distler.
4.5 (4) · 2 Reviews
Why HDAugmentedReality
You may be thinking to yourself "Meh, I still don't see why I should use HDAugmentedReality." It's true, grabbing frames and showing them is not that hard and you can read about it on this site. You can calculate the distance between points with a method from CLLocation without bleeding.
So why did I introduce this library? The problem comes when you need to calculate where to show the overlay for a POI on the screen. Assume you have a POI that is to the north of you and your device is pointing to the northeast. Where should you show the POI – centered or to the left side? At the top or bottom?
It all depends on the current position of the device in the room. If the device is pointing a little towards the ground, you must show the POI nearer to the top. If it’s pointing to the south, you should not show the POI at all. This could quickly get complicated!
And that’s where HDAugmentedReality is most useful. It grabs all the information needed from the gyroscope and compass and calculates where the device is pointing and its degree of tilt. Using this knowledge, it decides if and where a POI should be displayed on the screen.
Plus, without needing to worry about showing live video and doing complicated and error-prone math, you can concentrate on writing a great app your users will enjoy using.
Start Coding
Now have a quick look at the files inside the HDAugmentedReality\Classes group:
-
ARAnnotation: This class is used to define an POI. -
ARAnnotationView: This is used to provide a view for POI. -
ARConfiguration: This is used to provide some basic configuration and helper methods. -
ARTrackingManager: This is where the hard work is done. Luckily you don't have to deal with it. -
ARViewController: This controller does all the visual things for you. It shows a live video and adds markers to the view.
Setting Up the AR View
Open ViewController.swift and add another property below the places property.
fileprivate var arViewController: ARViewController!
Now find @IBAction func showARController(_ sender: Any) and add the following to the body of the method:
arViewController = ARViewController()
//1
arViewController.dataSource = self
//2
arViewController.maxVisibleAnnotations = 30
arViewController.headingSmoothingFactor = 0.05
//3
arViewController.setAnnotations(places)

self.present(arViewController, animated: true, completion: nil)
- First the
dataSourcefor thearViewControlleris set. ThedataSourceprovides views for visible POIs - This is some fine tuning for the
arViewController.maxVisibleAnnotationsdefines how many views are visible at the same time. To keep everything smooth you use a value of thirty, but this means also that if you live in an exciting area with lots of POIs around you, that maybe not all will be shown. -
headingSmoothingFactoris used to move views for the POIs about the screen. A value of 1 means that there is no smoothing and if you turn your iPhone around views may jump from one position to another. Lower values mean that the moving is animated, but then the views may be a bit behind the "moving". You should play a bit with this value to get a good compromise between smooth moving and speed. - This shows the
arViewController
You should have a look into ARViewController.swift for some more properties like maxDistance which defines a range in meters to show views within. So everything that is behind this value will not be shown.
Implementing the Datasource Method
Xcode complains the line where you assign self as the dataSource, to make it happy ViewController must adopt the ARDataSource protocol. This protocol has only one required method that should return a view for a POI. In most cases and also here you want to provide a custom view. Add a new file by pressing [cmd] + [n]. Choose iOS\Swift File and save it AnnotationView.swift.
Replace the content with the following:
import UIKit
//1
protocol AnnotationViewDelegate {
func didTouch(annotationView: AnnotationView)
}
//2
class AnnotationView: ARAnnotationView {
//3
var titleLabel: UILabel?
var distanceLabel: UILabel?
var delegate: AnnotationViewDelegate?
override func didMoveToSuperview() {
super.didMoveToSuperview()
loadUI()
}
//4
func loadUI() {
titleLabel?.removeFromSuperview()
distanceLabel?.removeFromSuperview()
let label = UILabel(frame: CGRect(x: 10, y: 0, width: self.frame.size.width, height: 30))
label.font = UIFont.systemFont(ofSize: 16)
label.numberOfLines = 0
label.backgroundColor = UIColor(white: 0.3, alpha: 0.7)
label.textColor = UIColor.white
self.addSubview(label)
self.titleLabel = label
distanceLabel = UILabel(frame: CGRect(x: 10, y: 30, width: self.frame.size.width, height: 20))
distanceLabel?.backgroundColor = UIColor(white: 0.3, alpha: 0.7)
distanceLabel?.textColor = UIColor.green
distanceLabel?.font = UIFont.systemFont(ofSize: 12)
self.addSubview(distanceLabel!)
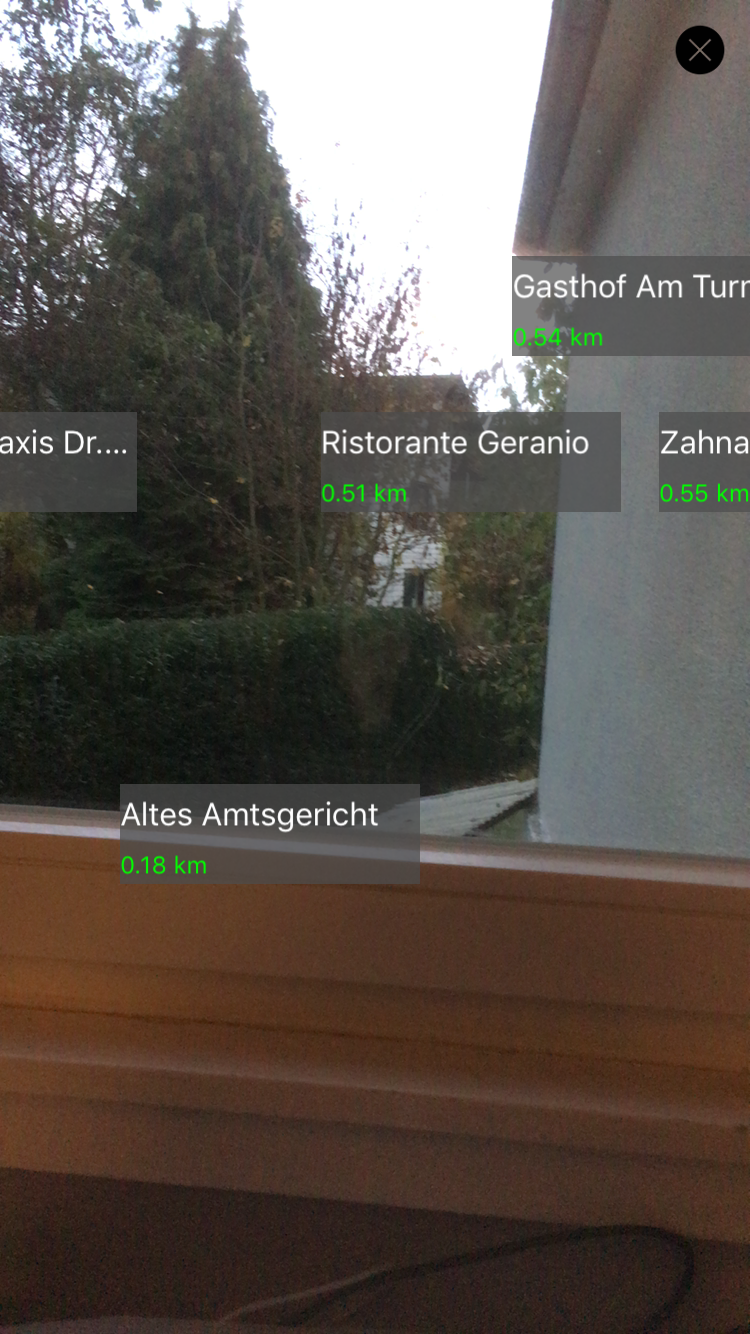
if let annotation = annotation as? Place {
titleLabel?.text = annotation.placeName
distanceLabel?.text = String(format: "%.2f km", annotation.distanceFromUser / 1000)
}
}
}
- First you add a delegate protocol, that you need later.
- This creates a subclass of
ARAnnotationViewwhich is used to show a view for a POI - The view in this app simply shows a label with the name of the POI and a second label with the distance. These lines declare the needed properties and a third one you again need later.
-
loadUI()adds and configures the labels.
To finish the class add two more methods
//1
override func layoutSubviews() {
  super.layoutSubviews()
  titleLabel?.frame = CGRect(x: 10, y: 0, width: self.frame.size.width, height: 30)
  distanceLabel?.frame = CGRect(x: 10, y: 30, width: self.frame.size.width, height: 20)
}

//2
override func touchesEnded(_ touches: Set<UITouch>, with event: UIEvent?) {
  delegate?.didTouch(annotationView: self)
}
- This method is called everytime the view needs to be redrawn and you simply make sure that the frames of the label have the correct values by resetting them.
- Here you tell the delegate that a view was touched, so the delegate can decide if and which action is needed.
Now head back to ViewController.swift and add the following extension:
extension ViewController: ARDataSource {
  func ar(_ arViewController: ARViewController, viewForAnnotation: ARAnnotation) -> ARAnnotationView {
    let annotationView = AnnotationView()
    annotationView.annotation = viewForAnnotation
    annotationView.delegate = self
    annotationView.frame = CGRect(x: 0, y: 0, width: 150, height: 50)

    return annotationView
  }
}
Here you create a new AnnotaionView and set its delegate before you return it.
Before you can test your views in action you need another extension.
extension ViewController: AnnotationViewDelegate {
  func didTouch(annotationView: AnnotationView) {
    print("Tapped view for POI: \(annotationView.titleLabel?.text)")
  }
}
Before you activate the camera, you have to add a key to the Info.plist. Open the file and add the key NSCameraUsageDescription with a value of Needed for AR, just like you did for accessing location information.
Build and run, and tap the camera button on the map view to go to the ar view. The first time you do so, the system will raise a permission dialog before it gives you access to the camera. Tap a POI and look at the console.