Google Maps iOS SDK Tutorial: Getting Started
In this tutorial, you’ll learn how to use the Google Maps iOS SDK to make an app that searches for nearby places to eat, drink or shop for groceries. By Ron Kliffer.
Getting the Location
Feed Me is all about finding places near the user, and you can’t do that without getting the user’s location.
Adding MapViewController Extension
iOS uses a delegate to inform your app of your user’s location. Your next step is to make MapViewController conform to CLLocationManagerDelegate.
Add the following extension to the bottom of MapViewController.Swift:
// MARK: - CLLocationManagerDelegate
//1
extension MapViewController: CLLocationManagerDelegate {
  // 2
  func locationManager(
    _ manager: CLLocationManager,
    didChangeAuthorization status: CLAuthorizationStatus
  ) {
    // 3
    guard status == .authorizedWhenInUse else {
      return
    }
    // 4
    locationManager.requestLocation()

    //5
    mapView.isMyLocationEnabled = true
    mapView.settings.myLocationButton = true
  }

  // 6
  func locationManager(
    _ manager: CLLocationManager,
    didUpdateLocations locations: [CLLocation]) {
    guard let location = locations.first else {
      return
    }

    // 7
    mapView.camera = GMSCameraPosition(
      target: location.coordinate,
      zoom: 15,
      bearing: 0,
      viewingAngle: 0)
  }

  // 8
  func locationManager(
    _ manager: CLLocationManager,
    didFailWithError error: Error
  ) {
    print(error)
  }
}
In this extension, you:
- Create a
MapViewControllerextension that conforms toCLLocationManagerDelegate. - Create a
locationManagerdelegate method that accepts aCLAuthorizationStatusparameter. This method is called once the user grants or revokes location permissions. - Verify the user has granted you permission while the app is in use.
- Ask the location manager for their location.
- Add the user’s location indicator and the location button.
- Create a different
locationManagermethod that accepts aCLLocationarray. This executes when the location manager receives new location data. - Update the map’s camera to center near the user’s current location. The
GMSCameraPositionclass aggregates all camera position parameters and passes them to the map for display. - Create a third
locationManagerthat accepts anErrorparameter. If the app throws an error, it prints to the console so that you can handle it and keep your app from crashing.
Creating an Instance of CLLocationManager
Now, you must do the work to request your user’s location.
First, add the following property to MapViewController:
let locationManager = CLLocationManager()
This will add and instantiate a CLLocationManager property named locationManager.
Next, find the definition of viewDidLoad() in the extension and replace it with the following:
override func viewDidLoad() {
  super.viewDidLoad()

  // 1
  locationManager.delegate = self

  // 2
  if CLLocationManager.locationServicesEnabled() {
    // 3
    locationManager.requestLocation()

    // 4
    mapView.isMyLocationEnabled = true
    mapView.settings.myLocationButton = true
  } else {
    // 5
    locationManager.requestWhenInUseAuthorization()
  }
}
Here’s what this does:
- Makes
MapViewControllerthe delegate oflocationManager. - Checks if the user previously authorized the use of location services for this app.
- Asks the location manager for the user’s location.
- Sets
isMyLocationEnabledandmyLocationButtonto true. This draws a light blue dot indicating the user’s location and adds a button to center the map on it. - Requests access to the user’s location while using the app if
locationServicesEnabledis false.
You’re ready to check for permission but you still need to ask for it first. You’ll fix that next.
Asking for Permission to Get Location
Open the Feed Me project at the top of the Project navigator and select the Feed Me target. Then go to the Info tab and select the first line in the Custom iOS Target Properties section.
Control-click and select Raw Keys & Values from the menu. Now, click the + icon to add a new row.
Set NSLocationWhenInUseUsageDescription as the key, choose String for the type and enter the following text as the value:
By accessing your location, this app can find good places to eat for you.
When you’re finished, it will look like this:

Build and run. Once your app loads, you’ll be prompted with an alert asking for location permissions. Tap on Allow While Using App.

You now see a map centered on your location. Scroll the map a little, then tap the Locate button in the bottom-right corner. The map centers on your location again.

Showing the Street Address
Now that you have the user’s location, it would be nice to show the street address of that location. Google Maps has an object that does exactly that: GMSGeocoder. This takes a coordinate and returns a readable street address.
Creating the UI for the Address
First, you’ll add some UI to present the address to the user.
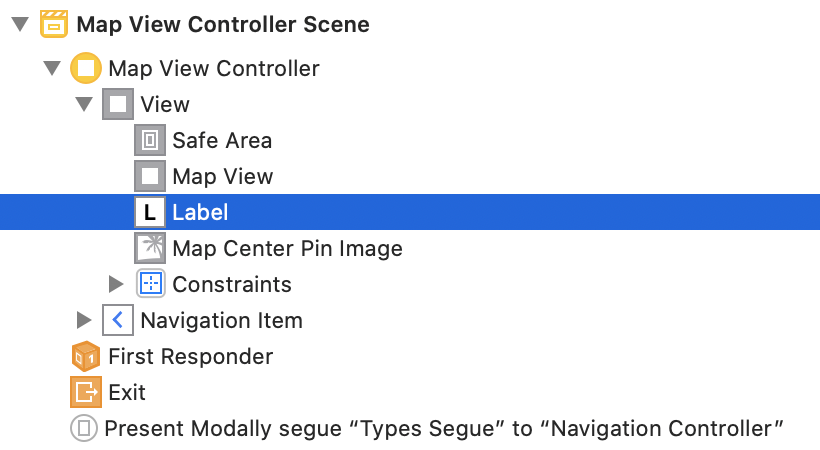
Open Main.storyboard and add a UILabel to the MapViewController scene. Make sure you add the label to MapViewController‘s view, and not GMSMapView.
Next, open the Attributes inspector, and set the following attributes for the label:
- Alignment to center.
- Lines to 0. Surprisingly, this lets the label take up as many lines as it needs to fit the text. Go figure! :]
- Background to white with 85% opacity.
The label’s Attributes inspector and the scene’s Object Tree should look like this when done:

Also, make sure that all the subviews are ordered as follows:
Finally, add 0 space constraints for left, bottom and right to the label as shown below:
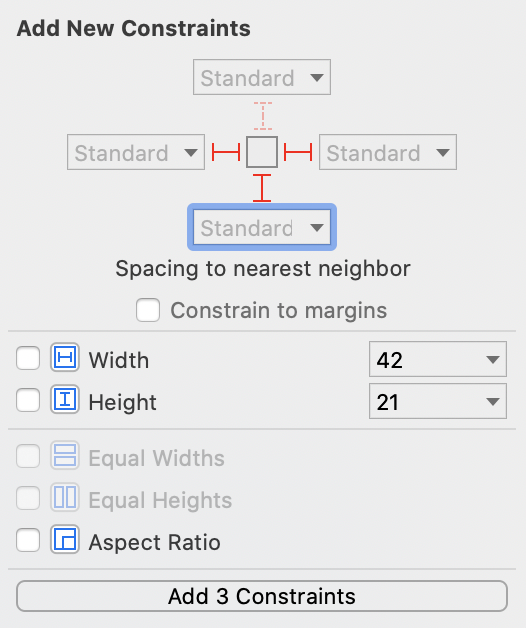
This pins the label to the bottom of the screen and stretches it over the entire width of the screen.
Your storyboard scene should look like this:

Next, create an outlet for the label.
Bring up Assistant Editor and Control-drag from the label in the Document Outline to MapViewController.swift. Set the connection type to Outlet, the name to addressLabel and click Connect.
This adds a property to your MapViewController that you can use in your code:
@IBOutlet weak var addressLabel: UILabel!
Getting Address From a Coordinate
Now that you have the address label, it’s time to get the address. Add the method below to MapViewController:
func reverseGeocode(coordinate: CLLocationCoordinate2D) {
  // 1
  let geocoder = GMSGeocoder()

  // 2
  geocoder.reverseGeocodeCoordinate(coordinate) { response, error in
    guard
      let address = response?.firstResult(),
      let lines = address.lines
      else {
        return
    }

    // 3
    self.addressLabel.text = lines.joined(separator: "\n")

    // 4
    UIView.animate(withDuration: 0.25) {
      self.view.layoutIfNeeded()
    }
  }
}
Here’s what each commented section does:
- Creates a
GMSGeocoderobject to turn a latitude and longitude coordinate into a street address. - Asks the geocoder to reverse geocode the coordinate passed to the method. It then verifies there is an address in the response of type
GMSAddress. This is a model class for addresses returned by theGMSGeocoder. - Sets the text of the
addressLabelto the address returned by the geocoder. - Once the address is set, animates the changes in the label’s intrinsic content size.
Your next step is to keep the map updated when the user changes locations.