Metal Tutorial with Swift 3 Part 2: Moving to 3D
In this second part of our Metal tutorial series, learn how to create a rotating 3D cube using Apple’s built-in 3D graphics API. By Andrew Kharchyshyn.
Introduction to Matrices
First things first: what is a matrix?
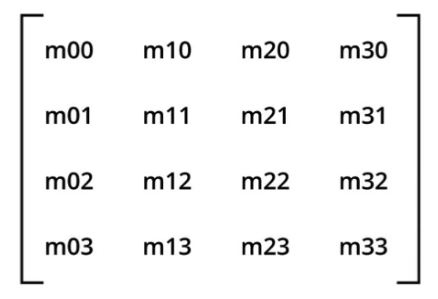
A matrix is a rectangular array of numbers (sorry, Neo!). In 3D gaming, you’ll often see a 4×4 sized matrix, with four columns and four rows.
Also note that you’re using the GLKit column-based GLKMatrix4, so elements are placed like this:
With matrices, you can transform your object in three ways:
- Translation: Shift the object along the x, y and z axis.
- Rotation: Rotate the object around any axis.
- Scale: Change the object size along any axis. In this tutorial, you’ll always scale proportionally along all axes.

How does this work? First, you create an instance of Matrix4, like this (you don’t need to add this or the rest of the code in this section, this is just to illustrate):
var modelTransformationMatrix = Matrix4()
Then you use apply transformations, like this:
modelTransformationMatrix.translate(positionX, y: positionY, z: positionZ)
modelTransformationMatrix.rotateAroundX(rotationX, y: rotationY, z: rotationZ)
modelTransformationMatrix.scale(scale, y: scale, z: scale)
There’s some math behind this that you can learn about in any Linear Algebra course. It’s great if you understand it, but it’s not necessary for this tutorial.
Before you continue, open HelloMetal-BridgingHeader.h and import your Matrix4 class. You’ll need that in the following sections.
#import "Matrix4.h"
Model Transformation
The first transformation you’ll need is the model transformation. This transformation converts your node’s coordinates from local coordinates to world coordinates. In other words, it lets you move your model around your world.
Let’s see how this works. Open Node.swift and add the following new properties:
var positionX: Float = 0.0
var positionY: Float = 0.0
var positionZ: Float = 0.0

var rotationX: Float = 0.0
var rotationY: Float = 0.0
var rotationZ: Float = 0.0
var scale: Float     = 1.0
These are convenience properties that you will set in order to position, rotate, or scale the node within the world. You will construct a model matrix from these which you will use to apply the model transformation.
To do this, add the following method at the end of Node:
func modelMatrix() -> Matrix4 {
    let matrix = Matrix4()
    matrix.translate(positionX, y: positionY, z: positionZ)
    matrix.rotateAroundX(rotationX, y: rotationY, z: rotationZ)
    matrix.scale(scale, y: scale, z: scale)
    return matrix
}
In this method, you generate a matrix from those parameters.
Now you need to pass this matrix to the shader so it can apply the model transformation. To do this, you need to understand the concept of uniform data.
Uniform Data
So far, you have passed different data for each vertex to the shaders through vertex arrays. But the model matrix will be the same across an entire model, so it would be a waste of space to copy it for each vertex.
When you have identical data across an entire model, you can instead pass the data to the shader as uniform data.
The first step to do this is to put your data into a buffer object, which represents memory accessible to both the CPU and the GPU.
In Node.swift, add this right after renderEncoder.setVertexBuffer(self.vertexBuffer, offset: 0, atIndex: 0):
// 1
let nodeModelMatrix = self.modelMatrix()
// 2
let uniformBuffer = device.makeBuffer(length: MemoryLayout<Float>.size * Matrix4.numberOfElements(), options: [])
// 3
let bufferPointer = uniformBuffer.contents()
// 4
memcpy(bufferPointer, nodeModelMatrix.raw(), MemoryLayout<Float>.size * Matrix4.numberOfElements())
// 5
renderEncoder.setVertexBuffer(uniformBuffer, offset: 0, at: 1)
Here’s the section-by-section breakdown:
- Call the method you wrote earlier to convert the convenience properties (like position and rotation) into a model matrix.
- Ask the device to create a buffer with shared CPU/GPU memory.
- Get a raw pointer from buffer (similar to
void *in Objective-C). - Copy your matrix data into the buffer.
- Pass
uniformBuffer(with data copied) to the vertex shader. This is similar to how you sent the buffer of vertex-specific data, except you use index 1 instead of 0.
There is one problem with this code: it’s in a render method that should be called, hopefully, 60 times per second. This means you’re creating a new buffer 60 times per second.
Continuously allocating memory each frame is expensive and not recommended in production apps; you’ll learn a better way to do this in future tutorials but this approach will do for now. You can see how this is done in the iOS Metal Game template.
You’ve passed the matrix to the vertex shader, but you’re not using it yet. To fix this, open Shaders.metal and add this structure right below VertexOut:
struct Uniforms{
  float4x4 modelMatrix;
};
Right now this only holds one component, but later you’ll use it to hold one more matrix.
Second, modify your vertex shader so it looks like this:
vertex VertexOut basic_vertex(
  const device VertexIn* vertex_array [[ buffer(0) ]],
  const device Uniforms&  uniforms    [[ buffer(1) ]],           //1
  unsigned int vid [[ vertex_id ]]) {

  float4x4 mv_Matrix = uniforms.modelMatrix;                     //2

  VertexIn VertexIn = vertex_array[vid];

  VertexOut VertexOut;
  VertexOut.position = mv_Matrix * float4(VertexIn.position,1);  //3
  VertexOut.color = VertexIn.color;

  return VertexOut;
}
Here’s what’s going on with this chunk of code:
- You add a second parameter for the uniform buffer, marking that it’s incoming in slot 1 to match up with the code you wrote earlier.
- You then get a handle to the model matrix in the uniforms structure.
- To apply the model transformation to a vertex, you simply multiply the vertex position by the model matrix.
You’re done with that part; now back to test the cube.
In Cube.swift, change the vertices back to this:
let A = Vertex(x: -1.0, y:   1.0, z:   1.0, r:  1.0, g:  0.0, b:  0.0, a:  1.0)
let B = Vertex(x: -1.0, y:  -1.0, z:   1.0, r:  0.0, g:  1.0, b:  0.0, a:  1.0)
let C = Vertex(x:  1.0, y:  -1.0, z:   1.0, r:  0.0, g:  0.0, b:  1.0, a:  1.0)
let D = Vertex(x:  1.0, y:   1.0, z:   1.0, r:  0.1, g:  0.6, b:  0.4, a:  1.0)

let Q = Vertex(x: -1.0, y:   1.0, z:  -1.0, r:  1.0, g:  0.0, b:  0.0, a:  1.0)
let R = Vertex(x:  1.0, y:   1.0, z:  -1.0, r:  0.0, g:  1.0, b:  0.0, a:  1.0)
let S = Vertex(x: -1.0, y:  -1.0, z:  -1.0, r:  0.0, g:  0.0, b:  1.0, a:  1.0)
let T = Vertex(x:  1.0, y:  -1.0, z:  -1.0, r:  0.1, g:  0.6, b:  0.4, a:  1.0)
In ViewController.swift, add the following after objectToDraw = Cube(device: device):
objectToDraw.positionX = -0.25
objectToDraw.rotationZ = Matrix4.degrees(toRad: 45)
objectToDraw.scale = 0.5
Build and run; as expected, the cube has been scaled down, shifted left and rotated 45 degrees around the Z axis.

This proves one thing: mathematical matrices are much cooler than any other matrices! :]

Now it’s time for some science. You’ll shift the cube along the X , Y and Z axes all at once. For that, add following code right below objectToDraw.positionX = -0.25:
objectToDraw.positionY =  0.25
objectToDraw.positionZ = -0.25
Build and run. The cube shifts along X and Y, but what’s wrong with Z?

You set .positionZ to be -0.25, so the cube should have moved away from you, but it didn’t. You might think there’s some problem with the matrix, but that’s not the problem at all. In fact, the cube did move back, but you can’t see it.
To understand the problem, you need to understand another type of transform: the projection transform.