CocoaPods Tutorial for Swift: Getting Started
Use this CocoaPods Tutorial for Swift to learn how to install and manage third-party library dependencies in your Swift projects. By Rony Rozen.
Sign up/Sign in
With a free Kodeco account you can download source code, track your progress, bookmark, personalise your learner profile and more!
Create accountAlready a member of Kodeco? Sign in
Sign up/Sign in
With a free Kodeco account you can download source code, track your progress, bookmark, personalise your learner profile and more!
Create accountAlready a member of Kodeco? Sign in
Contents
CocoaPods Tutorial for Swift: Getting Started
20 mins
A Word About Libraries
You’ll see the term library often used as a general term that actually means a library or framework. This tutorial is guilty of casually intermixing these words, too.
You may be wondering about the differences between a library, a framework and a CocoaPod. It’s OK if you find the terminology a bit confusing!
A CocoaPod, or pod for short, is a general term for either a library or framework that’s added to your project using CocoaPods.
iOS 8 introduced dynamic frameworks, which allow you to bundle code, images and other assets together. Prior to iOS 8, you created CocoaPods as “fat” static libraries. “Fat” means they contained several code instruction sets, like i386 for the simulator, armv7 for devices, etc. However, Swift doesn’t allow static libraries to contain resources such as images or assets.
Back to Installing Your First Dependency
It’s finally time to add your first dependency using CocoaPods. Add the following to your Podfile, right after use_frameworks!:
pod 'Alamofire', '4.9.1'
This tells CocoaPods you want to include Alamofire version 4.9.1 as a dependency for your project.
Save and close the Podfile.
You now need to tell CocoaPods to install the dependencies for your project.
Enter the following command in Terminal, after ensuring you’re still in the directory containing the IceCreamShop project and Podfile:
pod install
You should see output like this:
Analyzing dependencies
Adding spec repo `trunk` with CDN `https://cdn.cocoapods.org/`
Downloading dependencies
Installing Alamofire (4.9.1)
Generating Pods project
Integrating client project

[!] Please close any current Xcode sessions and use `IceCreamShop.xcworkspace` for this project from now on.
Pod installation complete! There is 1 dependency from the Podfile and 1 total pod installed.
Open the project folder using Finder and you’ll see CocoaPods created a new IceCreamShop.xcworkspace file and a Pods folder to store all the project’s dependencies.
Excellent! You’ve just added your first dependency using CocoaPods!
Using Installed Pods
Now, you’ll use your brand new dependency, Alamofire.
If the Xcode project is open, close it now and open IceCreamShop.xcworkspace.
Open PickFlavorViewController.swift and add the following just below the existing import:
import Alamofire
Build and run. You’ll see no change yet but rest assured that Alamofire is now available.
Next, replace loadFlavors() with the following:
  private func loadFlavors() {
    // 1
    Alamofire.request(
      "https://www.raywenderlich.com/downloads/Flavors.plist",
      method: .get,
      encoding: PropertyListEncoding(format: .xml, options: 0))
        .responsePropertyList { [weak self] response in
        // 2
        guard let self = self else { return }

        // 3
        guard
          response.result.isSuccess,
          let dictionaryArray = response.result.value as? [[String: String]]
          else {
            return
        }

        // 4
        self.flavors = self.flavorFactory.flavors(from: dictionaryArray)

        // 5
        self.collectionView.reloadData()
        self.selectFirstFlavor()
    }
  }
Here’s the play-by-play of what’s happening in this code:
- You use Alamofire to create a GET request and download a plist containing ice cream flavors.
- To break a strong reference cycle, you use a weak reference to
selfin the response completion block. Once the block executes, you immediately get a strong reference toselfso you can set properties on it later. - Next, you verify the
response.resultshows success and theresponse.result.valueis an array of dictionaries. - Now, you set
self.flavorsto an array ofFlavorobjects thatFlavorFactorycreates. This is a class a “colleague” wrote for you (you’re welcome!), which takes an array of dictionaries and uses them to create instances ofFlavor. - Finally, you reload the collection view and select the first flavor.
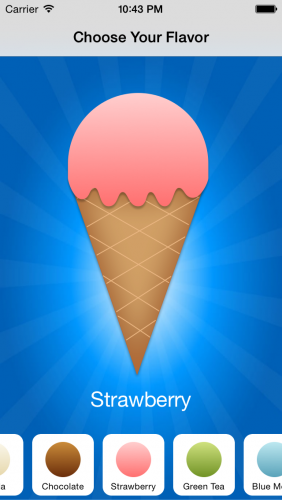
Build and run. You can now choose an ice cream flavor!
Now for a Tasty Topping
The app looks good, but you can still improve it.
Did you notice the app takes a second to download the flavors file? If you’re on a fast Internet connection, you might not notice the delay, but your customers won’t always be so lucky.
Your next step is to show a loading indicator in your app, to help customers understand it’s loading data and not just twiddling its libraries. MBProgressHUD is a really nice indicator that will work well here. And it supports CocoaPods; what a coincidence! :]
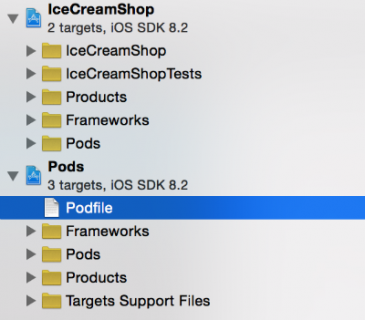
To use this pod, you need to add it to your Podfile. Rather than opening the Podfile from the command line, you can now find it in the Pods target in the workspace:
Open Podfile and add the following, right after the Alamofire line:
pod 'MBProgressHUD', '~> 1.0'
Save the file and install the dependencies via pod install in Terminal, just as you did before.
Notice anything different this time? Yep, you specified the version number as ~> 1.0. But why?
CocoaPods recommends that all pods use Semantic Versioning. Take a moment to understand what that is.
Semantic Versioning
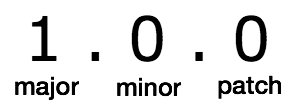
Many times, you’ll see a version written like this: 1.0.0. Those three numbers are major, minor and patch version numbers.
For example, for the version number 1.0.0, 1 is the major number, the first 0 is the minor number, and the second 0 is the patch number.
If the major number increases, it indicates that the version contains non-backward-compatible changes. When you upgrade a pod to the next major version, you may need to fix build errors or the pod may behave differently than before.
If the minor number increases, it indicates that the version contains new functionality that is backward-compatible. When you decide to upgrade, you may or may not need the new functionality, but it shouldn’t cause any build errors or change existing behavior.
If the patch number increases, it means the new version contains bug fixes but no new functionality or behavior changes. In general, you always want to upgrade patch versions as soon as possible to have the latest, stable version of the pod.
Finally, when you increase the highest-order number — major, then minor then patch — per the above rules, you must reset any lower-order numbers to zero.
Here’s an example:
Consider a pod that has a current version number of 1.2.3.
If you make changes that are not backward-compatible, don’t have new functionality, but fix existing bugs, you’d give it version 2.0.0.


