UIGestureRecognizer Tutorial: Getting Started
In this tutorial, you’ll learn how to configure UIGestureRecognizer objects and how to create custom recognizers in code. By Ryan Ackermann.
Connecting the Panning Gesture to the Recognizer
In the document outline for Main.storyboard, control-drag from the monkey’s pan gesture recognizer to the view controller. Select handlePan: from the pop-up.
At this point your Connections inspector for the pan gesture recognizer should look like this:

Build and run and try to drag the monkey. It doesn’t work?! This is because Xcode disables touches by default on views that normally don’t accept touches — like image views.
Letting the Image Views Accept Touches
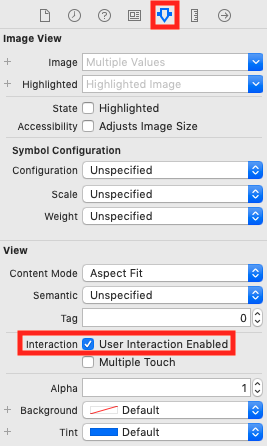
Fix this by selecting both image views, opening the Attributes inspector and checking User Interaction Enabled.
Build and run again. This time, you can drag the monkey around the screen!
Notice that you still can’t drag the banana because you need to connect its own pan gesture recognizer to handlePan(_:). You’ll do that now.
- Control-drag from the banana pan gesture recognizer to the view controller and select handlePan:.
- Double-check to make sure you’ve checked User Interaction Enabled on the banana as well.
Build and run. You can now drag both image views across the screen. It’s pretty easy to implement such a cool and fun effect, eh?
Adding Deceleration to the Images
Apple apps and controls typically have a bit of deceleration before an animation finishes. You see this when scrolling a web view, for example. You’ll often want to use this type of behavior in your apps.
There are many ways of doing this. The approach you’ll use for this tutorial produces a nice effect without much effort. Here’s what you’ll do:
- Detect when the gesture ends.
- Calculate the speed of the touch.
- Animate the object moving to a final destination based on the touch speed.
And here’s how you’ll accomplish those goals:
-
To detect when the gesture ends: Multiple calls to the gesture recognizer’s callback occur as the gesture recognizer’s state changes. Examples of those states are:
began,changedorended. You can find the current state of a gesture recognizer by looking at itsstateproperty. -
To detect the touch velocity: Some gesture recognizers return additional information. For example,
UIPanGestureRecognizerhas a handy method calledvelocity(in:)that returns, you guessed it, the velocity!
Easing Out Your Animations
Start by adding the following to the bottom of handlePan(_:) in ViewController.swift:
guard gesture.state == .ended else {
  return
}

// 1
let velocity = gesture.velocity(in: view)
let magnitude = sqrt((velocity.x * velocity.x) + (velocity.y * velocity.y))
let slideMultiplier = magnitude / 200

// 2
let slideFactor = 0.1 * slideMultiplier
// 3
var finalPoint = CGPoint(
  x: gestureView.center.x + (velocity.x * slideFactor),
  y: gestureView.center.y + (velocity.y * slideFactor)
)

// 4
finalPoint.x = min(max(finalPoint.x, 0), view.bounds.width)
finalPoint.y = min(max(finalPoint.y, 0), view.bounds.height)

// 5
UIView.animate(
  withDuration: Double(slideFactor * 2),
  delay: 0,
  // 6
  options: .curveEaseOut,
  animations: {
    gestureView.center = finalPoint
})
This simple deceleration equation uses the following strategy:
- Calculates the length of the velocity vector (i.e. the magnitude).
- Decreases the speed if the length is < 200. Otherwise, it increases it.
- Calculates a final point based on the velocity and the slideFactor.
- Makes sure the final point is within the view’s bounds
- Animates the view to the final resting place.
- Uses the ease out animation option to slow the movement over time.
Build and run to try it out. You should now have some basic but nice deceleration! Feel free to play around with it and improve it. If you come up with a better implementation, please share it in the forum discussion at the end of this article.
Pinch and Rotation Gestures
Your app is coming along great so far, but it would be even cooler if you could scale and rotate the image views by using pinch and rotation gestures as well!
The begin project gives you a great start. It created handlePinch(_:) and handleRotate(_:) for you. It also connected those methods to the monkey image view and the banana image view. Now, you’ll complete the implementation.
Implementing the Pinch and Rotation Gestures
Open ViewController.swift. Add the following to handlePinch(_:):
guard let gestureView = gesture.view else {
  return
}

gestureView.transform = gestureView.transform.scaledBy(
  x: gesture.scale,
  y: gesture.scale
)
gesture.scale = 1
Next add the following to handleRotate(_:):
guard let gestureView = gesture.view else {
  return
}

gestureView.transform = gestureView.transform.rotated(
  by: gesture.rotation
)
gesture.rotation = 0
Just like you got the translation from the UIPanGestureRecognizer, you get the scale and rotation from the UIPinchGestureRecognizer and UIRotationGestureRecognizer.
Every view has a transform applied to it, which gives information on the rotation, scale and translation that the view should have. Apple has many built-in methods to make working with a transform easier. These include CGAffineTransform.scaledBy(x:y:) to scale a given transform and CGAffineTransform.rotated(by:) to rotate a given transform.
Here, you use these methods to update the view’s transform based on the user’s gestures.
Again, since you’re updating the view each time the gesture updates, it’s very important to set the scale and rotation back to the default state so you don’t have craziness going on.
Now, hook these methods up in the storyboard editor. Open Main.storyboard and perform the following steps:
- As you did previously, connect the two pinch gesture recognizers to the view controller’s handlePinch:.
- Connect the two rotation gesture recognizers to the view controller’s handleRotate:.
Your view controller connections should now look like this:

Build and run on a device, if possible, because pinches and rotations are hard to do on the simulator.
If you are running on the simulator, hold down the Option key and drag to simulate two fingers. Then hold down Shift and Option at the same time to move the simulated fingers together to a different position.
You can now scale and rotate the monkey and the banana!

Simultaneous Gesture Recognizers
You may notice that if you put one finger on the monkey and one on the banana, you can drag them around at the same time. Kinda cool, eh?
However, you’ll notice that if you try to drag the monkey around and in the middle of dragging, bring down a second finger to pinch to zoom, it doesn’t work. By default, once one gesture recognizer on a view “claims” the gesture, other gesture recognizers can’t take over.
However, you can change this by overriding a method in the UIGestureRecognizer delegate.