Bond Tutorial: Bindings in Swift
Bond is a simple, powerful, type-safe binding framework for Swift. Learn how to use it with the popular MVVM architectural pattern in this Bond tutorial. By Tom Elliott.
Using the 500px API
The app you are building uses the 500px API. This was selected because it has a relatively simple interface and authentication mechanism.
Note: The starter application already has all the code you need to query 500px; you’ll find the code in the Model group.
To use the interface, you’ll have to register as a developer. Fortunately this is free, quick and easy!
Sign up via the following URL: https://500px.com/signup
Once you have signed up, navigate to your applications: https://500px.com/settings/applications. Here you will see an interface that allows you to register an application.

Select Register your application and fill in the registration form (only a few fields are mandatory). Your application will be created immediately.

Click on your app link and grab a copy of your consumer key. This is passed to 500px along with every request.
Open up Info.plist and edit the apiKey, adding the consumer key supplied by 500px:

Return to PhotoSearchViewModel.swift and add the following lazy property to PhotoSearchViewModel:
private let searchService: PhotoSearch = {
  let apiKey = Bundle.main.object(forInfoDictionaryKey: "apiKey") as! String
  return PhotoSearch(key: apiKey)
}()
This initializes the PhotoSearch class, which provides a Swift API for querying 500px.
In PhotoSearchViewModel.swift, update the executeSearch(_:) method contents as follows:
var query = PhotoQuery()
query.text = searchString.value ?? ""

searchService.findPhotos(query) {
  result in
  switch result {
  case .success(let photos):
    print("500px API returned \(photos.count) photos")
  case .error:
    print("Sad face :-(")
  }
}
This constructs a PhotoQuery, which represents the query parameters, and then executes the search with the searchService. The result is returned asynchronously, with the result enumeration representing success or failure.
Build and run the application and type a string. The view model will execute the query and you’ll see the following logged:
500px API returned 20 photos
If something went wrong then you’ll see the following:
Sad face :-(
If this happens, double-check your API key, your internet connection, cross your fingers, and try again! If it still doesn’t work, then it’s likely the 500px API is down.
Rendering the Results
It would be much more interesting if you could actually see the photos that your query returns, wouldn’t it?
Open PhotoSearchViewModel.swift, and add the following property to PhotoSearchViewModel:
let searchResults = MutableObservableArray<Photo>([])
As the name suggests, MutableObservableArray is a special type of observable, one that supports arrays.
Before trying it out, take a look at the MutableObservableArray (and ObservableArray) in a bit more detail. Use cmd+click to navigate around the various Bond APIs.
ObservableArray is similar to Observable: it is also a Signal. This means you can subscribe to events from that signal when the array changes. In this case, the event emits ObservableArrayEvent instances.
ObservabelArrayEvent encodes the change that occurred to the array via the ObservableArrayChange enumeration. The events emitted by the ObservableArray are quite detailed. Rather than informing observers of the new array value, they instead describe the changes that have occurred.
There is a very good reason for this level of detail. You could use a Bond Observable to bind an array to the UI, via a table view perhaps. However, if you add a single item to this array, the Observable can only indicate that *something* has changed, and as a result the entire UI would have to be re-built. The detail provided by MutableObservableArray allows for much more efficient UI updates.
Now that you know what an observable array is, it’s time to put one to use.
In PhotoSearchViewModel.swift, locate executeSearch(_:) and update the success case as follows:
case .success(let photos):
  self.searchResults.removeAll()
  self.searchResults.insert(contentsOf: photos, at: 0)
This clears the array, adding the new results.
Open PhotoSearchViewController.swift, and add the following to the end of bindViewModel():
viewModel.searchResults.bind(to: resultsTable) { dataSource, indexPath, tableView in
  let cell = tableView.dequeueReusableCell(withIdentifier: "MyCell", for: indexPath) as! PhotoTableViewCell
  let photo = dataSource[indexPath.row]
  cell.title.text = photo.title

  let backgroundQueue = DispatchQueue(label: "backgroundQueue",
                                      qos: .background,
                                      attributes: .concurrent,
                                      autoreleaseFrequency: .inherit,
                                      target: nil)
  cell.photo.image = nil
  backgroundQueue.async {
    if let imageData = try? Data(contentsOf: photo.url) {
      DispatchQueue.main.async() {
        cell.photo.image = UIImage(data: imageData)
      }
    }
  }
  return cell
}
Bond has a protocol extension for SignalProtocol that is specifically intended for binding observable arrays to table views. You use it here to bind searchResults to the resultsTable. The closure takes on a similar role to the standard table view datasource.
The closure is your standard table view cell wire-up. A cell is dequeued and various properties are set. Notice that the image is downloaded via a background queue in order to keep the UI responsive.
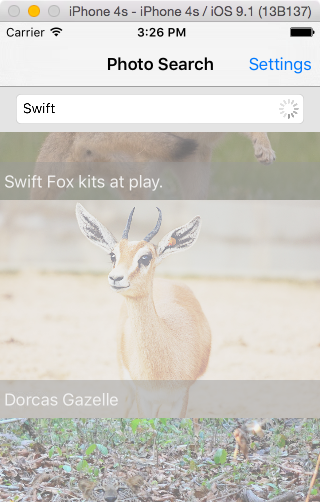
Build and run to see your application coming to life:

Notice that as you type into the text field, it automagically updates. Very cool.
A Bit of UI Flair
Time to wire up a bit more of your UI!
Within PhotoSearchViewModel.swift, add the following property:
let searchInProgress = Observable<Bool>(false)
This Observable will be used to indicate when a search is in progress. Now update the contents of executeSearch(_:) to make use of it:
var query = PhotoQuery()
query.text = searchString.value ?? ""

searchInProgress.value = true

searchService.findPhotos(query) {
  [unowned self] result in
  self.searchInProgress.value = false
  switch result {
  case .success(let photos):
    self.searchResults.removeAll()
    self.searchResults.insert(contentsOf: photos, at: 0)
  case .error:
    print("Sad face :-(")
  }
}
This sets searchInProgress.value to true before querying 500px, then returns it with false when the result is returned.
In PhotoSearchViewController.swift, add the following to the bottom of bindViewModel():
viewModel.searchInProgress
  .map { !$0 }.bind(to: activityIndicator.reactive.isHidden)

viewModel.searchInProgress
  .map { $0 ? CGFloat(0.5) : CGFloat(1.0) }
  .bind(to: resultsTable.reactive.alpha)
This shows the activity indicator and reduces the opacity of resultsTable when a query is in progress.
Build and run to see this in action:
By now you should really be starting to feel the benefits of Bond! And the effects of that martini :]
Handling Errors
Currently if the 500px query fails, your app just logs it to the console. It really should report any failure back to the user in a helpful and constructive fashion.
The problem is, how should this be modeled? An error doesn’t feel like it should be a view model property, since it is a transient occurrence rather than a change in state.
The answer is simple enough: rather than an Observable, all you need is a PublishSubject. In PhotoSearchViewModel.swift, add the following property:
let errorMessages = PublishSubject<String, NoError>()
Next, update the Error case of executeSearch(_:) as follows:
  case .error:
    self.errorMessages.next("There was an API request issue of some sort. Go ahead, hit me with that 1-star review!")
Within PhotoSearchViewController.swift, add the following to the bottom of bindViewModel:
_ = viewModel.errorMessages.observeNext {
   [unowned self] error in

  let alertController = UIAlertController(title: "Something went wrong :-(", message: error, preferredStyle: .alert)
  self.present(alertController, animated: true, completion: nil)
  let actionOk = UIAlertAction(title: "OK", style: .default,
    handler: { action in alertController.dismiss(animated: true, completion: nil) })

  alertController.addAction(actionOk)
}
This subscribes to the events emitted by the errorMessages property, displaying the supplied error message via a UIAlertController.
Build and run your application, then disconnect from the internet or remove your consumer key to see the error message in action:

Perfect. :]