ML Kit Tutorial for iOS: Recognizing Text in Images
In this ML Kit tutorial, you’ll learn how to leverage Google’s ML Kit to detect and recognize text. By David East.
Understanding Image Scaling
The default scanned-text.png image is 654×999 (width x height); however, the UIImageView has a “Content Mode” of “Aspect Fit,” which scales the image to 375×369 in the view. ML Kit receives the actual size of the image and returns the element frames based on that size. The frames from the actual size are then drawn on the scaled size, which produces a confusing result.
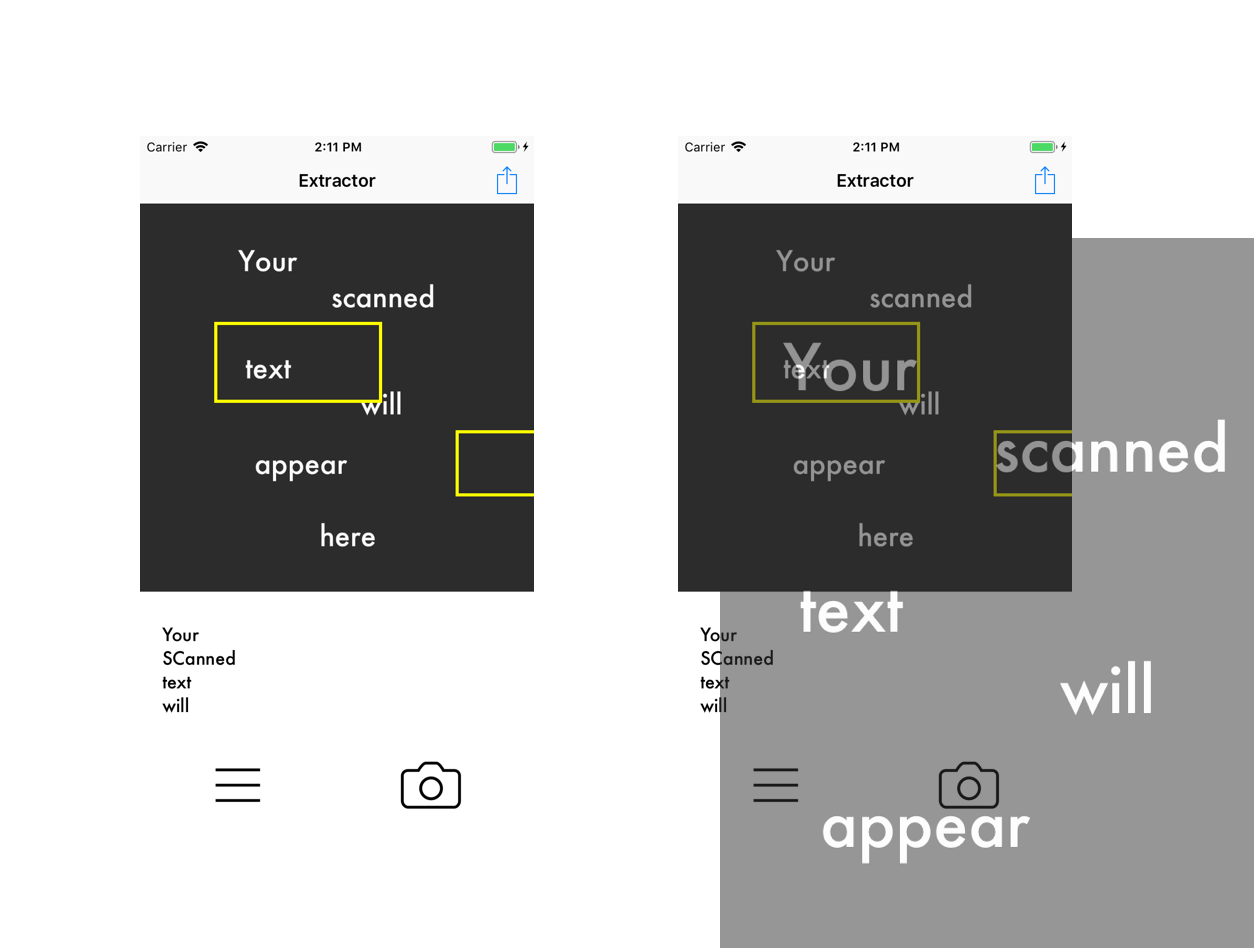
In the picture above, notice the differences between the scaled size and the actual size. You can see that the frames match up on the actual size. To get the frames in the right place, you need to calculate the scale of the image versus the view.
The formula is fairly simple (👀…fairly):
- Calculate the resolutions of the view and image.
- Determine the scale by comparing resolutions.
- Calculate height, width, and origin points x and y, by multiplying them by the scale.
- Use those data points to create a new CGRect.
If that sounds confusing, it’s OK! You’ll understand when you see the code.
Calculating the Scale
Open ScaledElementProcessor.swift and add the following method:
// 1
private func createScaledFrame(
  featureFrame: CGRect,
  imageSize: CGSize, viewFrame: CGRect)
  -> CGRect {
  let viewSize = viewFrame.size

  // 2
  let resolutionView = viewSize.width / viewSize.height
  let resolutionImage = imageSize.width / imageSize.height

  // 3
  var scale: CGFloat
  if resolutionView > resolutionImage {
    scale = viewSize.height / imageSize.height
  } else {
    scale = viewSize.width / imageSize.width
  }

  // 4
  let featureWidthScaled = featureFrame.size.width * scale
  let featureHeightScaled = featureFrame.size.height * scale

  // 5
  let imageWidthScaled = imageSize.width * scale
  let imageHeightScaled = imageSize.height * scale
  let imagePointXScaled = (viewSize.width - imageWidthScaled) / 2
  let imagePointYScaled = (viewSize.height - imageHeightScaled) / 2

  // 6
  let featurePointXScaled = imagePointXScaled + featureFrame.origin.x * scale
  let featurePointYScaled = imagePointYScaled + featureFrame.origin.y * scale

  // 7
  return CGRect(x: featurePointXScaled,
                y: featurePointYScaled,
                width: featureWidthScaled,
                height: featureHeightScaled)
  }
Here’s what’s going on in the code:
-
This method takes in
CGRects for the original size of the image, the displayed image size and the frame of theUIImageView. - The resolutions of the image and view are calculated by dividing their heights and widths respectively.
- The scale is determined by which resolution is larger. If the view is larger, you scale by the height; otherwise, you scale by the width.
- This method calculates width and height. The width and height of the frame are multiplied by the scale to calculate the scaled width and height.
- The origin of the frame must be scaled as well; otherwise, even if the size is correct, it would be way off center in the wrong position.
- The new origin is calculated by adding the x and y point scales to the unscaled origin multiplied by the scale.
-
A scaled
CGRectis returned, configured with calculated origin and size.
Now that you have a scaled CGRect, you can go from scribbles to sgraffito. Yes, that’s a thing. Look it up and thank me in your next Scrabble game.
Go to process(in:callback:) in ScaledElementProcessor.swift and modify the innermost for loop to use the following code:
for element in line.elements {
  let frame = self.createScaledFrame(
    featureFrame: element.frame,
    imageSize: image.size,
    viewFrame: imageView.frame)

  let shapeLayer = self.createShapeLayer(frame: frame)
  let scaledElement = ScaledElement(frame: frame, shapeLayer: shapeLayer)
  scaledElements.append(scaledElement)
}
The newly added line creates a scaled frame, which the code uses to create the correctly position shape layer.
Build and run. You should see the frames drawn in the right places. What a master painter you are!

Enough with default photos; time to capture something from the wild!
Taking Photos with the Camera
The project has the camera and library picker code already set up in an extension at the bottom of ViewController.swift. If you try to use it right now, you’ll notice that none of the frames match up. That’s because it’s still using the old frames from the preloaded image! You need to remove those and draw new ones when you take or select a photo.
Add the following method to ViewController:
private func removeFrames() {
  guard let sublayers = frameSublayer.sublayers else { return }
  for sublayer in sublayers {
    sublayer.removeFromSuperlayer()
  }
}
This method removes all sublayers from the frame sublayer using a for loop. This gives you a clean canvas for the next photo.
To consolidate the detection code, add the following new method to ViewController:
// 1
private func drawFeatures(
  in imageView: UIImageView,
  completion: (() -> Void)? = nil
  ) {
  // 2
  removeFrames()
  processor.process(in: imageView) { text, elements in
    elements.forEach() { element in
      self.frameSublayer.addSublayer(element.shapeLayer)
    }
    self.scannedText = text
    // 3
    completion?()
  }
}
Here’s what changed:
-
This methods takes in the
UIImageViewand a callback so that you know when it’s done. - Frames are automatically removed before processing a new image.
- Trigger the completion callback once everything is done.
Now, replace the call to processor.process(in:callback:) in viewDidLoad() with the following:
drawFeatures(in: imageView)
Scroll down to the class extension and locate imagePickerController(_:didFinishPickingMediaWithInfo:); add this line of code to the end of the if block, after imageView.image = pickedImage:
drawFeatures(in: imageView)
When you shoot or select a new photo, this code ensures that the old frames are removed and replaced by the ones from the new photo.
Build and run. If you’re on a real device (not a simulator), take a picture of printed text. You might see something strange:

What’s going on here?
You’ll cover image orientation in a second, because the above is an orientation issue.
Dealing With Image Orientations
This app is locked in portrait orientation. It’s tricky to redraw the frames when the device rotates, so it’s easier to restrict the user for now.
This restriction requires the user to take portrait photos. The UICameraPicker rotates portrait photos 90 degrees behind the scenes. You don’t see the rotation because the UIImageView rotates it back for you. However, what the detector gets is the rotated UIImage.

This leads to some confusing results. ML Kit allows you to specify the orientation of the photo in the VisionMetadata object. Setting the proper orientation will return the correct text, but the frames will be drawn for the rotated photo.

Therefore, you need to fix the photo orientation to always be in the “up” position. The project contains an extension named +UIImage.swift. This extension adds a method to UIImage that changes the orientation of any photo to the up position. Once the photo is in the correct orientation, everything will run smoothly!
Open ViewController.swift and, in imagePickerController(_:didFinishPickingMediaWithInfo:), replace imageView.image = pickedImage with the following:
// 1
let fixedImage = pickedImage.fixOrientation()
// 2
imageView.image = fixedImage
Here’s what changed:
-
The newly selected image,
pickedImage, is rotated back to the up position. -
Then, you assign the rotated image to the
imageView.
Build and run. Take that photo again. You should see everything in the right place.