ML Kit Tutorial for iOS: Recognizing Text in Images
In this ML Kit tutorial, you’ll learn how to leverage Google’s ML Kit to detect and recognize text. By David East.
Using the Text Detector
Open ViewController.swift and, after the outlets at the top of the class body, add an instance of ScaledElementProcessor as a property:
let processor = ScaledElementProcessor()
Then, add the following code at the bottom of viewDidLoad() to display the detected text in the UITextView:
processor.process(in: imageView) { text in
  self.scannedText = text
}
This small block calls process(in:), passing the main imageView and assigning the recognized text to the scannedText property in the callback.
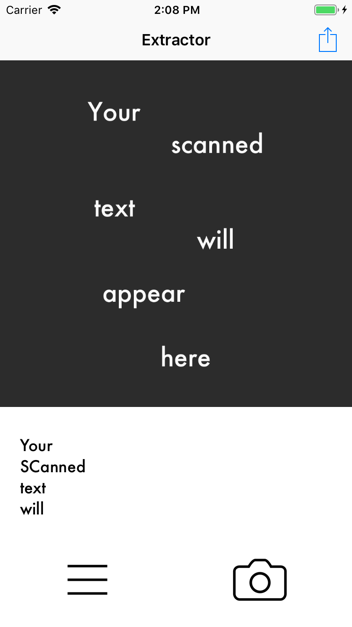
Run the app, and you should see the following text right below the image:
Your
SCanned
text
will
appear
here
You might need to scroll the text view to reveal the last couple of lines.
Notice how the “S” and “C” of scanned are uppercase. Sometimes, with specific fonts, the wrong casing can appear. This is the reason why the text is displayed in a UITextView, so the user can manually edit to fix detection mistakes.
Understanding the Classes
VisionText
Did you notice that the callback of textRecognizer.process(in:) in ScaledElementProcessor returned an object in the result parameter instead of plain old text? This is an instance of VisionText, a class that contains lots of useful information, such as the recognized text. But you want to do more than just get the text. Wouldn’t it be cool to outline each frame of each recognized text element?
ML Kit provides the result in a structure similar to a tree. You need to traverse to the leaf element in order to obtain the position and size of the frame containing the recognized text. If the reference to tree structures did not make a lot of sense to you, don’t worry too much. The sections below should clarify what’s going on.
However, if you are interested in learning more about tree data structures, you can always check out this tutorial on Swift Tree Data Structures.
VisionTextBlock
When working with recognized text, you start with a VisionText object — this is an object (call it the tree) that can contain multiple blocks of text (like branches in a tree). You iterate over each branch, which is a VisionTextBlock object in the blocks array, like this:
for block in result.blocks {

}
VisionTextElement
A VisionTextBlock is simply an object containing a collection of lines of text (like leaves on a branch) each represented by a VisionTextElement instance. This nesting doll of objects allows you to see the hierarchy of the identified text.

Looping through each object looks like this:
for block in result.blocks {
  for line in block.lines {
    for element in line.elements {

    }
  }
}
All objects in this hierarchy contain the frame in which the text is located. However, each object contains a different level of granularity. A block may contain multiple lines, a line may contain multiple elements, and an element may contain multiple symbols.
For this tutorial, you’ll use elements as the level of granularity. Elements will typically correspond to a word. This will allow you to draw over each word and show the user where each word is located in the image.
The last loop iterates over the elements in each line of the text block. These elements contain the frame, a simple CGRect. Using this frame, you can draw borders around the words on the image.
Highlighting the Text Frames
Detecting Frames
To draw on the image, you’ll need to create a CAShapeLayer with the frame of the text element. Open ScaledElementProcessor.swift and add the following struct to the top of the file:
struct ScaledElement {
  let frame: CGRect
  let shapeLayer: CALayer
}
This struct is a convenience. It makes it easier to group the frame and CAShapeLayer to the controller. Now, you need a helper method to create a CAShapeLayer from the element’s frame.
Add the following code to the end of ScaledElementProcessor:
private func createShapeLayer(frame: CGRect) -> CAShapeLayer {
  // 1
  let bpath = UIBezierPath(rect: frame)
  let shapeLayer = CAShapeLayer()
  shapeLayer.path = bpath.cgPath
  // 2
  shapeLayer.strokeColor = Constants.lineColor
  shapeLayer.fillColor = Constants.fillColor
  shapeLayer.lineWidth = Constants.lineWidth
  return shapeLayer
}

// MARK: - private

// 3
private enum Constants {
  static let lineWidth: CGFloat = 3.0
  static let lineColor = UIColor.yellow.cgColor
  static let fillColor = UIColor.clear.cgColor
}
Here’s what the code does:
-
A
CAShapeLayerdoes not have an initializer that takes in aCGRect. So, you construct aUIBezierPathwith theCGRectand set the shape layer’spathto theUIBezierPath. -
The visual properties for colors and widths are set via a
Constantsenum. - This enum helps keep the coloring and widths consistent.
Now, replace process(in:callback:) with the following:
// 1
func process(
  in imageView: UIImageView,
  callback: @escaping (_ text: String, _ scaledElements: [ScaledElement]) -> Void
  ) {
  guard let image = imageView.image else { return }
  let visionImage = VisionImage(image: image)

  textRecognizer.process(visionImage) { result, error in
    guard
      error == nil,
      let result = result,
      !result.text.isEmpty
      else {
        callback("", [])
        return
    }

    // 2
    var scaledElements: [ScaledElement] = []
    // 3
    for block in result.blocks {
      for line in block.lines {
        for element in line.elements {
          // 4
          let shapeLayer = self.createShapeLayer(frame: element.frame)
          let scaledElement =
            ScaledElement(frame: element.frame, shapeLayer: shapeLayer)

          // 5
          scaledElements.append(scaledElement)
        }
      }
    }

    callback(result.text, scaledElements)
  }
}
Here’s what changed:
-
The callback now takes an array of
ScaledElementinstances in addition to the recognized text. -
scaledElementsserves as a collection for frames and shape layers. -
Exactly as outlined above, the code uses a
forloop to get the frame of each element. -
The innermost
forloop creates the shape layer from the element’s frame, which is then used to construct a newScaledElementinstance. -
Add the newly created instance to
scaledElements.
Drawing
The code above was getting your pencils together. Now, it’s time to draw! Open ViewController.swift and, in viewDidLoad(), replace the call to process(in:) with the following:
processor.process(in: imageView) { text, elements in
  self.scannedText = text
  elements.forEach() { feature in
    self.frameSublayer.addSublayer(feature.shapeLayer)
  }
}
ViewController has a frameSublayer property that is attached to the imageView. Here, you add each element’s shape layer to the sublayer, so that iOS will automatically draw the shape on the image.
Build and run. See your work of art!

Oh. What is that? It looks like you’re more of a Picasso than a Monet. What’s going on, here? Well, it’s probably time to talk about scale.