Top 10 WWDC 2017 Videos
Wondering which WWDC 2017 videos are the best for developers to watch? Check out our recommended Top 10! By Tim Mitra.
7) Designing Sound – Session 803

Apple sound designer Hugo Verweji invites attendees to close their eyes as he takes the viewers on an aural journey through a forest, then into light rain and finally a thunder storm. Sound, he says, has a magical ability to create emotions. This session takes the audience through various soundscapes and demonstrates that sound is an integral part of our experiences with our apps and devices.
Sound can warn us; sound can convey a person’s calm or haste. App design doesn’t end with how the app looks. Using sound in apps helps shapes the experience the developer is trying to convey. Sounds attached to notifications can indicate “look at me!”, “time to wake up”, or “oops, your Apple Pay transaction failed”.
He demonstrates how sound can be used in the Toast Modern app, which is a timely demonstration as hipster toast sweeps through the Bay area. Hugo continues with a special set where he shows how some of the popular and familiar sounds in iOS were created. Sorry, I won’t give any spoilers here — you’ll have to watch it yourself! :]
Haptics combine with sound to provide a rich experience to what we see, hear and feel on our Apple Watches and iPhone 7s. The session also covers sound design to create different feelings for different tones.
This session is for more than just musicians and sound designers; it’s a must see even if you’ve never thought about sound in your app before. If you do nothing about sound, you’ll be stuck with the default sounds, and you’ll miss the opportunity to make your app stand our and to be in line with your branding.
Hugo also reminds us that silence is golden. Use sound sparingly, and offer to turn off sounds altogether. Whatever you do, ask yourself, “What do I want people to feel when they use my app?”
8) Vision Framework: Building on Core ML – Session 506
In this session Brett Keating describes what you can do with Vision framework. Face Detection with deep learning and optionally combined with Core ML promises some interesting enhancements. There’s better detection and higher recall, which enables you to recognize smaller faces, strong profiles and even obstructed faces.
Image registration will let you stitch together separate images by using common landmarks, and features like rectangle detection and object tracking are now more refined.
Combined with CoreML and computer vision, you won’t have to any heavy lifting to implement the Vision framework in your app. The framework will tell you where the faces are, and Apple will take care of the rest. In Apple’s words, Vision provides a “high-level device to solve computer vision problems in one simple API.”
He also discusses the benefits of on-device image processing versus cloud-based processing. By keeping processing on on the device, you can retain the privacy of your user’s data. The cost of cloud based services is also a factor, as the cost to use cloud based services may affect the developer and the user. The low latency of device-based processing is also an advantage.
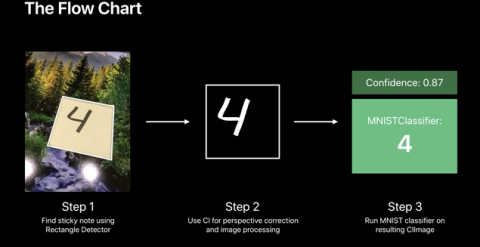
Frank Doepke then takes over the talk and delves into some practical demos of the Vision framework. He explains that it’s a matter of making requests, handling requests and viewing the results. You can use basic settings, and feed in a single image or a series of images. You can also use Core Image if that’s how you roll. Dropping in a Core ML model lets you further refine the tasks your app performs, such as object recognition. In the last demo, he makes use of MNISTVision, popular in the machine learning community. With this he’s able to categorize, straighten and recognize hand written characters.
This is a great session if you’re interested in computer vision. Throw in Core ML and Core Image and you can create the next great hotdog-detecting app.
9) Debugging with Xcode 9 – Session 404
“Debugging is what we developers do when we’re not writing bugs.” – Me, again.
I spend an awful lot of time setting breakpoints, looking a debug logs, playing in the View Debugger and Memory Graph debugger. Any session on debugging is my favorite session.
Wireless Development is the first topic covered in this session. The Lightning cable is no longer required — yay! Working untethered definitely aids in ARKit and tvOS development, managing other accessories plugged into the Lightning port or even when you’re just kicking back on the couch. Connecting is straightforward on basic networks, Apple TV and corporate networks. This new capability is demoed working wirelessly with the accelerometer.
Time Profiler now has an “All” button that lets you view all the active threads in your app. You can also pin one thread and compare as you scroll through the other threads.
Breakpoint debugging with conditions are now easier to work with, and code completion is now included in the Breakpoint editor. Additionally, breakpoints with options now have a white triangle indicator for easy recognition. A tooltip is also available to see what options are available.
In the View Debugger, view controllers are now included in the view tree as the parents of the views. They are also indicated in-canvas with a banner making it easy to find the view controllers. View Controllers can also be selected and reviewed in the inspector.
The View Debugger lets you inspect SpriteKit views so you can debug sprites and views. Apple has included the SceneKit Inspector to edit your scene and debug it in runtime debugging mode. The entire scene graph can be explored and additionally saved as a snapshot.
“We use our debugger to debug our debuggers.” – Chris Miles.
The Memory Graph Debugger is actually built in SpriteKit. In the demo, the presenter opens another Xcode and debug it in another copy of Xcode. Finally Sebastian Fischer demos the new enhancements in Xcode 9 debugging.
10) Updating Your App for iOS 11 – Session 204

You’ll definitely want to watch this session, unless you’re one of those mythical developers who has never wrestled with your app layout.
Up first — UIKit. The navigation bars and tab bars as children of UIBarItem can now apply the new landscape tab bar, which is slightly smaller with a title and icon side-by-side. Turning on Large Titles in the navigation bar is as easy as setting a property and adopting largeTitleDisplayMode. A new UISearchBarController now houses new style of search bar in the header, and can scroll away to hide under the header.
Navigation Bars and Tab Bars now support Auto Layout. These items provide their positions, and you provide the sizes. The former layout margins are now actually minimums, and TopLayoutGuide and bottomLayoutGuide are now deprecated by SafeAreaInsets. Layout margins now have Directional Layout Margins that apply to leading and trailing constraints. You can also decide to override the properties altogether and have full-screen content.
TableView headers and footers are now self-sizing in iOS 11. If you’re not ready for this, you can easily override this behavior by setting the estimated sizes to zero. In iOS 11, the TableView separator insets inside this region are now relative to the edge of the cells and the full width of the screen. UITableView and UITableViewHeaderFooterView now have content views that respect the safe area insets as well.
If you are eager to adopt the look and feel of iOS 11 in your apps, this should definitely be on your watchlist.