How To Make an App Like Runkeeper: Part 1
Runkeeper, a GPS app like the one you’re about to make, has over 40 million users! This tutorial will show you how to make an app like Runkeeper. By Richard Critz.
Send the Simulator On a Run
While you should always test your app on a real device before releasing it, you don't have to go for a run each time you want to test MoonRunner.
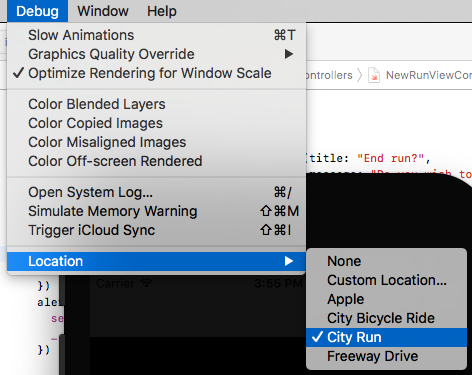
Build and run in the simulator. Before pressing the New Run button, select Debug\Location\City Run from the Simulator menu.
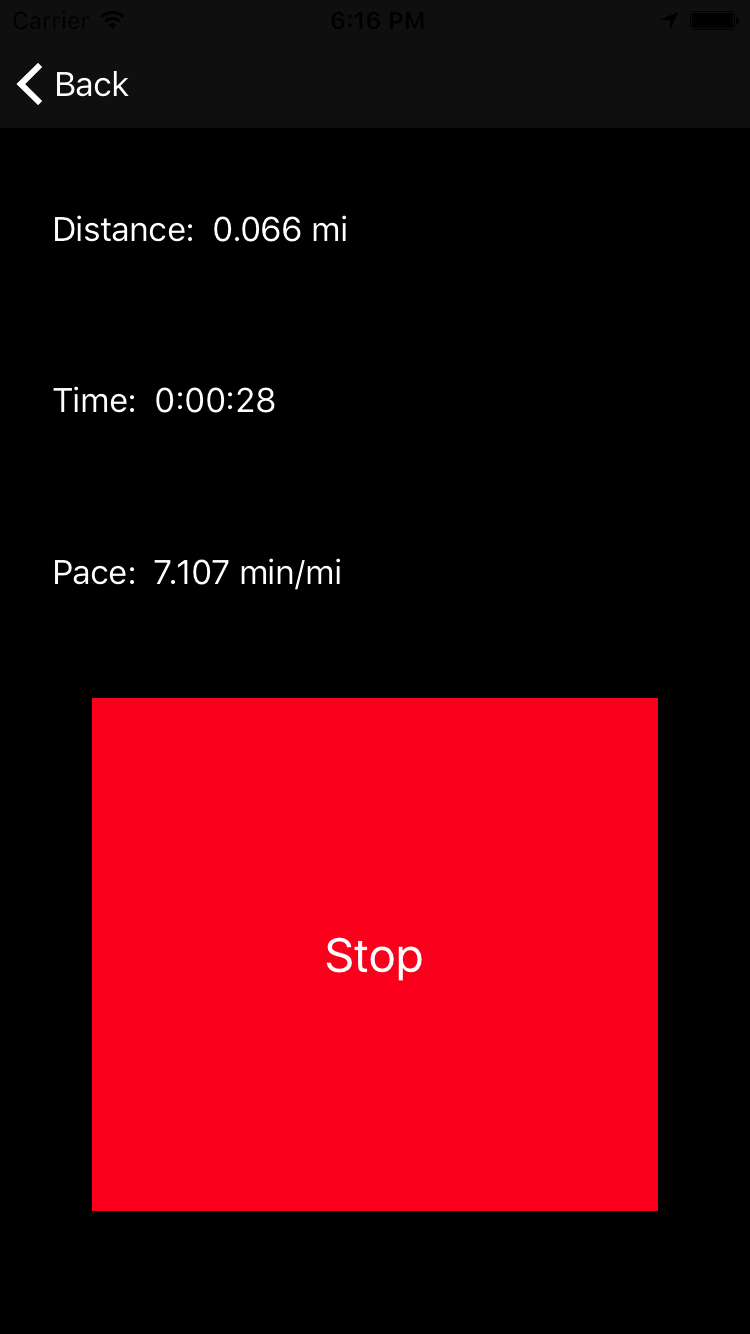
Now, press New Run, then press Start and verify that the simulator begins its workout.
Map It Out
After all of that hard work, it's time to show the user where they went and how well they did.
Open RunDetailsViewController.swift and replace configureView() with:
private func configureView() {
  let distance = Measurement(value: run.distance, unit: UnitLength.meters)
  let seconds = Int(run.duration)
  let formattedDistance = FormatDisplay.distance(distance)
  let formattedDate = FormatDisplay.date(run.timestamp)
  let formattedTime = FormatDisplay.time(seconds)
  let formattedPace = FormatDisplay.pace(distance: distance,
                                         seconds: seconds,
                                         outputUnit: UnitSpeed.minutesPerMile)

  distanceLabel.text = "Distance:  \(formattedDistance)"
  dateLabel.text = formattedDate
  timeLabel.text = "Time:  \(formattedTime)"
  paceLabel.text = "Pace:  \(formattedPace)"
}
This formats all of the details of the run and sets them to display.
Rendering the run on the map requires a bit more work. There are three steps to this:
- Set the region for the map so that only the area of the run is shown, not the entire world.
- Provide a delegate method that styles the map overlay properly.
- Create an
MKOverlaythat describes the line to be drawn.
Add the following method:
private func mapRegion() -> MKCoordinateRegion? {
  guard
    let locations = run.locations,
    locations.count > 0
  else {
    return nil
  }

  let latitudes = locations.map { location -> Double in
    let location = location as! Location
    return location.latitude
  }

  let longitudes = locations.map { location -> Double in
    let location = location as! Location
    return location.longitude
  }

  let maxLat = latitudes.max()!
  let minLat = latitudes.min()!
  let maxLong = longitudes.max()!
  let minLong = longitudes.min()!

  let center = CLLocationCoordinate2D(latitude: (minLat + maxLat) / 2,
                                      longitude: (minLong + maxLong) / 2)
  let span = MKCoordinateSpan(latitudeDelta: (maxLat - minLat) * 1.3,
                              longitudeDelta: (maxLong - minLong) * 1.3)
  return MKCoordinateRegion(center: center, span: span)
}
An MKCoordinateRegion represents the display region for the map. You define it by supplying a center point and a span that defines horizontal and vertical ranges. It's important to add a little padding so that map edges don't crowd the route.
At the end of the file, after the closing brace, add the following extension:
extension RunDetailsViewController: MKMapViewDelegate {
  func mapView(_ mapView: MKMapView, rendererFor overlay: MKOverlay) -> MKOverlayRenderer {
    guard let polyline = overlay as? MKPolyline else {
      return MKOverlayRenderer(overlay: overlay)
    }
    let renderer = MKPolylineRenderer(polyline: polyline)
    renderer.strokeColor = .black
    renderer.lineWidth = 3
    return renderer
  }
}
Each time MapKit wants to display an overlay, it asks its delegate for something to render that overlay. For now, if the overlay is an MKPolyine (a collection of line segments), you return MapKit's MKPolylineRenderer configured to draw in black. You'll make this more colorful shortly.
Finally, you need to create your overlay. Add the following method to RunDetailsViewController (not the extension):
private func polyLine() -> MKPolyline {
  guard let locations = run.locations else {
    return MKPolyline()
  }

  let coords: [CLLocationCoordinate2D] = locations.map { location in
    let location = location as! Location
    return CLLocationCoordinate2D(latitude: location.latitude, longitude: location.longitude)
  }
  return MKPolyline(coordinates: coords, count: coords.count)
}
Here, you turn each recorded location from the run into a CLLocationCoordinate2D as required by MKPolyline.
Now it's time to glue all these bits together. Add the following method:
private func loadMap() {
  guard
    let locations = run.locations,
    locations.count > 0,
    let region = mapRegion()
  else {
      let alert = UIAlertController(title: "Error",
                                    message: "Sorry, this run has no locations saved",
                                    preferredStyle: .alert)
      alert.addAction(UIAlertAction(title: "OK", style: .cancel))
      present(alert, animated: true)
      return
  }

  mapView.setRegion(region, animated: true)
  mapView.add(polyLine())
}
Here, you make sure there is something to draw. Then you set the map region and add the overlay.
Now, add the following at the end of configureView().
loadMap()
Build and run. When you save your completed run, you should now see a map of the run!
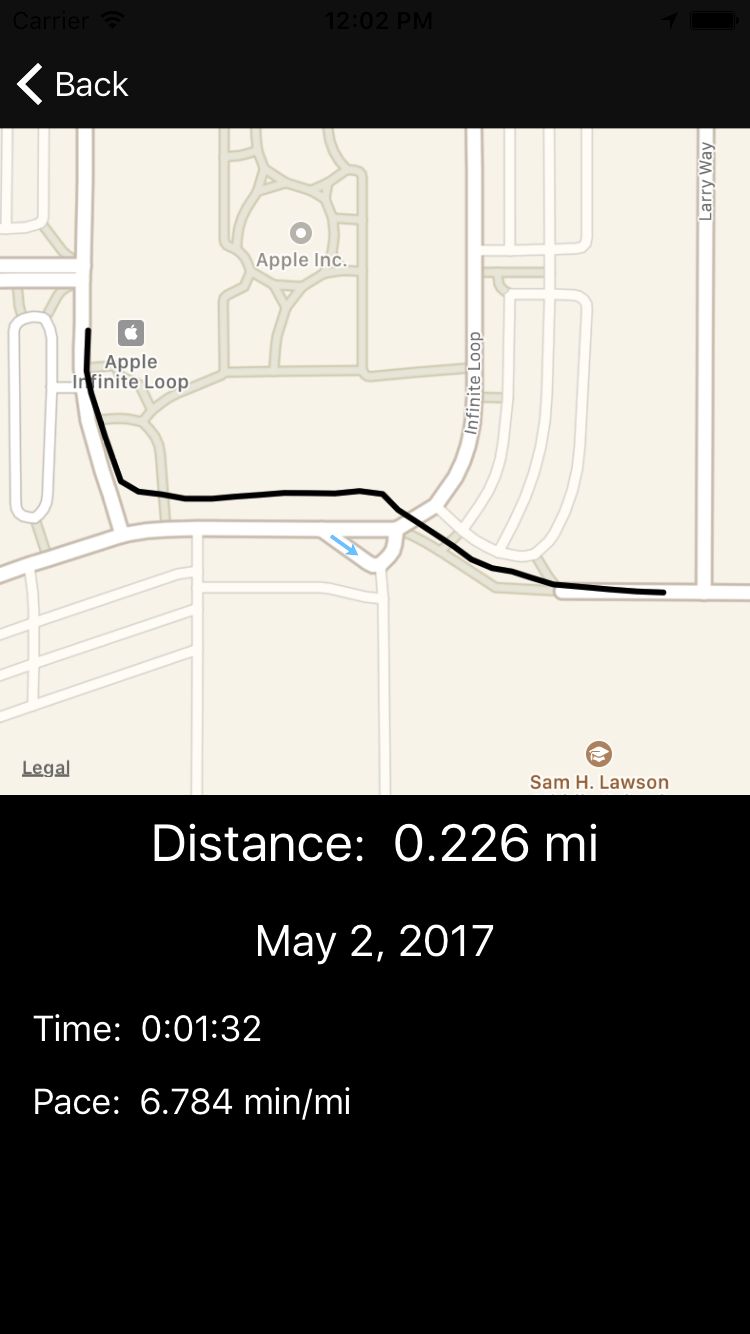
On the simulator, this is normal. The messages come from MapKit and do not indicate an error on your part.
ERROR /BuildRoot/Library/Caches/com.apple.xbs/Sources/VectorKit_Sim/VectorKit-1230.34.9.30.27/GeoGL/GeoGL/GLCoreContext.cpp 1763: InfoLog SolidRibbonShader:
ERROR /BuildRoot/Library/Caches/com.apple.xbs/Sources/VectorKit_Sim/VectorKit-1230.34.9.30.27/GeoGL/GeoGL/GLCoreContext.cpp 1764: WARNING: Output of vertex shader 'v_gradient' not read by fragment shader
/BuildRoot/Library/Caches/com.apple.xbs/Sources/VectorKit_Sim/VectorKit-1295.30.5.4.13/src/MDFlyoverAvailability.mm:66: Missing latitude in trigger specification
Introducing Color
The app is pretty awesome already, but the map could be much better if you used color to highlight differences in pace.
Add a new Cocoa Touch Class file, and name it MulticolorPolyline. Make it a subclass of MKPolyline.
Open MulticolorPolyline.swift and import MapKit:
import MapKit
Add a color property to the class:
var color = UIColor.black
Wow, that was easy! :] Now, for the more difficult stuff, open RunDetailsViewController.swift and add the following method:
private func segmentColor(speed: Double, midSpeed: Double, slowestSpeed: Double, fastestSpeed: Double) -> UIColor {
  enum BaseColors {
    static let r_red: CGFloat = 1
    static let r_green: CGFloat = 20 / 255
    static let r_blue: CGFloat = 44 / 255

    static let y_red: CGFloat = 1
    static let y_green: CGFloat = 215 / 255
    static let y_blue: CGFloat = 0

    static let g_red: CGFloat = 0
    static let g_green: CGFloat = 146 / 255
    static let g_blue: CGFloat = 78 / 255
  }

  let red, green, blue: CGFloat

  if speed < midSpeed {
    let ratio = CGFloat((speed - slowestSpeed) / (midSpeed - slowestSpeed))
    red = BaseColors.r_red + ratio * (BaseColors.y_red - BaseColors.r_red)
    green = BaseColors.r_green + ratio * (BaseColors.y_green - BaseColors.r_green)
    blue = BaseColors.r_blue + ratio * (BaseColors.y_blue - BaseColors.r_blue)
  } else {
    let ratio = CGFloat((speed - midSpeed) / (fastestSpeed - midSpeed))
    red = BaseColors.y_red + ratio * (BaseColors.g_red - BaseColors.y_red)
    green = BaseColors.y_green + ratio * (BaseColors.g_green - BaseColors.y_green)
    blue = BaseColors.y_blue + ratio * (BaseColors.g_blue - BaseColors.y_blue)
  }

  return UIColor(red: red, green: green, blue: blue, alpha: 1)
}
Here, you define the recipes for your base red, yellow and green colors. Then you create a blended color based on where the specified speed falls in the range from slowest to fastest.

Replace your polyLine() implementation with the following:
private func polyLine() -> [MulticolorPolyline] {

  // 1
  let locations = run.locations?.array as! [Location]
  var coordinates: [(CLLocation, CLLocation)] = []
  var speeds: [Double] = []
  var minSpeed = Double.greatestFiniteMagnitude
  var maxSpeed = 0.0

  // 2
  for (first, second) in zip(locations, locations.dropFirst()) {
    let start = CLLocation(latitude: first.latitude, longitude: first.longitude)
    let end = CLLocation(latitude: second.latitude, longitude: second.longitude)
    coordinates.append((start, end))

    //3
    let distance = end.distance(from: start)
    let time = second.timestamp!.timeIntervalSince(first.timestamp! as Date)
    let speed = time > 0 ? distance / time : 0
    speeds.append(speed)
    minSpeed = min(minSpeed, speed)
    maxSpeed = max(maxSpeed, speed)
  }

  //4
  let midSpeed = speeds.reduce(0, +) / Double(speeds.count)

  //5
  var segments: [MulticolorPolyline] = []
  for ((start, end), speed) in zip(coordinates, speeds) {
    let coords = [start.coordinate, end.coordinate]
    let segment = MulticolorPolyline(coordinates: coords, count: 2)
    segment.color = segmentColor(speed: speed,
                                 midSpeed: midSpeed,
                                 slowestSpeed: minSpeed,
                                 fastestSpeed: maxSpeed)
    segments.append(segment)
  }
  return segments
}
Here's what the new version does:
- A polyline is made up of line segments, each marked by its endpoints. Prepare to collect coordinate pairs to describe each segment and the speed for each segment.
- Convert each endpoint into a
CLLocationobject and save them in pairs. - Calculate the speed for the segment. Note that Core Location occasionally returns more than one update with the same timestamp so guard against division by 0. Save the speed and update the minimum and maximum speeds.
- Calculate the average speed for the run.
- Use the previously prepared coordinate pairs to create a new
MulticolorPolyline. Set its color.
You will now see an error on the line mapView.add(polyLine()) in loadMap(). Replace that line with:
mapView.addOverlays(polyLine())
Now replace mapView(_:rendererFor:) in the MKMapViewDelegate extension with:
func mapView(_ mapView: MKMapView, rendererFor overlay: MKOverlay) -> MKOverlayRenderer {
  guard let polyline = overlay as? MulticolorPolyline else {
    return MKOverlayRenderer(overlay: overlay)
  }
  let renderer = MKPolylineRenderer(polyline: polyline)
  renderer.strokeColor = polyline.color
  renderer.lineWidth = 3
  return renderer
}
This is very similar to the previous version. It now expects each overlay to be a MulticolorPolyline and uses the embedded color to render the segment.
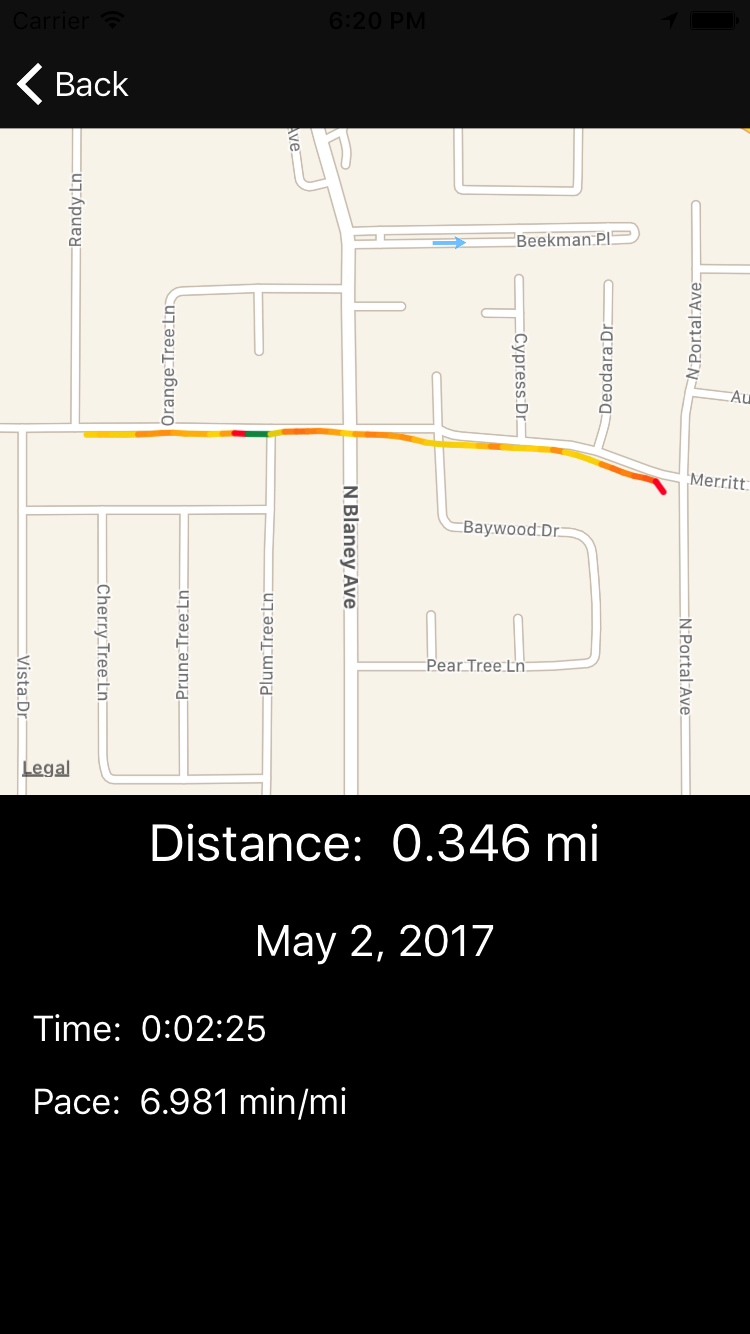
Build and run! Let the simulator take a quick jog and then check out the fancy colored map at the end!