How To Make an App Like Runkeeper: Part 1
Runkeeper, a GPS app like the one you’re about to make, has over 40 million users! This tutorial will show you how to make an app like Runkeeper. By Richard Critz.
Starting a Run
It’s almost time to start running. But first, the app needs to know where it is. For this, you will use Core Location. It is important that there be only one instance of CLLocationManager in your app and that it not be inadvertently deleted.
To accomplish this, add another Swift file to your project named LocationManager.swift. Replace the contents of the file with:
import CoreLocation

class LocationManager {
  static let shared = CLLocationManager()

  private init() { }
}
You need to make a couple of project level changes before you can begin tracking the user’s location.
First, click on the project at the top of the Project Navigator.

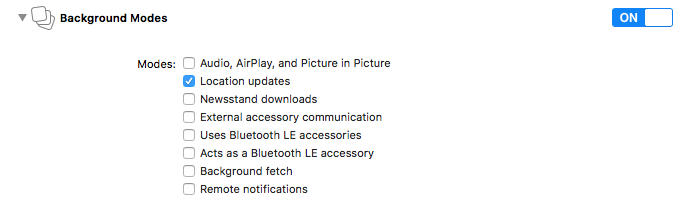
Select the Capabilities tab and switch Background Modes to ON. Check Location updates.
Next, open Info.plist. Click the + next to Information Property List. From the resulting drop-down list, select Privacy – Location When In Use Usage Description and set its value to MoonRunner needs access to your location in order to record and track your run!

Before your app can use location information, it must get permission from the user. Open AppDelegate.swift and add the following to application(_:didFinishLaunchingWithOptions:) just before return true:
let locationManager = LocationManager.shared
locationManager.requestWhenInUseAuthorization()
Open NewRunViewController.swift and import CoreLocation:
import CoreLocation
Next, add the following after the run property:
private let locationManager = LocationManager.shared
private var seconds = 0
private var timer: Timer?
private var distance = Measurement(value: 0, unit: UnitLength.meters)
private var locationList: [CLLocation] = []
Taking it line-by-line:
-
locationManageris the object you’ll use to start and stop location services. -
secondstracks the duration of the run, in seconds. -
timerwill fire each second and update the UI accordingly. -
distanceholds the cumulative distance of the run. -
locationListis an array to hold all theCLLocationobjects collected during the run.
Add the following after viewDidLoad():
override func viewWillDisappear(_ animated: Bool) {
  super.viewWillDisappear(animated)
  timer?.invalidate()
  locationManager.stopUpdatingLocation()
}
This ensures that location updates, a big battery consumer, as well as the timer are stopped when the user navigates away from the view.
Add the following two methods:
func eachSecond() {
  seconds += 1
  updateDisplay()
}

private func updateDisplay() {
  let formattedDistance = FormatDisplay.distance(distance)
  let formattedTime = FormatDisplay.time(seconds)
  let formattedPace = FormatDisplay.pace(distance: distance,
                                         seconds: seconds,
                                         outputUnit: UnitSpeed.minutesPerMile)

  distanceLabel.text = "Distance:  \(formattedDistance)"
  timeLabel.text = "Time:  \(formattedTime)"
  paceLabel.text = "Pace:  \(formattedPace)"
}
eachSecond() will be called once per second by a Timer that you will set up shortly.
updateDisplay() uses the fancy formatting capabilities you built in FormatDisplay.swift to update the UI with the details of the current run.
Core Location reports location updates via its CLLocationManagerDelegate. Add this now in an extension at the end of the file:
extension NewRunViewController: CLLocationManagerDelegate {

  func locationManager(_ manager: CLLocationManager, didUpdateLocations locations: [CLLocation]) {
    for newLocation in locations {
      let howRecent = newLocation.timestamp.timeIntervalSinceNow
      guard newLocation.horizontalAccuracy < 20 && abs(howRecent) < 10 else { continue }

      if let lastLocation = locationList.last {
        let delta = newLocation.distance(from: lastLocation)
        distance = distance + Measurement(value: delta, unit: UnitLength.meters)
      }

      locationList.append(newLocation)
    }
  }
}
This delegate method will be called each time Core Location updates the user's location, providing an array of CLLocation objects. Usually this array contains only one object but, if there are more, they are ordered by time with the most recent location last.
A CLLocation contains some great information, including the latitude, longitude, and timestamp of the reading.
Before blindly accepting the reading, it’s worth checking the accuracy of the data. If the device isn’t confident it has a reading within 20 meters of the user’s actual location, it’s best to keep it out of your dataset. It's also important to ensure that the data is recent.
If the CLLocation passes the checks, the distance between it and the most recent saved point is added to the cumulative distance of the run. distance(from:) is very convenient here, taking into account some surprisingly difficult math involving the Earth’s curvature, and returning a distance in meters.
Lastly, the location object itself is added to a growing array of locations.
Now add the following method back in NewRunViewController (not the extension):
private func startLocationUpdates() {
  locationManager.delegate = self
  locationManager.activityType = .fitness
  locationManager.distanceFilter = 10
  locationManager.startUpdatingLocation()
}
You make this class the delegate for Core Location so that you can receive and process location updates.
The activityType parameter is made specifically for an app like this. It helps the device to intelligently save power throughout the user’s run, such as when they stop to cross a road.
Lastly, you set a distanceFilter of 10 meters. As opposed to the activityType, this parameter doesn’t affect battery life. The activityType is for readings and the distanceFilter is for the reporting of readings.
As you’ll see after doing a test run later, the location readings can deviate a little from a straight line. A higher distanceFilter could reduce the zigging and zagging and, thus, give you a more accurate line. Unfortunately, a filter that's too high will pixelate your readings. That’s why 10 meters is a good balance.
Finally, you tell Core Location to start getting location updates!
To actually begin the run, add these lines to the end of startRun():
seconds = 0
distance = Measurement(value: 0, unit: UnitLength.meters)
locationList.removeAll()
updateDisplay()
timer = Timer.scheduledTimer(withTimeInterval: 1.0, repeats: true) { _ in
  self.eachSecond()
}
startLocationUpdates()
This resets all of the values to be updated during the run to their initial state, starts the Timer that will fire each second, and begins collecting location updates.
Saving the Run
At some point, your user will get tired and stop running. You have the UI in place to do that, but you also need to save the run's data or your user will be very unhappy to see all of that effort go to waste.
Add the following method to NewRunViewController in NewRunViewController.swift:
private func saveRun() {
  let newRun = Run(context: CoreDataStack.context)
  newRun.distance = distance.value
  newRun.duration = Int16(seconds)
  newRun.timestamp = Date()

  for location in locationList {
    let locationObject = Location(context: CoreDataStack.context)
    locationObject.timestamp = location.timestamp
    locationObject.latitude = location.coordinate.latitude
    locationObject.longitude = location.coordinate.longitude
    newRun.addToLocations(locationObject)
  }

  CoreDataStack.saveContext()

  run = newRun
}
If you've used Core Data prior to Swift 3, you will notice the power and simplicity of iOS 10's Core Data support. You create a new Run object and initialize its values as with any other Swift object. You then create a Location object for each CLLocation you recorded, saving only the relevant data. Finally, you add each of these new Locations to the Run using the automatically generated addToLocations(_:).
When the user ends the run, you want to stop tracking location. Add the following to the end of stopRun():
locationManager.stopUpdatingLocation()
Finally, in stopTapped() locate the UIAlertAction titled "Save" and add a call to self.saveRun() so that it looks like this:
alertController.addAction(UIAlertAction(title: "Save", style: .default) { _ in
  self.stopRun()
  self.saveRun() // ADD THIS LINE!
  self.performSegue(withIdentifier: .details, sender: nil)
})