How to Make a Game Like Candy Crush With SpriteKit and Swift: Part 1
In the first part of this tutorial on how to make a Candy Crush-like mobile game using Swift and SpriteKit, you’ll learn how to start building your game including creating your storyboard, adding your cookies, and more. By Kevin Colligan.
Update note: This SpriteKit tutorial has been updated for Xcode 9.3 and Swift 4.1 by Kevin Colligan. The original tutorial was written by Matthijs Hollemans and subsequently updated by Morten Faarkrog.
In this three-part “How to” tutorial with SpriteKit and Swift series, you’ll learn how to make a game like Candy Crush Saga named Cookie Crunch Adventure. Yum, that sounds even better than candy!
- (You’re here) In the first part, you’ll put some of the foundation in place. You’ll set up the gameplay view, the sprites, and the logic for loading levels.
- In the second part you’ll focus on detecting swipes, swapping cookies, and finding and removing cookie chains.
- In the third part, you’ll work on refilling the level with new yummy cookies after successful swipes. You’ll complete the gameplay by adding support for scoring points, winning and losing, shuffling the cookies, and more.
In the process of going through this tutorial, you’ll get some excellent practice with Swift techniques such as enums, generics, subscripting, closures, and extensions. You’ll also learn a lot about game architecture and best practices.
There’s a lot to cover, so dive right in!
Note: This Swift tutorial assumes you have working knowledge of SpriteKit and Swift. If you’re new to SpriteKit, check out the SpriteKit for beginners tutorial or our book, 2D iOS & tvOS Games by Tutorials. For an introduction to Swift, see our Swift tutorials.
Getting Started
Cookie Crunch will use an architecture that is very much like the model-view-controller, or MVC, pattern that you may know from non-game apps:
- The data model will consist of
Level,Cookieand a few other classes. The models will contain the data, such as the 2D grid of cookie objects, and handle most of the gameplay logic. - The views will be
GameSceneand theSKSpriteNodes on the one hand, andUIViews on the other. The views will be responsible for showing things on the screen and for handling touches on those things. The scene in particular will draw the cookie sprites and detect swipes. - The view controller will play the same role here as in a typical MVC app: it will sit between the models and the views and coordinate the whole shebang.
All of these objects will communicate with each other, mostly by passing arrays and sets of objects to be modified. This separation will give each object only one job that it can do, totally independent of the others, which will keep the code clean and easy to manage.
Use the Download Materials button at the top or bottom of this tutorial to download the starter project. Open it and run it in the simulator, and you’ll see you’ve got the foundations in place for your game:
- A tasty background image
- Labels for your Target, Moves and Score
- A Shuffle button
Who ate all the cookies?
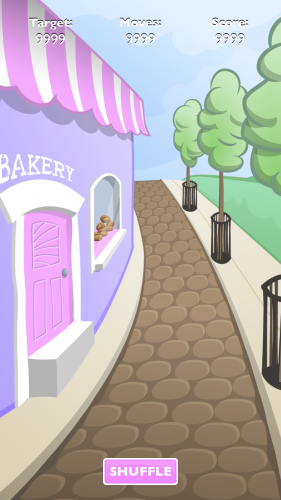
The cookies are missing, of course. You’ll add those soon. But first, it’s time to tour the starter project.
GameScene.swift
The GameScene includes sound properties, which allow your app to load all sounds once and reuse them as needed:
let swapSound = SKAction.playSoundFileNamed("Chomp.wav", waitForCompletion: false)
let invalidSwapSound = SKAction.playSoundFileNamed("Error.wav", waitForCompletion: false)
let matchSound = SKAction.playSoundFileNamed("Ka-Ching.wav", waitForCompletion: false)
let fallingCookieSound = SKAction.playSoundFileNamed("Scrape.wav", waitForCompletion: false)
let addCookieSound = SKAction.playSoundFileNamed("Drip.wav", waitForCompletion: false)
It also loads the background image from the asset catalog. Since the scene’s anchorPoint is (0.5, 0.5), the background image will always be centered on all iPhone screen sizes:
override init(size: CGSize) {
  super.init(size: size)

  anchorPoint = CGPoint(x: 0.5, y: 0.5)

  let background = SKSpriteNode(imageNamed: "Background")
  background.size = size
  addChild(background)
}
GameViewController
There are two important GameViewController properties to note. The scene variable provides a reference to the GameScene.
The lazy backgroundMusic declares a variable and initializes it in the same statement, a common iOS pattern:
lazy var backgroundMusic: AVAudioPlayer? = {
    guard let url = Bundle.main.url(forResource: "Mining by Moonlight", withExtension: "mp3") else {
      return nil
    }
    do {
      let player = try AVAudioPlayer(contentsOf: url)
      player.numberOfLoops = -1
      return player
    } catch {
      return nil
    }
}()
The initialization code sits in a closure. It loads the background music MP3 and sets it to loop forever. Because the variable is marked lazy, the code from the closure won’t run until backgroundMusic is first accessed.
The GameScene is set up in viewDidLoad(). You’ll come back to that later.
The IBOutlets and IBActions correspond to objects in the Main.storyboard. You’ll connect them in the later part of the tutorial.
Main Storyboard
Remember those labels and the Shuffle button you saw in the simulator? Those were created in the Main.storyboard. They don’t work now, but you’ll fix that before we’re done.
UIKit and SpriteKit get along quite nicely

The Target, Moves and Score labels appear in nested stack views at the top of the screen. If you need a refresher, check out our Stack Views tutorial.
Assets
The starter project contains a bunch of audio and image files to make your game sound and look tasty. Audio files are in a folder named Sounds.
![]()
Images are either in the global assets catalog (Assets.xcassets), or in a texture atlas. In Xcode, a texture atlas looks like any other folder, with a name that ends in .atlas. The special name tells Xcode to pack the images into a texture atlas when it builds the game, dramatically improving performance. To learn more about texture atlases, check out our SpriteKit Animations and Texture Atlases tutorial.
Take a look inside Sprites.atlas to find the matching-images for your game: croissants, cupcakes, donuts (yum!). Grid.atlas contains grid images (less yum).
Other items of note:
-
LevelData.swift uses Swift 4’s new
DecodableAPI to make parsing the JSON files a snap. You’ll use it to create levels. See this JSON Parsing screencast for more. - Array2D.swift is a helper file which makes it easier to create two-dimensional arrays.
- Tile.swift is empty now. But contains some hints for adding jelly.
That does it for the starter project tour!
Add Your Cookies
Enough with the pre-heating, let’s start baking! Your next steps are to:
- Create the
Cookieclass. - Create the
Levelclass. - Load levels from JSON files.
- Serve up your cookies atop background tiles — mom taught you to always use a plate, after all!