AR Face Tracking Tutorial for iOS: Getting Started
In this tutorial, you’ll learn how to use AR Face Tracking to track your face using a TrueDepth camera, overlay emoji on your tracked face, and manipulate the emoji based on facial expressions you make. By Yono Mittlefehldt.
Adding a Mesh Mask
On the surface, it looks like you’ve only turned on the front-facing camera. However, what you don’t see is that your iPhone is already tracking your face. Creepy, little iPhone.
Wouldn’t it be nice to see what the iPhone is tracking? What a coincidence, because that’s exactly what you’re going to do next!
Add the following code after the closing brace for the EmojiBlingViewController class definition:
// 1
extension EmojiBlingViewController: ARSCNViewDelegate {
  // 2
  func renderer(_ renderer: SCNSceneRenderer, nodeFor anchor: ARAnchor) -> SCNNode? {

    // 3
    guard let device = sceneView.device else {
      return nil
    }

    // 4
    let faceGeometry = ARSCNFaceGeometry(device: device)

    // 5
    let node = SCNNode(geometry: faceGeometry)

    // 6
    node.geometry?.firstMaterial?.fillMode = .lines

    // 7
    return node
  }
}
In this code you:
- Declare that
EmojiBlingViewControllerimplements theARSCNViewDelegateprotocol. - Define the
renderer(_:nodeFor:)method from the protocol. - Ensure the Metal device used for rendering is not nil.
- Create a face geometry to be rendered by the Metal device.
- Create a SceneKit node based on the face geometry.
- Set the fill mode for the node’s material to be just lines.
- Return the node.
ARSCNFaceGeometry is only available in SceneKit views rendered using Metal, which is why you needed to pass in the Metal device during its initialization. Also, this code will only compile if you’re targetting real hardware; it will not compile if you target a simulator.
Before you can run this, you need to set this class to be the ARSCNView‘s delegate.
At the end of the viewDidLoad() function, add:
sceneView.delegate = self
OK, time for everyone’s favorite step. Build and run that app!
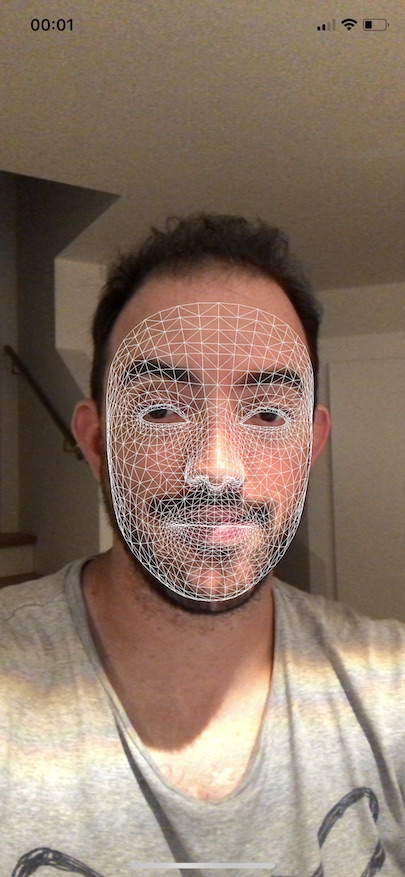
Updating the Mesh Mask
Did you notice how the mesh mask is a bit… static? Sure, when you move your head around, it tracks your facial position and moves along with it, but what happens when you blink or open your mouth? Nothing.
How disappointing.
Luckily, this is easy to fix. You just need to add another ARSCNViewDelegate method!
At the end of your ARSCNViewDelegate extension, add the following method:
// 1
func renderer(
  _ renderer: SCNSceneRenderer,
  didUpdate node: SCNNode,
  for anchor: ARAnchor) {

  // 2
  guard let faceAnchor = anchor as? ARFaceAnchor,
    let faceGeometry = node.geometry as? ARSCNFaceGeometry else {
      return
  }

  // 3
  faceGeometry.update(from: faceAnchor.geometry)
}
Here, you:
- Define the
didUpdateversion of therenderer(_:didUpdate:for:)protocol method. - Ensure the anchor being updated is an
ARFaceAnchorand that the node’s geometry is anARSCNFaceGeometry. - Update the
ARSCNFaceGeometryusing theARFaceAnchor’sARFaceGeometry
Now, when you build and run, you should see the mesh mask form and change to match your facial expressions.

Emoji Bling
If you haven’t already done so, go ahead and download the material for this tutorial via the button at the top or bottom of the tutorial.
Inside, you’ll find a folder called SuperUsefulCode with some Swift files. Drag them to your project just below EmojiBlingViewController.swift. Select Copy items if needed, Create groups, and make sure that the Emoji Bling target is selected

StringExtension.swift includes an extension to String that can convert a String to a UIImage.
EmojiNode.swift contains a subclass of SCNNode called EmojiNode, which can render a String. It takes an array of Strings and can cycle through them as desired.
Feel free to explore the two files, but a deep dive into how this code works is beyond the scope of this tutorial.
With that out of the way, it’s time to augment your nose. Not that there’s anything wrong with it. You’re already such a beautiful person. :]
At the top of your EmojiBlingViewController class, define the following constants:
let noseOptions = ["👃", "🐽", "💧", " "]
The blank space at the end of the array is so that you have the option to clear out the nose job. Feel free to choose other nose options, if you want.
Next, add the following helper function to your EmojiBlingViewController class:
func updateFeatures(for node: SCNNode, using anchor: ARFaceAnchor) {
  // 1
  let child = node.childNode(withName: "nose", recursively: false) as? EmojiNode

  // 2
  let vertices = [anchor.geometry.vertices[9]]

  // 3
  child?.updatePosition(for: vertices)
}
Here, you:
- Search
nodefor a child whose name is “nose” and is of typeEmojiNode - Get the vertex at index 9 from the
ARFaceGeometryproperty of theARFaceAnchorand put it into an array. - Use a member method of
EmojiNodeto update it’s position based on the vertex. ThisupdatePosition(for:)method takes an array of vertices and sets the node’s position to their center.
ARFaceGeometry has 1220 vertices in it and index 9 is on the nose. This works, for now, but you’ll briefly read later the dangers of using these index constants and what you can do about it.
It might seem silly to have a helper function to update a single node, but you will beef up this function later and rely heavily on it.
Now you just need to add an EmojiNode to your face node. Add the following code just before the return statement in your renderer(_:nodeFor:) method:
// 1
node.geometry?.firstMaterial?.transparency = 0.0

// 2
let noseNode = EmojiNode(with: noseOptions)

// 3
noseNode.name = "nose"

// 4
node.addChildNode(noseNode)

// 5
updateFeatures(for: node, using: faceAnchor)
In this code, you:
- Hide the mesh mask by making it transparent.
- Create an
EmojiNodeusing your defined nose options. - Name the nose node, so it can be found later.
- Add the nose node to the face node.
- Call your helper function that repositions facial features.
You’ll notice a compiler error because faceAnchor is not defined. To fix this, change the guard statement at the top of the same method to the following:
guard let faceAnchor = anchor as? ARFaceAnchor,
  let device = sceneView.device else {
  return nil
}
There is one more thing you should do before running your app. In renderer(_:didUpdate:for:), add a call to updateFeatures(for:using:) just before the closing brace:
updateFeatures(for: node, using: faceAnchor)
This will ensure that, when you scrunch your face up or wiggle your nose, the emoji’s position will update along with your motions.
Now it’s time to build and run!
