Android Things Tutorial: Getting Started
Did you ever want to tinker with all those little pins on hardware boards? Well in this tutorial, you’ll learn how to do just that, with AndroidThings! By Dean Djermanović.
Connect to the Internet
If you are using a Raspberry Pi you will need an HDMI monitor, HDMI cable and a mouse. If you are using a Pico Pi as part the Android Things kit make sure you follow the instructions that came with it to attach the included screen.
-
- If you are using a Raspberry Pi insert your SD card into it and connect your external monitor to the board via the HDMI cable. Now, connect your mouse to a USB port and make sure the board is connected to the power supply
- If you are using a Pico Pi, power it up via a USB-C cable.
- You’ll see this screen. Click Continue using your mouse on a Raspberry Pi or touch screen if using the Pico Pi Android Things Kit

-
- You’ll see this screen:
- You’ll see this screen:

-
- Download Android Things Toolkit from Google Play Store to your mobile phone. This is a companion app for mobile devices that can help you get started quickly. Open the app after you install it.
- Download Android Things Toolkit from Google Play Store to your mobile phone. This is a companion app for mobile devices that can help you get started quickly. Open the app after you install it.

-
- Set up your account and accept Terms of Use. After you do that, you’ll see this screen:
- Set up your account and accept Terms of Use. After you do that, you’ll see this screen:

-
- Tap on Pair your device.
- Tap on Pair your device.

-
- Tap YES.
- Tap YES.

-
- Tap NEXT.
- Tap NEXT.

-
- Tap SEARCH.
- Tap SEARCH.

-
- Enter the device code that you see on your monitor. Tap PAIR after that.
- Select your Wi-Fi network from the list. Your computer and the board need to be on the same network.
- Enter the Wi-Fi password and press CONNECT. Once you connect it, you’ll see this screen:
- Enter the device code that you see on your monitor. Tap PAIR after that.
- Select your Wi-Fi network from the list. Your computer and the board need to be on the same network.
- Enter the Wi-Fi password and press CONNECT. Once you connect it, you’ll see this screen:

-
- You can test the Rainbow HAT peripheral here, but for some users these tests don’t always run from the app. For now, tap FINISH.
- You can test the Rainbow HAT peripheral here, but for some users these tests don’t always run from the app. For now, tap FINISH.

-
- A dialog window will pop up. Tap NOT NOW.
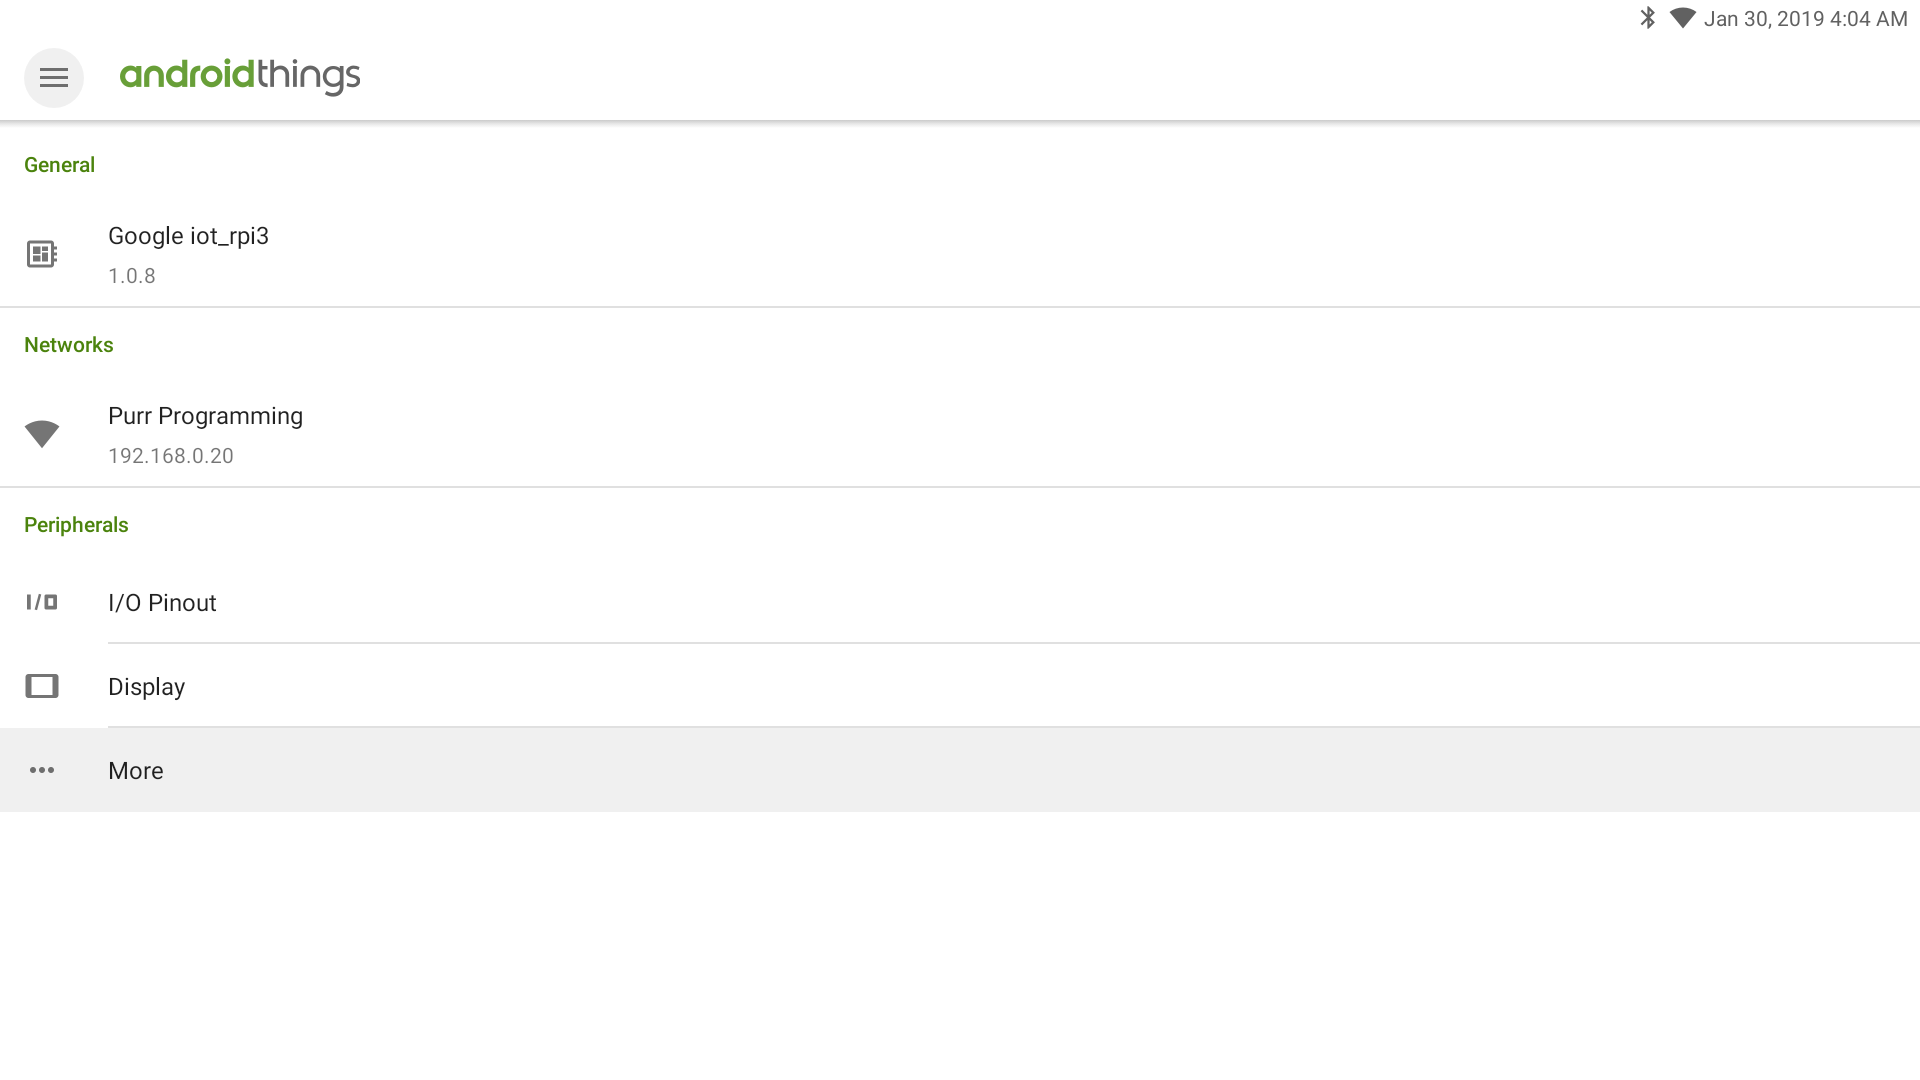
- You’ll see this screen on your monitor:
- A dialog window will pop up. Tap NOT NOW.
- You’ll see this screen on your monitor:

Replace ip-address text with your ip address and press Enter. You should get the message that you’ve connected successfully.
- Under the Network section there’s a network name that you’re connected to, and the IP address. Remember that IP address.
- Open the terminal and enter the following command:
adb connect ip-address
adb connect ip-address
Congratulations! You have connected to your board. :]

Before you move on to the code, it is a good idea to test your Rainbow HAT to make sure that it’s up and running. The screen on your device should look like this:
Click or tap on the … More option.

Next, select Rainbow Hat

Finally click or tap the Test button.
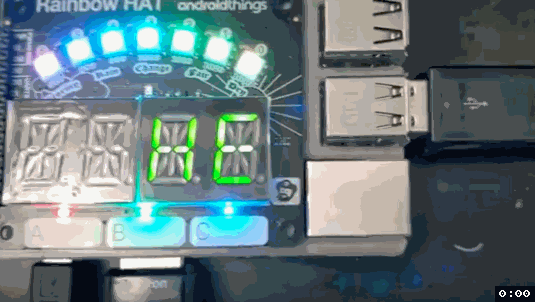
If you conneted your HAT correctly, it should light up and flash “hello world”. If you’re using a Raspberri Pi, you can optionally unplug the HDMI cable from the monitor since you’re not going to use it for the rest of the tutorial. Your development board is ready to use. :]
Download and Explore the Starter Project
Before you start building apps for Android Things make sure you have SDK tools version 27.0.1, or higher, and SDK with Android 8.1 (API 27), or higher, otherwise update them accordingly.
Download the materials for the tutorial by using the Download Materials button at the top or bottom of the page, and import the starter project into Android Studio.
Explore the project and see what makes the Android Things project different from a traditional phone and tablet project.
Open the app-level build.gradle file.
In the dependencies block, you’ll see this line:
compileOnly 'com.google.android.things:androidthings:' + project.ext.androidThingsVersion
The Things support library is a new library which Google is developing to handle the communication with peripherals and drivers. This is a completely new library not present in the Android SDK, and this library is one of the most important features. It exposes a set of Java Interfaces and classes (APIs) that you can use to connect and exchange data with external devices such as sensors, actuators and so on. This library hides the inner communication details, supporting several industry standard protocols (GPIO, I2C, UART, etc.).
Next, open AndroidManifest.xml. You’ll see this line under the Application tag:
<uses-library android:name="com.google.android.things" />
The uses-library element makes this prebuilt library available to the app’s classpath at runtime.
Android Things does not include a user-facing launcher app. Any app intending to run on an embedded device must launch an Activity automatically on boot. In order to do that, it must attach an intent-filter containing the HOME category to the Activity that it’s going to launch. Since you’re not writing a production app, a simple intent-filter with the action MAIN and category LAUNCHER is enough to set which Activity you’ll launch from Android Studio by default.
Build and run the app. Currently, not much has changed, so let’s start communicating with the board.