Augmented Reality in Android with Google’s Face API
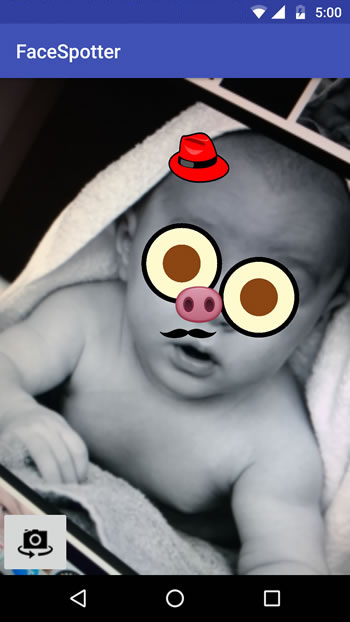
You’ll build a Snapchat Lens-like app called FaceSpotter which draws cartoony features over faces in a camera feed using augmented reality. By Joey deVilla.
What’s Your Angle?
The Face API provides another measurement: Euler angles.
Pronounced “Oiler” and named after mathematician Leonhard Euler, these describe the orientation of detected faces. The API uses the x-, y-, and z- coordinate system below.
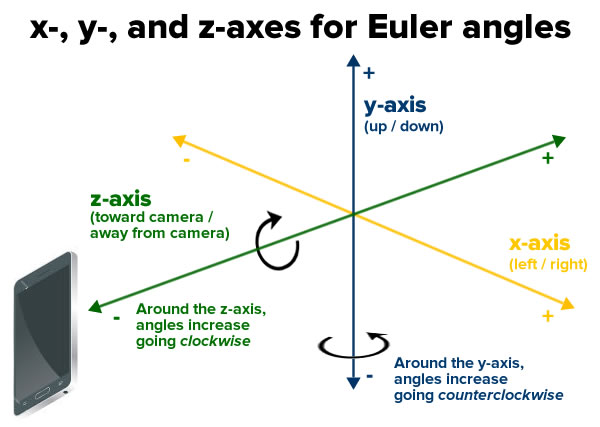
…and reports the following Euler angles for each detected face.


- The Euler y angle, which is its angle rotation around the y-axis. When you shake your head to say “no” as shown below, you’re rotating your head back and forth around the y-axis. This angle is detected only if the detector is set to
ACCURATE_MODE. - The Euler z angle, which measures its rotation around the z-axis. When you bobble your head from side to side as illustrated below, you’re rotating your head back and forth around the z-axis.
Open FaceTracker.java and add support for Euler angles by adding these lines to its onUpdate() method, after the call to updatePreviousLandmarkPositions:
// Get head angles.
mFaceData.setEulerY(face.getEulerY());
mFaceData.setEulerZ(face.getEulerZ());
You’ll make use of the Euler z angle to modify FaceGraphic so that it draws a hat on any face whose Euler z angle is greater than 20 degrees to one side.
Open FaceGraphic.java and add the following to the end of draw:
// Head tilt
float eulerY = mFaceData.getEulerY();
float eulerZ = mFaceData.getEulerZ();

// Draw the hat only if the subject's head is titled at a sufficiently jaunty angle.
final float HEAD_TILT_HAT_THRESHOLD = 20.0f;
if (Math.abs(eulerZ) > HEAD_TILT_HAT_THRESHOLD) {
  drawHat(canvas, position, width, height, noseBasePosition);
}
…and add the following drawHat method to the end of the class:
private void drawHat(Canvas canvas, PointF facePosition, float faceWidth, float faceHeight, PointF noseBasePosition) {
  final float HAT_FACE_WIDTH_RATIO = (float)(1.0 / 4.0);
  final float HAT_FACE_HEIGHT_RATIO = (float)(1.0 / 6.0);
  final float HAT_CENTER_Y_OFFSET_FACTOR = (float)(1.0 / 8.0);

  float hatCenterY = facePosition.y + (faceHeight * HAT_CENTER_Y_OFFSET_FACTOR);
  float hatWidth = faceWidth * HAT_FACE_WIDTH_RATIO;
  float hatHeight = faceHeight * HAT_FACE_HEIGHT_RATIO;

  int left = (int)(noseBasePosition.x - (hatWidth / 2));
  int right = (int)(noseBasePosition.x + (hatWidth / 2));
  int top = (int)(hatCenterY - (hatHeight / 2));
  int bottom = (int)(hatCenterY + (hatHeight / 2));
  mHatGraphic.setBounds(left, top, right, bottom);
  mHatGraphic.draw(canvas);
}
Run the app. Now a cute little hat will appear near the top of any head titled at a jaunty angle:
Bouncing Irises
Finally, you’ll use a simple physics engine to make the irises bounce around. This requires two simple changes to FaceGraphic. First, you need to declare two new instance variables, which provide a physics engine for each eye. Put these just below the declaration for the Drawable instance variables:
// We want each iris to move independently, so each one gets its own physics engine.
private EyePhysics mLeftPhysics = new EyePhysics();
private EyePhysics mRightPhysics = new EyePhysics();
The second change goes in the call to FaceGraphic’s draw method. Until now, you’ve set the iris positions to the same coordinates as the eye positions.
Now, modify the code in draw’s “draw the eyes” section to use the physics engines to determine each iris’ position:
// Draw the eyes.
PointF leftIrisPosition = mLeftPhysics.nextIrisPosition(leftEyePosition, eyeRadius, irisRadius);
drawEye(canvas, leftEyePosition, eyeRadius, leftIrisPosition, irisRadius, leftEyeOpen, smiling);
PointF rightIrisPosition = mRightPhysics.nextIrisPosition(rightEyePosition, eyeRadius, irisRadius);
drawEye(canvas, rightEyePosition, eyeRadius, rightIrisPosition, irisRadius, rightEyeOpen, smiling);
Run the app. Now everyone has googly (pun somewhat intended) eyes!

Where to Go From Here?
You can download the final project here.
You’ve made the journey from augmented reality and face detection newbie to…well, maybe not grizzled veteran, but someone who now knows how to make use of both in Android apps.
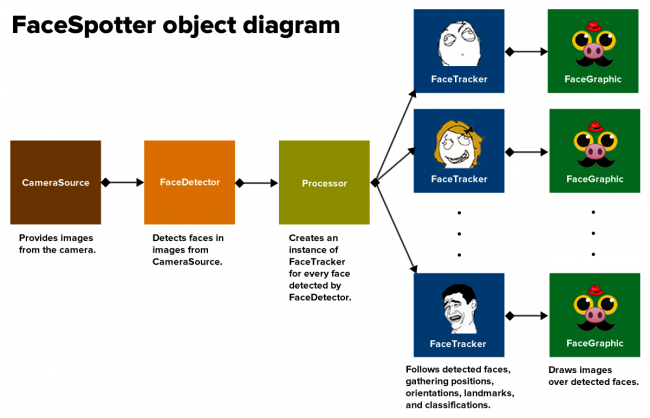
Now that you’ve gone through a few iterations of the app, from starter version to finished version, you should have no trouble understanding this diagram showing how FaceSpotter’s objects are related:
A good next step would be to take a closer look at Google’s Mobile Vision site, and particularly the section on the Face API.
Reading other people’s code is a great way to learn things, and Google’s android-vision GitHub repository is a treasure trove of ideas and code.
If you have any questions or comments, please join the discussion below!