Moya Tutorial for iOS: Getting Started
Moya is a networking library inspired by the concept of encapsulating network requests in type-safe way, typically using enumerations, that provides confidence when working with your network layer. Become a networking superhero with Moya! By Shai Mishali.
Imgur – Sharing With Friends!
For this, you’ll create another Moya target named Imgur that will let you interact with two different endpoints for image handling: one for uploading and one for deleting.
Similar to the Marvel API, you’ll need to sign up for a free account with Imgur.
After that, you’ll need to create an Imgur Application. You may use any fake URL for the callback, as you won’t be using OAuth here. You can also simply choose **OAuth 2 authorization without a callback URL**.
Registering a new Imgur application
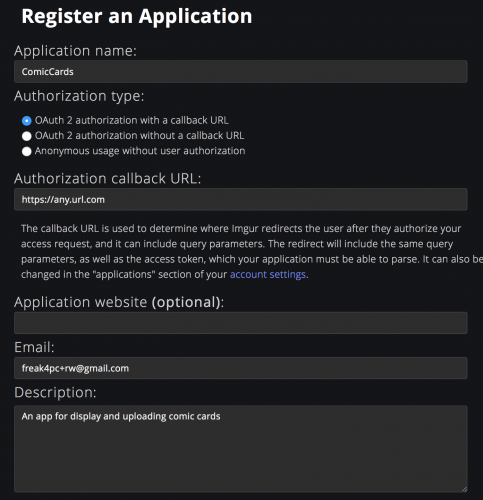
Once you submit the form, Imgur will present you with your new Imgur Client ID and Client secret. Save these for the next step.
Creating the Imgur Target
Right-click the ComicCards/Network folder and select New File… Then create a new Swift file and name it Imgur.swift.
Add the following code to define the Imgur endpoints that you’ll implement and use:
import UIKit
import Moya

public enum Imgur {
  // 1
  static private let clientId = "YOUR CLIENT ID"

  // 2
  case upload(UIImage)
  case delete(String)
}
Similar to the Marvel API, you:
- Store your Imgur Client ID in
clientId. Make sure to replace this with the Client ID generated in the previous step (you don’t need the secret). - Define the two endpoints that you’ll be using:
upload, used to upload an image, anddelete, which takes a hash for a previously uploaded image and deletes it from Imgur. These are represented in the Imgur API as POST /image and DELETE /image/{imageDeleteHash}.
Next, you’ll conform to TargetType. Add the following code right below your new enum:
extension Imgur: TargetType {
  // 1
  public var baseURL: URL {
    return URL(string: "https://api.imgur.com/3")!
  }

  // 2
  public var path: String {
    switch self {
    case .upload: return "/image"
    case .delete(let deletehash): return "/image/\(deletehash)"
    }
  }

  // 3
  public var method: Moya.Method {
    switch self {
    case .upload: return .post
    case .delete: return .delete
    }
  }

  // 4
  public var sampleData: Data {
    return Data()
  }

  // 5
  public var task: Task {
    switch self {
    case .upload(let image):
      let imageData = image.jpegData(compressionQuality: 1.0)!

      return .uploadMultipart([MultipartFormData(provider: .data(imageData),
                                                 name: "image",
                                                 fileName: "card.jpg",
                                                 mimeType: "image/jpg")])
    case .delete:
      return .requestPlain
    }
  }

  // 6
  public var headers: [String: String]? {
    return [
      "Authorization": "Client-ID \(Imgur.clientId)",
      "Content-Type": "application/json"
    ]
  }

  // 7
  public var validationType: ValidationType {
    return .successCodes
  }
}
This should look familiar to you by now. Let’s go through the seven protocol properties of the new Imgur target.
To upload a file, you’ll use the .uploadMultipart task type, which takes an array of MultipartFormData structs. You then create an instance of MultipartFormData with the appropriate image data, field name, file name and image mime type.
- The base URL for the Imgur API is set to
https://api.imgur.com/3. - You return the appropriate endpoint
pathbased on the case./imagefor.upload, and/image/{deletehash}for.delete. - The
methoddiffers based on the case as well:.postfor.uploadand.deletefor.delete. - Just like before, you return an empty
Datastruct forsampleData. - The
taskis where things get interesting. You return a differentTaskfor every endpoint. The.deletecase doesn’t require any parameters or content since it’s a simpleDELETErequest, but the.uploadcase needs some more work. - Like the Marvel API, the
headersproperty returns aContent-Type: application/jsonheader, and an additional header. The Imgur API uses Header authorization, so you’ll need to provide your Client ID in the header of every request, in the form ofAuthorization: Client-ID (YOUR CLIENT ID). - The
.validationTypeis the same as before — valid for any status codes between 200 and 299.
Your Imgur target is done! This concludes the Moya-related code for the ComicCards app. Kudos to you!

The final step is completing CardViewController to have it use your newly created Moya target.
Wrapping Up CardViewController
Go back to CardViewController.swift and add the following lines at the beginning of your CardViewController class, below the comic property:
private let provider = MoyaProvider<Imgur>()
private var uploadResult: UploadResult?
Like before, you create a MoyaProvider instance, this time with the Imgur target. You also define uploadResult — an optional UploadResult property you’ll use to store the result of an upload, which you’ll need when deleting an image.
You have two methods to implement: uploadCard() and deleteCard().
At the end of uploadCard(), append the following code:
// 1
let card = snapCard()

// 2
provider.request(.upload(card),
  // 3
  callbackQueue: DispatchQueue.main,
  progress: { [weak self] progress in
    // 4
    self?.progressBar.setProgress(Float(progress.progress), animated: true)
  },
  completion: { [weak self] response in
    guard let self = self else { return }

    // 5
    UIView.animate(withDuration: 0.15) {
      self.viewUpload.alpha = 0.0
      self.btnShare.alpha = 0.0
    }

    // 6
    switch response {
    case .success(let result):
      do {
        let upload = try result.map(ImgurResponse<UploadResult>.self)

        self.uploadResult = upload.data
        self.btnDelete.alpha = 1.0

        self.presentShare(image: card, url: upload.data.link)
      } catch {
        self.presentError()
      }
    case .failure:
      self.presentError()
    }
})
This big chunk of code definitely needs some explanation, but worry not — most of it should be relatively familiar.
You’ll use this property later when finishing up the deleteCard() method. After storing the upload result, you trigger the presentShare method which will present a proper share alert with the URL to the uploaded image, and the image itself. A failure will trigger the presentError() method.
- You use a helper method called
snapCard()to generate aUIImagefrom the presented card on screen. - Like with the Marvel API, you use your provider to invoke the
uploadendpoint with an associated value of the card image. -
callbackQueueallows providing a queue on which you’ll receive upload progress updates in the next callback. You provide the mainDispatchQueueto ensure progress updates happen on the main thread. - You define a progress closure, which will be invoked as your image is uploaded to Imgur. This sets the progress bar’s progress and will be invoked on the main
DispatchQueueprovided incallbackQueue. - When the request completes, you fade out the upload view and the share button.
- As before, you handle the
successandfailureoptions of the result. If successful, you try to map the response to anImgurResponseand then store the mapped response in the instance property you defined before.
And for your final piece of code for the day: Add the following code inside deleteCard():
// 1
guard let uploadResult = uploadResult else { return }
btnDelete.isEnabled = false

// 2
provider.request(.delete(uploadResult.deletehash)) { [weak self] response in
  guard let self = self else { return }

  let message: String

  // 3
  switch response {
  case .success:
    message = "Deleted successfully!"
    self.btnDelete.alpha = 0.0
  case .failure:
    message = "Failed deleting card! Try again later."
    self.btnDelete.isEnabled = true
  }

  let alert = UIAlertController(title: message, message: nil, preferredStyle: .alert)
  alert.addAction(UIAlertAction(title: "Done", style: .cancel))

  self.present(alert, animated: true, completion: nil)
}
This method is rather simple and works as follows:
- You make sure the
uploadResultis available and disable the delete button so the user doesn’t tap it again. - You use the Imgur provider to invoke the
deleteendpoint with the associated value of the upload result’sdeletehash. This hash uniquely identifies the uploaded image. - In case of a successful or failed deletion, you show an appropriate message.
That is it! Build and run your app one final time. Select a comic and share your image to Imgur. After you’re done with it, you can tap the Delete from Imgur button to remove it.
uploadResult will be cleared and the deletehash will be lost. Persisting the hash for any generated images over different sessions is a nice challenge you might want to tackle :].