Catalyst Tutorial: Running iPad apps on macOS
In this Catalyst tutorial, you’ll learn how to take an iPad app and configure it to run on macOS and add Mac-specific features like contextual menus. By Warren Burton.
Mac Exclusive Features
macOS has several features that iOS doesn’t. Windows can have toolbars at the top for useful UI. Some MacBook Pros have a configurable touch bar, and the primary screen has a menu bar.
In this section you will:
- Add a menu item to the main menu bar.
- Add a toolbar to the window.
- Provide a custom icon for Mac.
- Add a touch bar item to the touch bar.
Modifying the Menu Bar
The menu bar should be the primary source of actions for your app. An action doesn’t need to exist in the toolbar or the touch bar, but the action should exist in the menu bar. Ideally, the action should have a key command too.
![]()
To change the menu bar, you need to override buildMenu(with:), from UIResponder. If you open AppDelegate.swift from the Project navigator, you see that the declaration for AppDelegate is:
class AppDelegate: UIResponder, UIApplicationDelegate
Which means that AppDelegate is already a UIResponder. The UIApplicationDelegate for any app is also the penultimate object to receive a message in the responder chain. The last object in the responder chain is UIApplication.
You’ll add a new extension to AppDelegate now. Select and expand the Infrastructure folder in the Project navigator and press Command-N. Select iOS ▸ Swift File and click Next. Name the file AppDelegate+MenuBuilder.swift, make sure the Markup target is selected, and click Create.
Replace the content of the new file with this code:
import UIKit

extension AppDelegate {
  override func buildMenu(with builder: UIMenuBuilder) {
    //1
    guard builder.system == .main else { return }

    //2
    builder.remove(menu: .format)

    //3
    let selector = #selector(MarkupViewController.cleanDocumentAction)
    let clearEditor = UIKeyCommand(
      title: "Clear Editor",
      image: nil,
      action: selector,
      input: "k",
      modifierFlags: [.command],
      propertyList: nil)

    //4
    let menu = UIMenu(
      title: "",
      image: nil,
      identifier: UIMenu.Identifier("Open Doc"),
      options: .displayInline,
      children: [clearEditor])

    //5
    builder.insertChild(menu, atEndOfMenu: .edit)
  }
}
In this extension you override buildMenu(with:) in AppDelegate to change the main menu.
- Check that the menu is Main menu as opposed to a context menu.
- Remove the Format menu you don’t need.
- Create a
UIKeyCommandinstance using K as the key shortcut. The action calls out tocleanDocumentActioninMarkupViewController. - Create a
UIMenuinstance with the new command. - Add the new menu to the end of Edit menu.
Check that your target is set to My Mac. Build and run and you can see that the Format menu is gone and the Edit menu now has a Clear Editor action:

As a bonus, you’re still improving your iPad app. Any iPad user with a hardware keyboard can use this key command too.
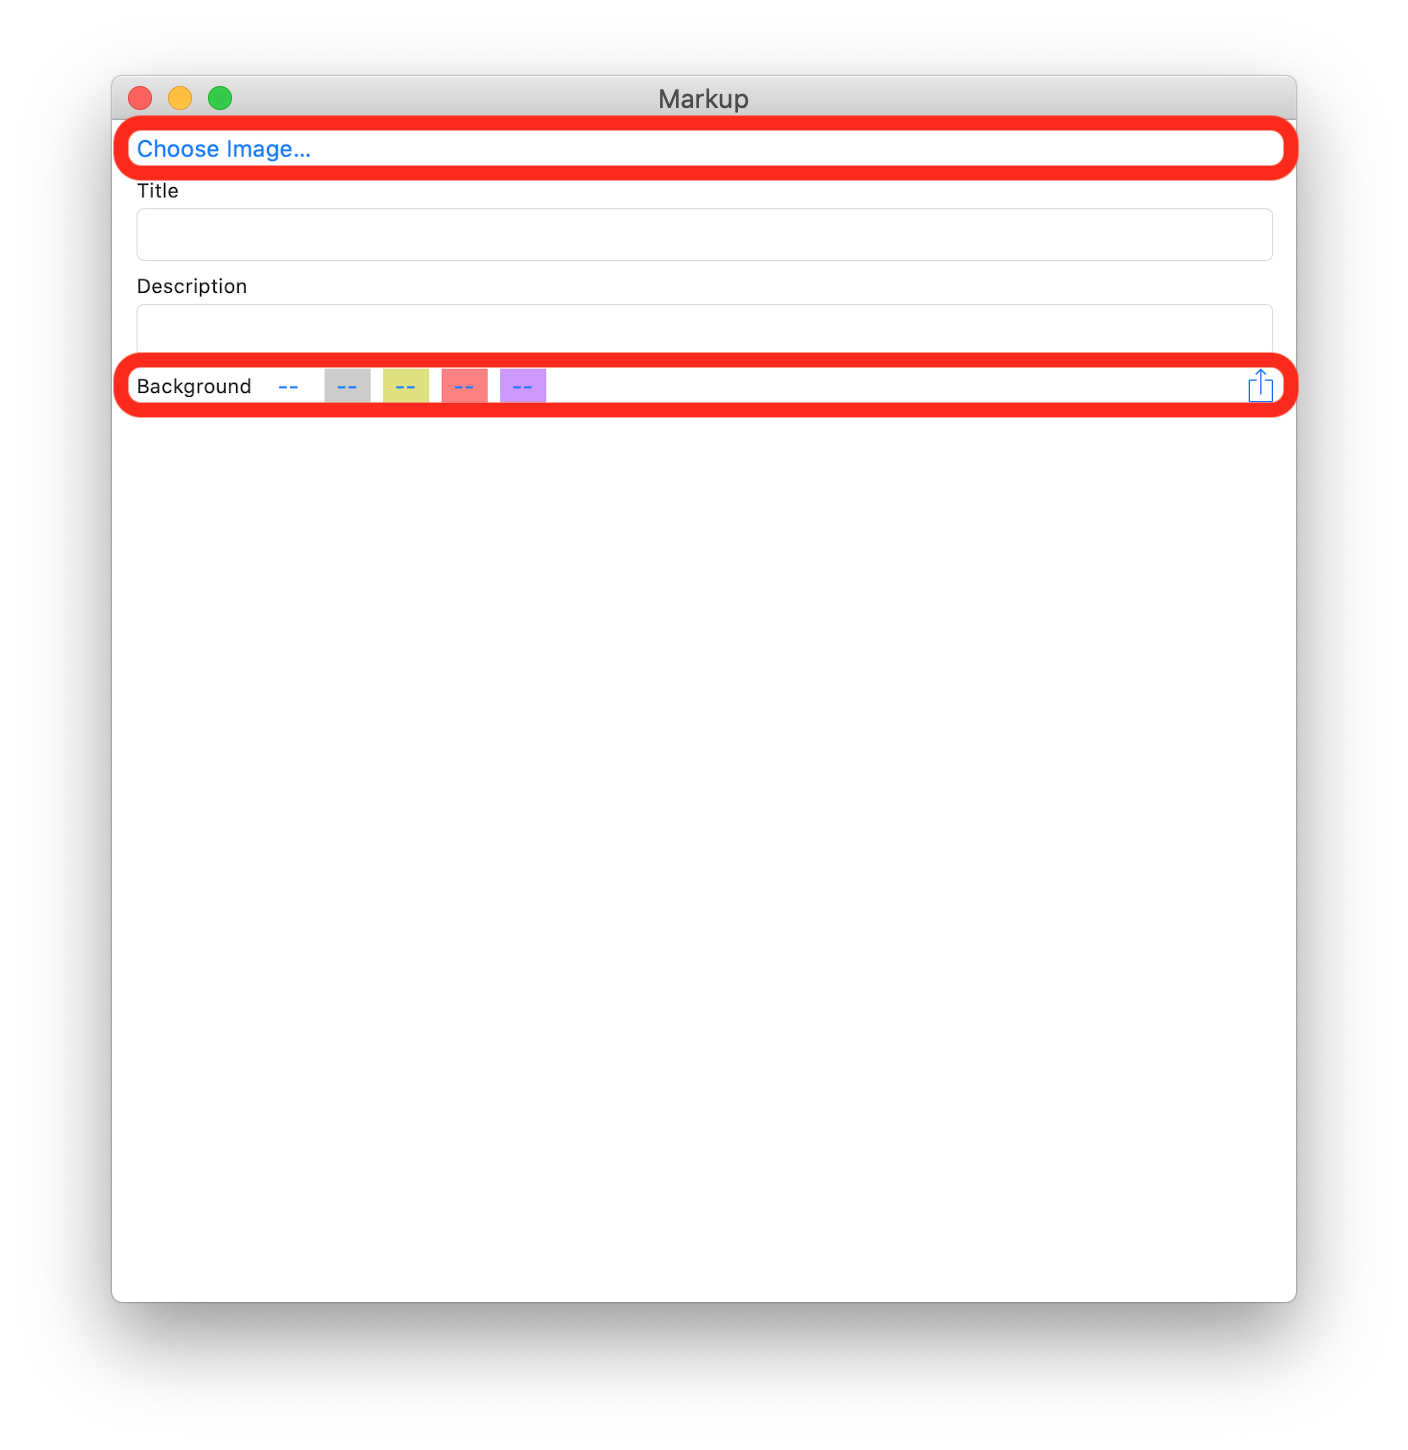
Adding a Toolbar
A toolbar holds UI that is relevant to the window, like this:

In this section, you’ll shift the color selector, image picker and share buttons into the toolbar.
The first thing to do is to hide these elements from the main section of the app when running on macOS:
Open MarkupViewController.swift, and add two IBOutlet inside MarkupViewController, below the four other IBOutlet lines:
@IBOutlet weak var buttonStack: UIStackView!
@IBOutlet weak var colorStack: UIStackView!
Now open MarkupViewController.storyboard in Assistant Editor by holding down Option while clicking MarkupViewController.storyboard in Project navigator. You should now have MarkupViewController.swift on one side of your window and MarkupViewController.storyboard on the other.
Drag from the IBOutlet connection for buttonStack in MarkupViewController.swift to the UIStackView in the storyboard that holds the Choose Image… button.

Repeat for the color controls. Drag from the IBOutlet connection for colorStack in MarkupViewController.swift to UIStackView in the storyboard that holds the background color buttons and the share button.

You can now close Assistant Editor by clicking the close button at the top left of the split view.

Still in MarkupViewController.swift, locate viewDidLoad() and add this code at the end of the method:
#if targetEnvironment(macCatalyst)
buttonStack.isHidden = true
colorStack.isHidden = true
#endif
You’re hiding these two stack views when running on macOS. The outer stack view that contains them will squish up to hide the spaces at runtime.
Build and run. You now have a very clean UI for your editor. It’s time to build the toolbar.

You’re going to add another extension to MarkupViewController. Select the Primary Views folder in Project navigator and press Command-N to add a new file. Select iOS ▸ Swift File and click Next. Name the file MarkupViewController+NSToolbar.swift and click Create.
Add this code to the file:
import UIKit

#if targetEnvironment(macCatalyst)
extension MarkupViewController: NSToolbarDelegate {
  //1
  enum Toolbar {
    static let colors = NSToolbarItem.Identifier(rawValue: "colors")
    static let share = NSToolbarItem.Identifier(rawValue: "share")
    static let addImage = NSToolbarItem.Identifier(rawValue: "addImage")
  }

  //2
  func toolbar(
    _ toolbar: NSToolbar,
    itemForItemIdentifier itemIdentifier: NSToolbarItem.Identifier,
    willBeInsertedIntoToolbar flag: Bool)
      -> NSToolbarItem? {
    //3
    if itemIdentifier == Toolbar.colors {
      let items = AppColors.colorSpace
        .enumerated()
        .map { (index, slice) -> NSToolbarItem in
          let item = NSToolbarItem()
          item.image = UIImage.swatch(slice.1)
          item.target = self
          item.action = #selector(colorSelectionChanged(_:))
          item.tag = index
          item.label = slice.0
          return item
        }

      let group = NSToolbarItemGroup(itemIdentifier: Toolbar.colors)
      group.subitems = items
      group.selectionMode = .momentary
      group.label = "Text Background"

      return group
    }
    //4
    else if itemIdentifier == Toolbar.addImage {
      let item = NSToolbarItem(itemIdentifier: Toolbar.addImage)
      item.image = UIImage(systemName: "photo")?.forNSToolbar()
      item.target = self
      item.action = #selector(chooseImageAction)
      item.label = "Add Image"

      return item
    }
    else if itemIdentifier == Toolbar.share {
      let item = NSToolbarItem(itemIdentifier: Toolbar.share)
      item.image = UIImage(systemName: "square.and.arrow.up")?.forNSToolbar()
      item.target = self
      item.action = #selector(shareAction)
      item.label = "Share Item"

      return item
    }

    return nil
  }

  //5
  func toolbarDefaultItemIdentifiers(_ toolbar: NSToolbar)
      -> [NSToolbarItem.Identifier] {
    return [Toolbar.colors, Toolbar.addImage, .flexibleSpace, Toolbar.share]
  }

  func toolbarAllowedItemIdentifiers(_ toolbar: NSToolbar)
      -> [NSToolbarItem.Identifier] {
    return self.toolbarDefaultItemIdentifiers(toolbar)
  }

  //6
  @objc func colorSelectionChanged(_ sender: NSToolbarItem) {
    guard let template = currentContent else {
      return
    }
    template.textBackgroundColor = AppColors.colors[sender.tag]
    currentContent = template
  }
}
#endif
This big chunk of code definitely needs some explanation, but worry not — most of it should be relatively straight forward. You made MarkupViewController conform to NSToolbarDelegate.
- Create the
NSToolbarItem.Identifieritems you’ll use in the extension. - Implement
toolbar(_:itemForItemIdentifier:willBeInsertedIntoToolbar:)fromNSToolbarDelegateand, for each possible identifier, return anNSToolbarItem. - The color selector is an
NSToolbarItemGroupformed ofNSToolbarItem, each representing a color swatch image. - Add Image and Share items are instances of
NSToolbarItemthat use system icons. Note thatNSToolbarItemimages render as a 32-by-32 square regardless of the input image. The helperforNSToolbar()paints a source image into a newUIImageof that exact size with correct aspect ratio. -
toolbarDefaultItemIdentifiers(_:)andtoolbarAllowedItemIdentifiers(_:)are delegate methods that describe what items should appear by default and what items are allowed in the toolbar. -
colorSelectionChanged(_:)handles the action to change the color from the toolbar.
Next, add this code to the end of MarkupViewController+NSToolbar.swift:
extension MarkupViewController {
  func buildMacToolbar() {
    #if targetEnvironment(macCatalyst)
    guard let windowScene = view.window?.windowScene else {
      return
    }

    if let titlebar = windowScene.titlebar {
      let toolbar = NSToolbar(identifier: "toolbar")
      toolbar.delegate = self
      toolbar.allowsUserCustomization = true
      titlebar.toolbar = toolbar
    }
    #endif
  }
}
Here, you create a helper method that hooks up your toolbar to an instance of UITitleBar, which is a property of UIWindowScene, and you get access to that from your application’s UIWindow.
Now you need to call buildMacToolbar() at some point when the app launches. Open MarkupViewController.swift and add this method to MarkupViewController, just below viewDidLoad():
override func viewDidAppear(_ animated: Bool) {
  super.viewDidAppear(animated)
  buildMacToolbar()
}
viewDidAppear(_:) gets called later in the the view lifecycle than viewDidLoad(). You need to wait until the window has appeared to gain access to UIWindowScene.
Build and run. You will see that your window gains a toolbar at the top of the window:
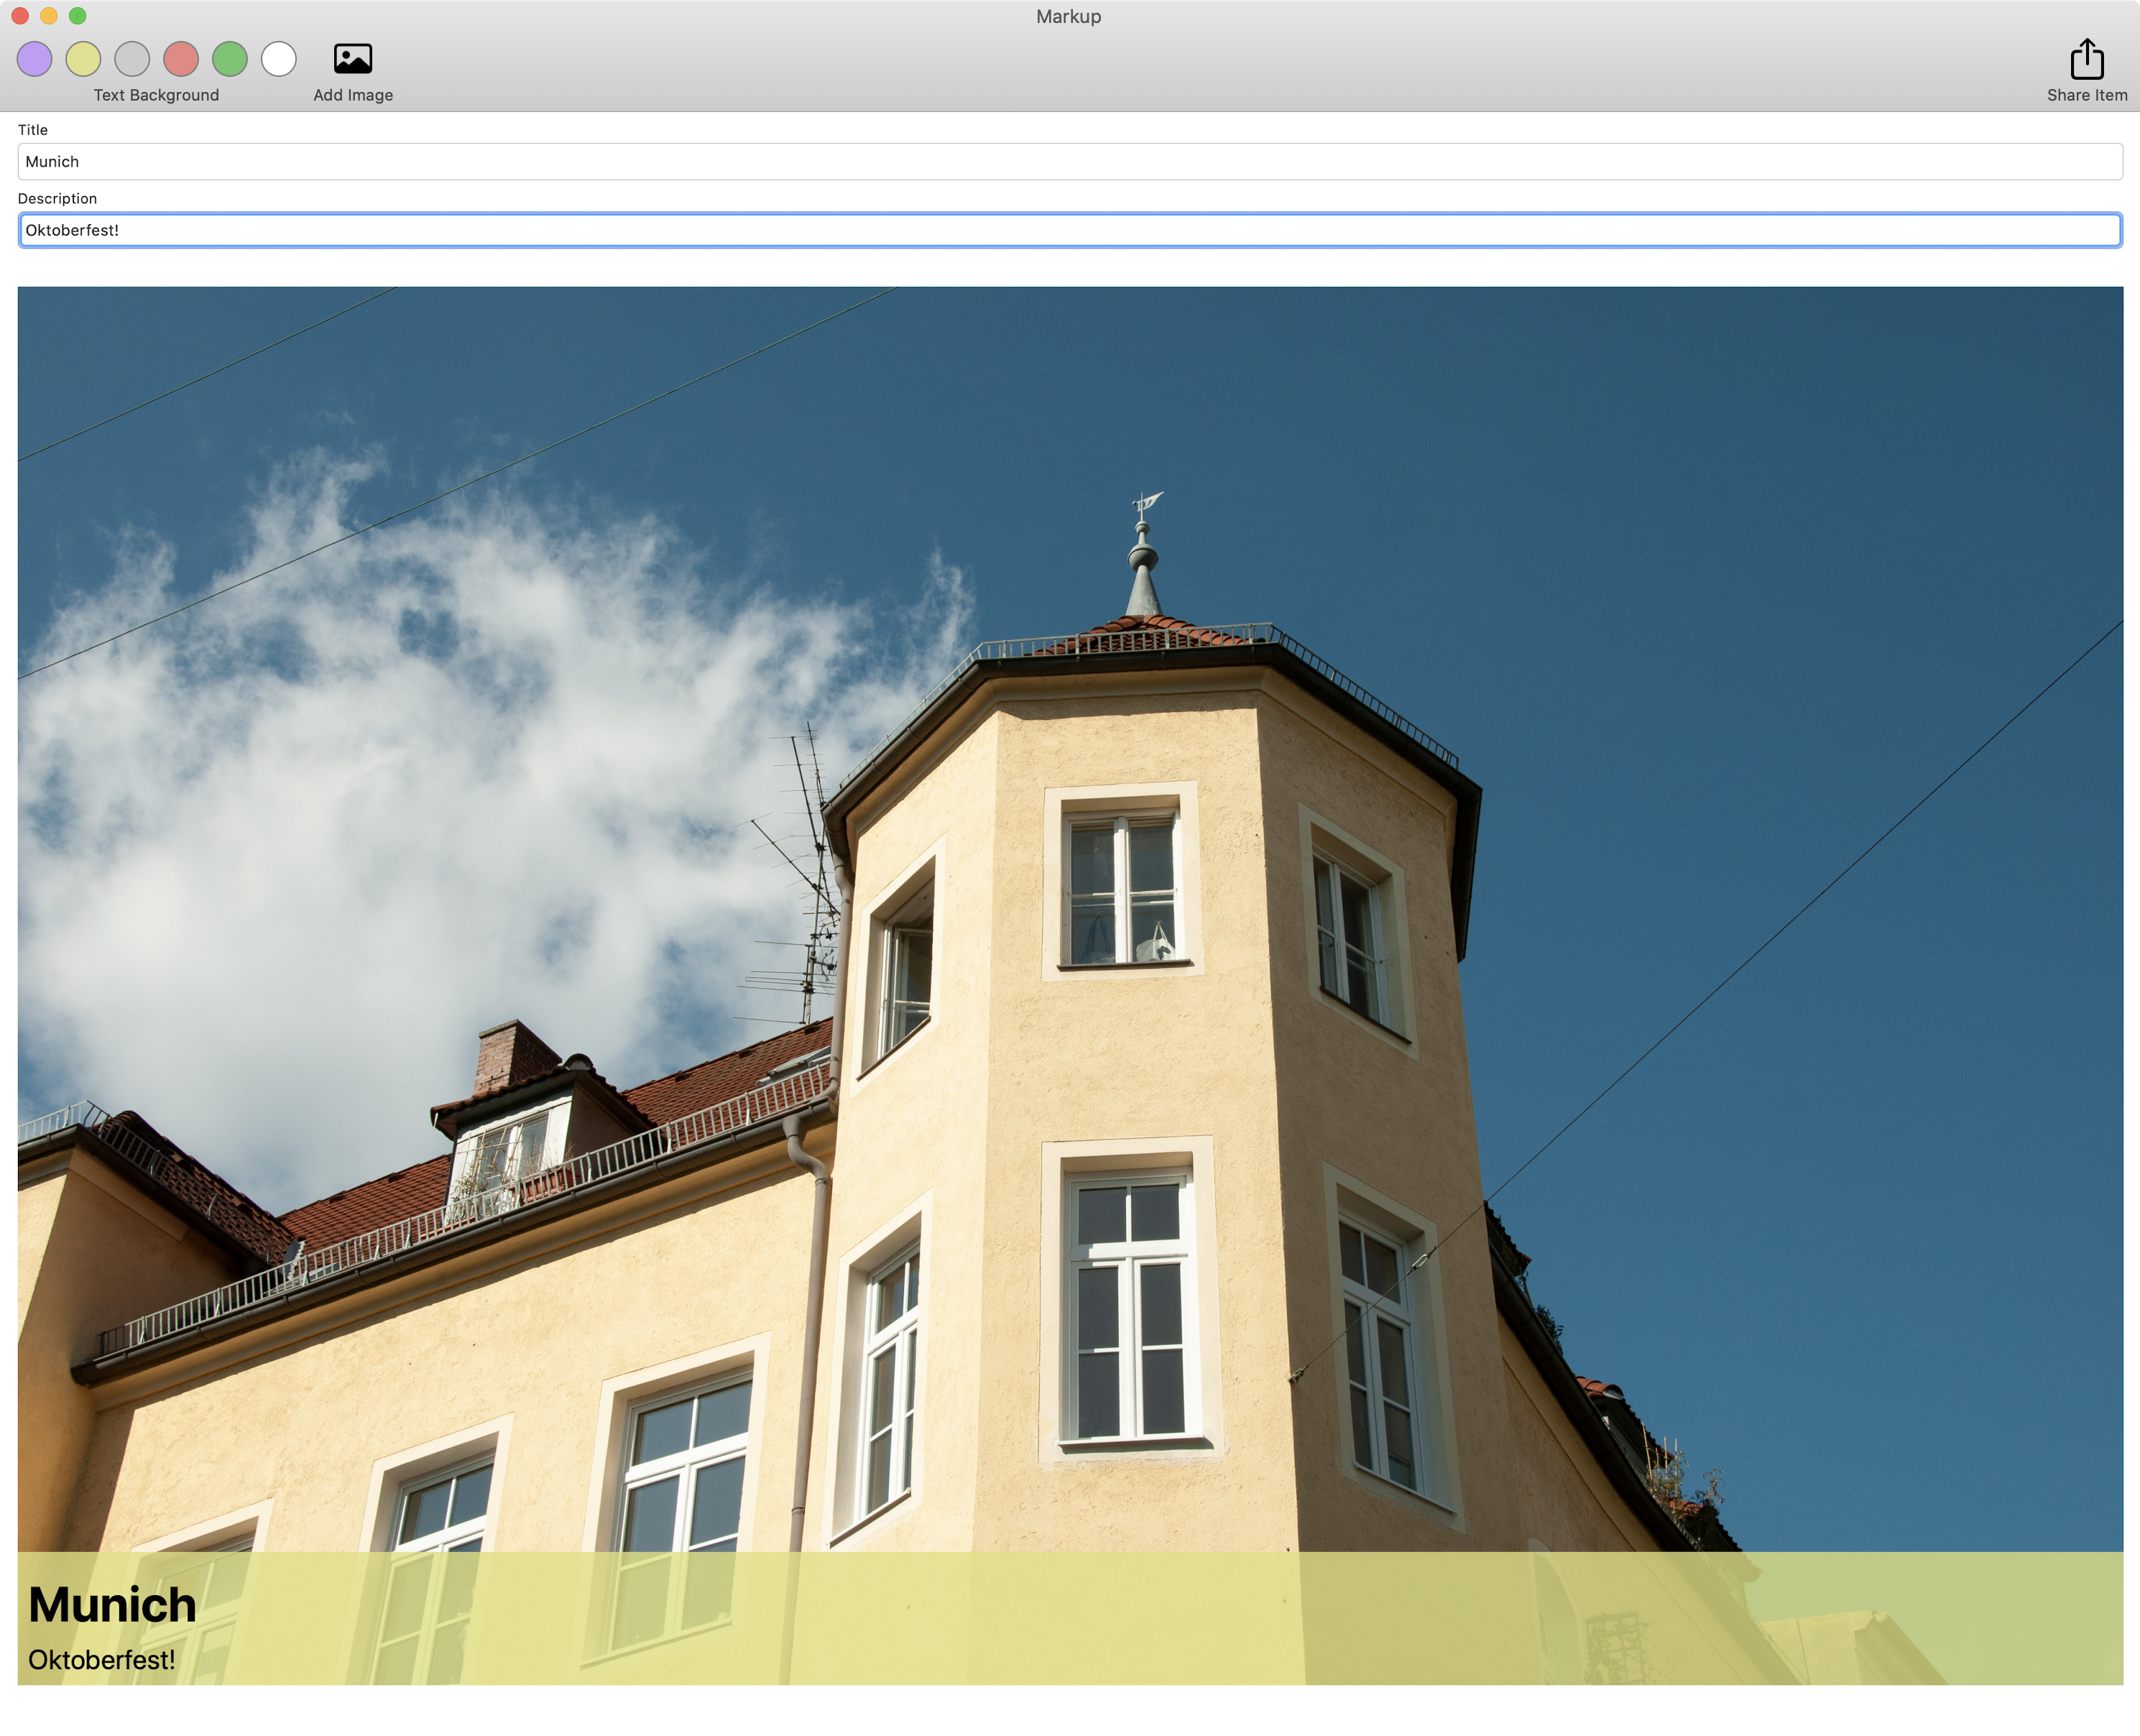
Click on the Color swatches, and the background color behind the rendered text will change accordingly.
You may notice the Share and Add Image buttons don’t work yet. That’s because UIPopover views need anchors ― a location to display popovers. The anchors for iOS are the buttons you hid at the start of the section.
Inside MarkupViewController, locate chooseImageAction(_:) and add the following code at the start of the method:
#if targetEnvironment(macCatalyst)
let source = titleField!
#else
let source = chooseImageButton!
#endif
Then change let helper = ImagingHelper(presenter: self, sourceview: chooseImageButton) to:
let helper = ImagingHelper(presenter: self, sourceview: source)
On macOS you present the UIImagePickerViewController popover on titleField.
Now locate shareAction(_:) in MarkupViewController and replace the line for activity.popoverPresentationController?.sourceView = sender with:
#if targetEnvironment(macCatalyst)
activity.popoverPresentationController?.sourceView = view
activity.popoverPresentationController?.sourceRect = CGRect(x: view.bounds.width - 200,y: 50,width: 1,height: 1)
#else
activity.popoverPresentationController?.sourceView = sender
#endif
Here you set the anchor for UIActivityViewController popover to be the top right of the main view when running on macOS. These two changes work but aren’t very attractive. They do show you the type of changes that you’ll need to do to adapt your app to Catalyst.
Build and run. Try out Add Image and Share buttons. Notice how UIActivityViewController doesn’t look like the version you have on iOS. You receive a NSSharingServicePicker instead:

Catalyst provides the bridging. You’ll notice more of these bridges from UIKit to AppKit as you continue your adventures. Your app now looks as if it belongs on macOS.