Beginning Android Development with Kotlin, Part One: Installing Android Studio
In this Beginning Android Development tutorial, you will learn how to set up all the tools needed to start Android development. By Joe Howard.
Building the Project
Android Studio takes this as a cue to go do a bunch of behind-the-scenes operations and create your project. As it shoots out descriptions of what it’s doing, you may notice it says something like this:

Here, you see your project name, which is familiar. But then there is this Gradle word as well.
The benefit of having a modern IDE like Android Studio is that it handles a lot for you. But, as you’re learning how to use the software, it’s good to have a general sense of what it does for you.
Gradle
Gradle is a build tool that’s easy to use, and if you investigate further, you’ll find it contains advanced options. It takes your Java or Kotlin code, XML layouts and the latest Android build tools to create the app package file, also known as an APK (Android Package Kit) file.
You can customize your configurations to have development or production versions of the app that behave differently. You can also add dependencies for third-party libraries.
After a brief moment, Android Studio will finish building your project. The project is pretty empty, of course, but it has everything it needs set up so that it can be launched on an Android device or emulator.
You’ll likely see a “Tip of the Day” presented by Android Studio:

Android Studio will build the project, and when it’s finished, you’ll be at the Project screen:

Let’s take a brief look at the different parts of the project, all found under the app folder:
- The manifests/AndroidManifest.xml file provides to the Android system important information required to run your app.
- The res directory is your resource directory. Application resources such as images, XML layouts, styles, colors etc. are defined in this directory.
- The res/layout directory is where all your UI (User Interface) will be designed. You will use Android XML to design your UI.
- The res/menu directory is where you define the contents of your application’s menus.
- The res/values directory is where you define the resources such as dimensions (res/values/dimens.xml), colors (res/values/colors.xml), strings (res/values/strings.xml), etc.
Open res/layout/activity_main.xml and click Text at the bottom of the screen.
This shows you the xml code for your main layout. It also shows a preview of how it will look like on a device on the right side of the screen.
Note: If the Preview screen is not shown by default for you, open it by selecting View\Tool Windows\Preview from the menu

Running on an Emulator
You’ve got Android Studio and you’ve created an app. So how do you run it?
Android Studio comes with the ability to set up a software-based Android device on your computer and run apps on it, browse websites, debug and everything you would expect from a simulator. This capability is known as the Android Emulator.
You can set up multiple emulators and set the screen size and platform version for each to whatever you like. Good thing, too. You’d need a whole room dedicated to storing devices for testing because there are so many out there — okay, maybe that’s an exaggeration, but you get the idea. :]
If you ran through the setup wizard earlier using the standard installation, then you’ll already have an emulator set up and ready for you.
Up until recently, your computer would have to emulate everything an Android device would try to do, right down to its hardware, which runs an ARM-based processor. Most computers make use of x86-based processors, meaning your computer has to translate each instruction to one that an ARM-based processor would understand and this takes a significant amount of time. To reduce this overhead, on macOS Android Studio has adopted the HAXM driver which is able to speed things up a bit. On Linux, Android Studio uses KVM.
You still have the option to create an emulator that is as close to an actual device as you can, but be aware that the initial load times can drag a bit and have put off many an Android developer from using emulators at all.
With all that being said…let’s set up an emulator anyway, because you do need to know how!
Creating an Emulator
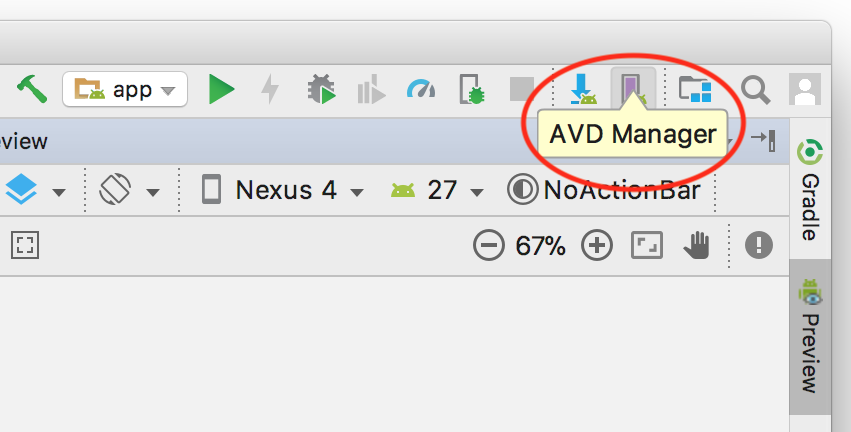
Click the AVD Manager. It’s a button near the right side of the toolbar that shows an Android popping its head up next to a device with a purple display:
The AVD Manager will open to a screen with an option to create a new device:

Virtual Device
Click the Create Virtual Device… button to start the process of creating a new virtual device.
The first step is to select the type of device. The Category section, on the left side of the screen, shows a list of the different device types you can emulate (TV, Wear, Phone, Tablet). Make sure the Phone option is selected. In the middle of the screen, there is a list of specific devices with their screen size, resolution and density. Take a moment to explore them.

What you need now is just to emulate a phone-sized device, but if you wanted to emulate an Android Wear watch or an Android TV then you have options to do so here.
Select Pixel 2 in the list of devices available to you from the phone category and click Next.
Select Android Version
On the next screen, you have to select the version of Android the virtual device will run.
For this tutorial, select Pie and make sure the one selected has the value x86 in the ABI column so the emulator runs as fast as possible on your x86 computer.

Note: If that version is not already downloaded, click on the Download link beside the release name to download before you continue.
Click Next once you’re done to advance to the final screen.
Verify Virtual Device
The last screen lets you confirm your choices and gives options to configure some other properties such as device name and startup orientation. Clicking the Show Advanced Settings button, shows you extra configurations you can change such as Camera, Network and Memory settings.

Use the defaults and click Finish.


Close the AVD Manager to go back to Android Studio’s main view. Now that you’ve configured everything, click the Run button.
