Database Migrations with Vapor
In this Server-Side Swift tutorial, see how to perform various migrations on your Vapor application database, using PostgreSQL running on Docker. By Jonathan S Wong.
Unique Room Migration
As your startup begins to grow and you get more conference rooms, as much as iOS developers are excited about SwiftUI, you don’t want someone to create another conference room with the same name. It’s time for another migration! This migration will add a unique key to the name property of the table.
Create a new file called 0003_UniqueRoomNames.swift in the Migrations directory and update the code to the following:
import FluentPostgreSQL
import Vapor

struct UniqueRoomNames: Migration {
  typealias Database = PostgreSQLDatabase

}
This sets up the struct for your unique room migration. Next add the prepare(on:) method:
static func prepare(on conn: PostgreSQLConnection) -> EventLoopFuture<Void> {
  return Database.update(Room.self, on: conn) { builder in
    builder.unique(on: \.name)
  }
}
In this migration, you use Database.update(_:on:) like before to update your Room model. To make a property unique, you use the unique(on:) function, passing in the KeyPath of the unique field. In this case, it is the name KeyPath.
The reverse of this migration is to delete the unique key. Add the following code after prepare(on:):
static func revert(on conn: PostgreSQLConnection) -> EventLoopFuture<Void> {
  return Database.update(Room.self, on: conn) { builder in
    builder.deleteUnique(from: \.name)
  }
}
In order to run this migration, add it to the configure.swift file above services.register(migrations):
migrations.add(migration: UniqueRoomNames.self, database: .psql)
Before running the app again, there are already routes created for you to create a room and get all of the current rooms. In Sources/App/Controllers/RoomController.swift, uncomment the following code:
//  func rooms(_ req: Request) throws -> Future<[Room]> {
//    return Room.query(on: req).all()
//  }
//
//  func create(_ req: Request) throws -> Future<Room> {
//    return try req.content.decode(Room.self).flatMap { room in
//      return room.save(on: req)
//    }
//  }
In Sources/App/routes.swift, uncomment the following code:
//  let roomController = RoomController()
//
//  router.get("rooms", use: roomController.rooms)
//  router.post("rooms", use: roomController.create)
Build and run.
In the RESTed app, set up a request as follows:
- URL: http://localhost:8080/rooms
- Method: GET
Your request should look similar to the following:

Send the request in RESTed and you should see a response body with the rooms already in the database.
Now try to create a room that already exists. Set up a request as follows:
- URL: http://localhost:8080/rooms
- Method: POST
- Add a single parameter called name. Use a name that already exists like SwiftUI.
- Select JSON-encoded as the request type. This ensures that the data is sent as JSON and that the
Content-Typeheader is set toapplication/json.
After sending your request, you should get an error like so:

The error shows that your migration to add the unique key to the room name property was successful.
Migrations with Default Values
Engineers at your startup are collaborating more and more, but they currently don’t know how people can fit in a room. Time to add that through a migration!
First, update your Room model by adding a size property:
var size: Int
The compiler will complain that size is not initialized. One option is to make this size property optional, but you would have to unwrap the optional every time you wanted to use it. Instead, you can modify the default initializer to take in the size property. Replace the initializer with the following code:
init(name: String, size: Int) {
  self.name = name
  self.size = size
}
This is OK for creating new rooms from this point on, but you previously created rooms with the old Room(name:) initializer when you seeded your database. You don’t want to change the previous migration. Migrating data is sensitive and can be error-prone. A better solution is to create a convenience initializer. Add the following below your previous initializer:
convenience init(name: String) {
  self.init(name: name, size: 0)
}
Now if you build, your code will compile, and you didn’t modify a prior migration.
It’s time to add the struct for your migration. Create a new file for the AddSizeToRoom migration in the Migrations directory called 0004_AddSizeToRoom.swift. Update the code in the file to the new migration:
import FluentPostgreSQL
import Vapor

struct AddSizeToRoom: Migration {
  typealias Database = PostgreSQLDatabase

  static func prepare(on connection: PostgreSQLConnection) -> Future<Void> {
    return Database.update(Room.self, on: connection) { builder in
      let defaultValueConstraint = PostgreSQLColumnConstraint.default(.literal(2))
      builder.field(for: \.size, type: .int, defaultValueConstraint)
    }
  }

  static func revert(on connection: PostgreSQLConnection) -> Future<Void> {
    return Database.update(Room.self, on: connection) { builder in
      builder.deleteField(for: \.size)
    }
  }
}
This migration creates a default value for your size column with the value 2. You could have chosen 0 here like the default value of your struct, but you know that the rooms you have can fit at least two people. If you query your data in the future and you see a Room that has a size of 0, you know someone forgot to set the size of the room before creating it.
Add the migration to configure.swift above services.register(migrations):
migrations.add(migration: AddSizeToRoom.self, database: .psql)
Build and run. In Postico, you should now see all five migrations in your Fluent table:

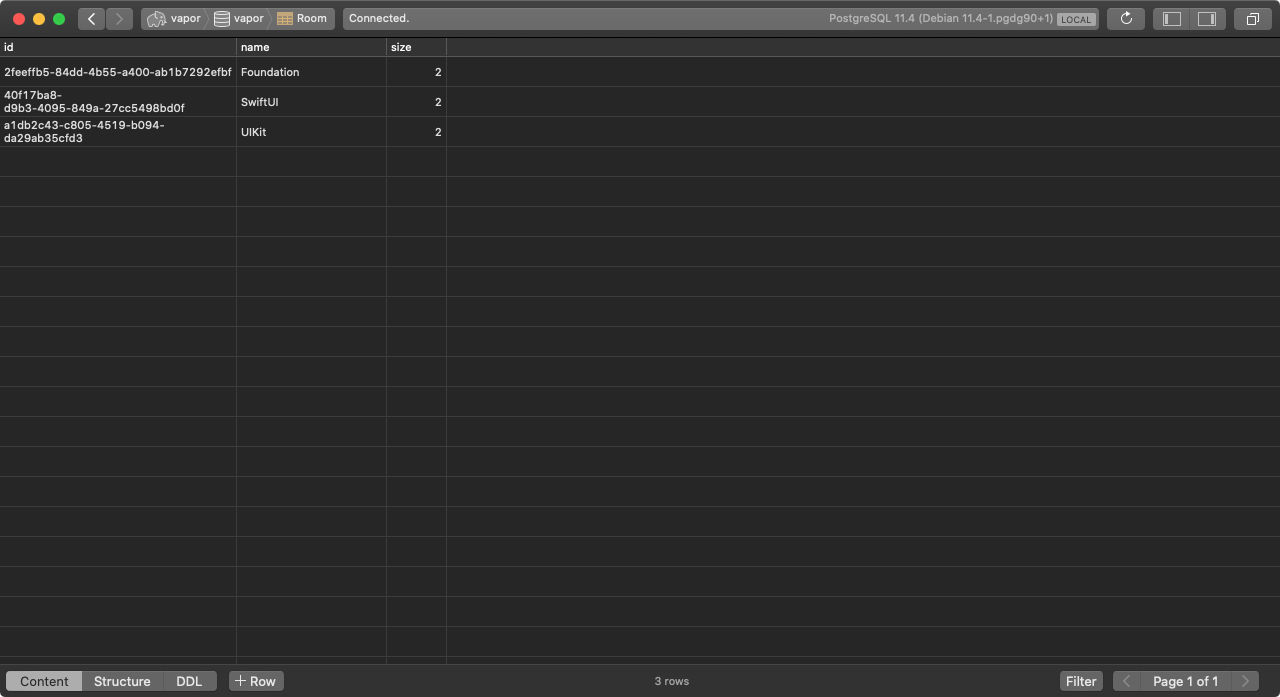
Your Room table should now have a new column called size with a value of 2 in each row:
That finishes all the migrations for your conference room app!
As cleanup, you can now stop the Postgres Docker container you started earlier using the following commands in Terminal:
docker stop postgres
docker rm postgres
If you wish, you can also delete the Postgres Docker image that was downloaded:
docker image rm postgres
Where to Go From Here?
You can download the completed project for this tutorial using the Download Materials button at the top or bottom of this page.
This tutorial provides an overview of different migrations you may come across as you build your Vapor application and your data model changes. If you enjoyed this tutorial, why not check out our full-length book on Vapor development: Server-Side Swift with Vapor?
If you’re a beginner to web development, but have worked with Swift for some time, you’ll find it’s easy to create robust, fully-featured web apps and web APIs with Vapor 3.
Whether you’re looking to create a backend for your iOS app, or want to create fully-featured web apps, Vapor is the perfect platform for you.
You can find more Vapor tutorials as well as tutorials using the Kitura framework on our Server-Side Swift page.
Questions or comments on this tutorial? Leave them in the comments below!