HealthKit Tutorial With Swift: Getting Started
Learn how to request permission to access HealthKit data, as well as read and write data to HealthKit’s central repository in this HealthKit tutorial. By Ted Bendixson.
4.5 (15) · 1 Review
Preparing a list of data types to read and write
Now it’s time to prepare a list of types to read and types to write.
Paste this third bit of code into the authorizeHealthKit(completion:) method, right after the second piece:
//3. Prepare a list of types you want HealthKit to read and write
let healthKitTypesToWrite: Set<HKSampleType> = [bodyMassIndex,
                                                activeEnergy,
                                                HKObjectType.workoutType()]

let healthKitTypesToRead: Set<HKObjectType> = [dateOfBirth,
                                               bloodType,
                                               biologicalSex,
                                               bodyMassIndex,
                                               height,
                                               bodyMass,
                                               HKObjectType.workoutType()]
HealthKit expects a set of HKSampleType objects that represent the kinds of data your user can write, and it also expects a set of HKObjectType objects for your app to read.
HKObjectType.workoutType() is a special kind of HKObjectType. It represents any kind of workout.
Authorizing HealthKit
The final part is the easiest. You just need to request authorization from HealthKit. Paste this last piece of code after the third piece:
//4. Request Authorization
HKHealthStore().requestAuthorization(toShare: healthKitTypesToWrite,
                                     read: healthKitTypesToRead) { (success, error) in
  completion(success, error)
}
These lines of code request authorization from HealthKit and then call your completion handler. They use the success and error variables passed in from HKHealthStore’s requestAuthorization(toShare: read: completion:) method.
You can think of it as a redirect. Instead of handling the completion inside of HealthKitSetupAssistant, you are passing the buck to a view controller that can present an alert or take some other action.
The starter project already has an Authorize HealthKit button for this, and it invokes the method authorizeHealthKit() in MasterViewController. That sounds like the perfect place to call the new authorization method you just wrote.
Open MasterViewController.swift, locate authorizeHealthKit() and paste this code into the body:
HealthKitSetupAssistant.authorizeHealthKit { (authorized, error) in

  guard authorized else {

    let baseMessage = "HealthKit Authorization Failed"

    if let error = error {
      print("\(baseMessage). Reason: \(error.localizedDescription)")
    } else {
      print(baseMessage)
    }

    return
  }

  print("HealthKit Successfully Authorized.")
}
This code uses the authorizeHealthKit(completion:) method you just implemented. When it is finished, it prints a message to the console to let you know if HealthKit was successfully authorized.
Build and run. Tap Authorize HealthKit in the main view, and you will see an authorization screen pop up:

Turn on all the switches, scrolling the screen to see all of them, and click Allow. You’ll see a message like this in Xcode’s console:
HealthKit Successfully Authorized.
Great! Your app has access to HealthKit’s central repository. Now it’s time to start tracking things.
Characteristics and Samples
In this section, you will learn:
- How to read your user’s biological characteristics.
- How to read and write different types of samples (weight, height, etc.)
Biological characteristics tend to be the kinds of things that don’t change, like your blood type. Samples represent things that often do change, like your weight.
In order to properly track the effectiveness of a Prancercise workout regimen, the Prancercise Tracker app needs to get a sample of your user’s weight and height. Put together, these samples can be used to calculate Body Mass Index (BMI).
Note: Body Mass Index (BMI) is a widely used indicator of body fat, and it’s calculated from the weight and height of a person. Learn more about it here.
Reading Characteristics
The Prancercise Tracker app doesn’t write biological characteristics. It reads them from HealthKit. That means those characteristics need to be stored in HeathKit’s central repository first.
If you haven’t already done this, it’s time to tell HeathKit some more about yourself.
Open the Health App on your device or in the simulator. Select the Health Data tab. Then tap on the profile icon in the top right hand corner to view your health profile. Hit Edit, and enter information for Date of Birth, Sex, Blood Type:
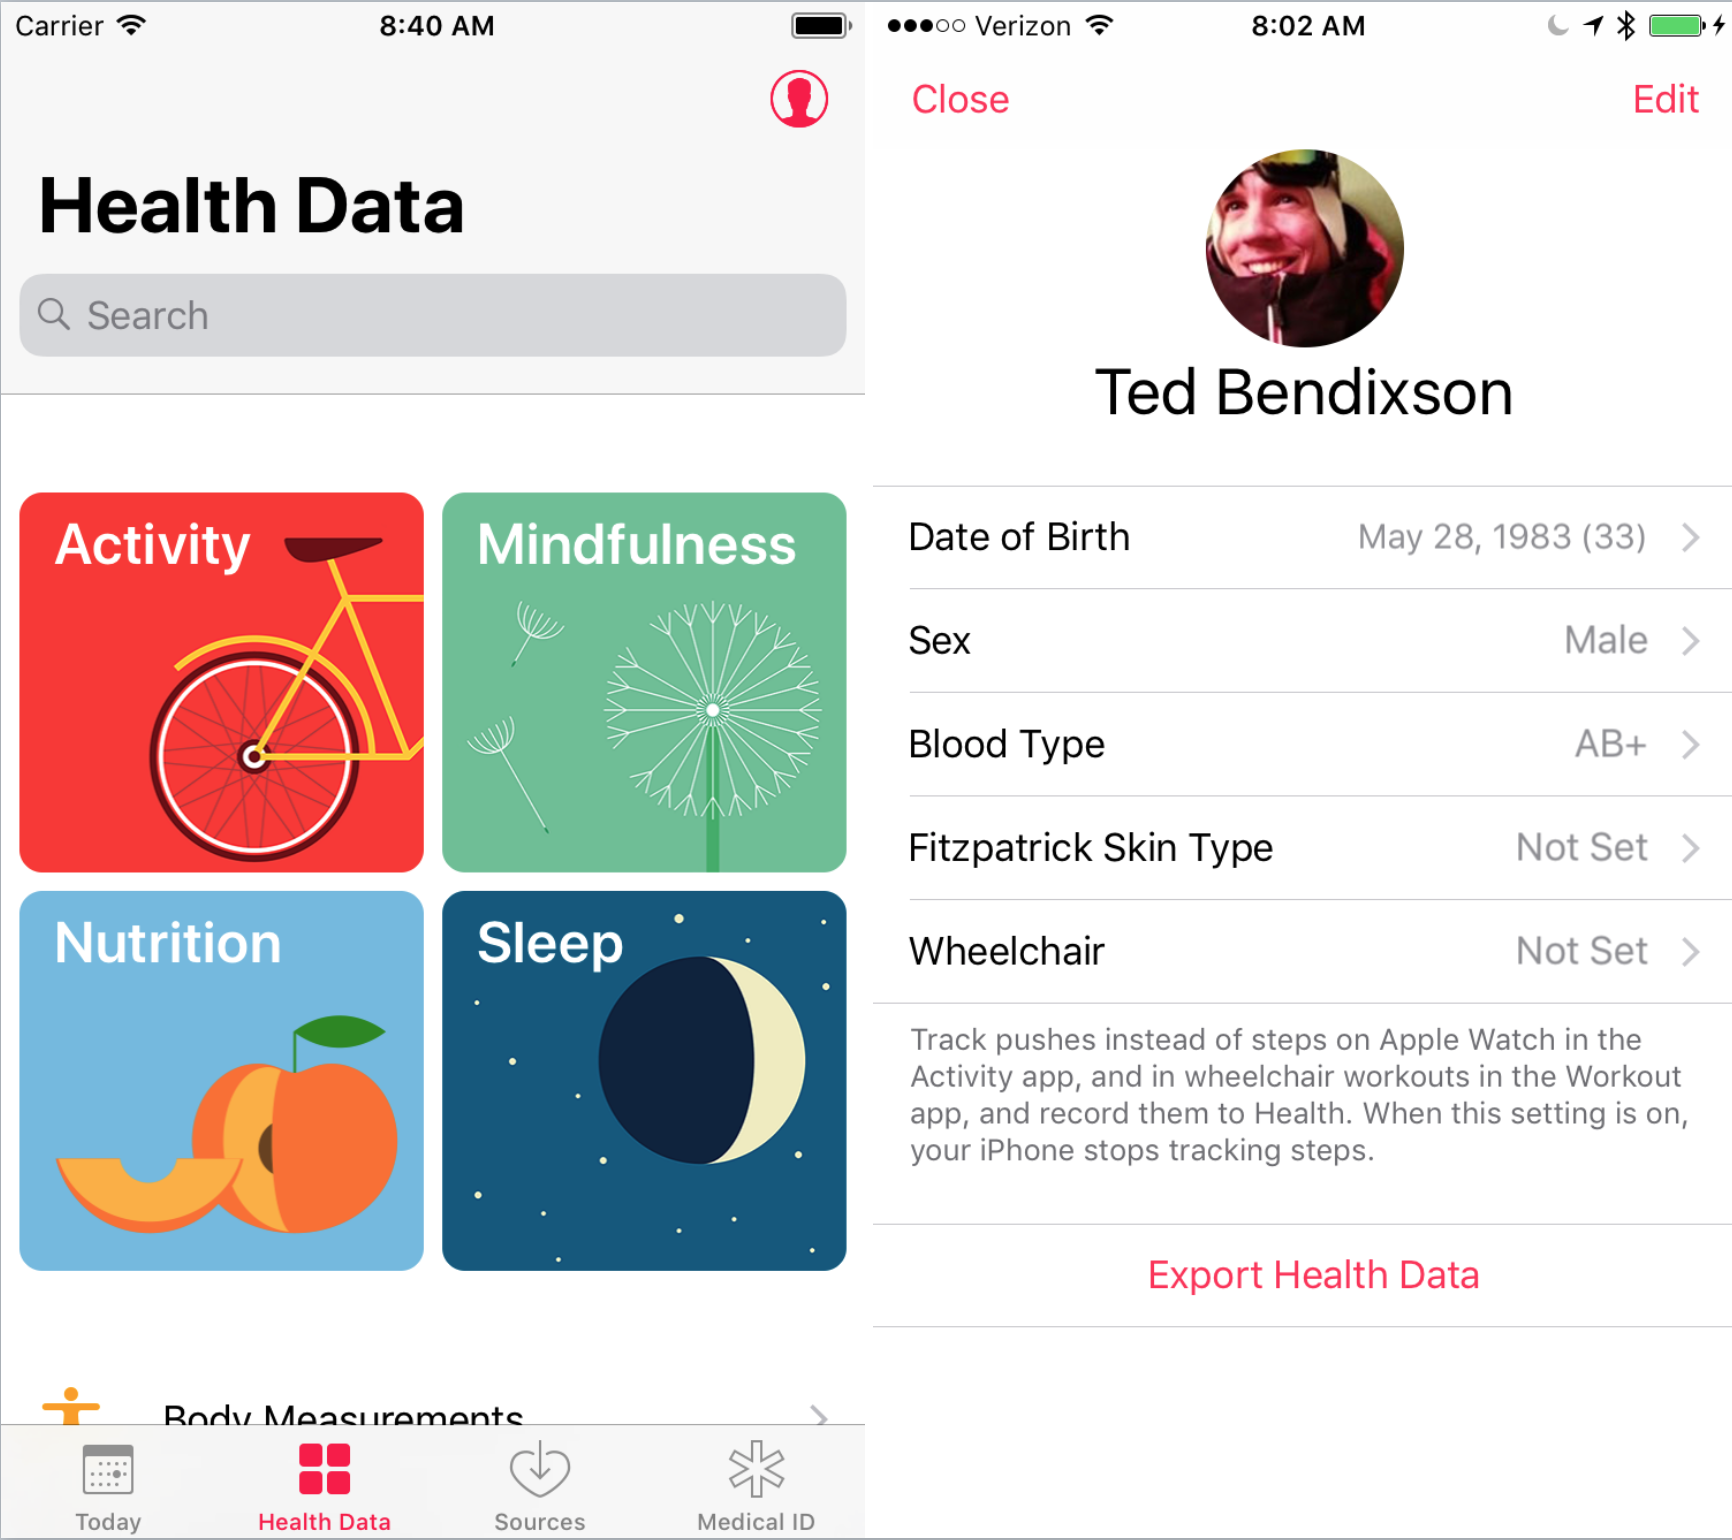
Now that HealthKit knows your Date of Birth, Sex, and Blood Type, it’s time to read those characteristics into Prancercise Tracker.
Go back to Xcode and open ProfileDataStore.swift. The ProfileDataStore class represents your point of access to all of the health-related data for your users.
Paste the following method into ProfileDataStore:
class func getAgeSexAndBloodType() throws -> (age: Int,
                                              biologicalSex: HKBiologicalSex,
                                              bloodType: HKBloodType) {

  let healthKitStore = HKHealthStore()

  do {

    //1. This method throws an error if these data are not available.
    let birthdayComponents =  try healthKitStore.dateOfBirthComponents()
    let biologicalSex =       try healthKitStore.biologicalSex()
    let bloodType =           try healthKitStore.bloodType()

    //2. Use Calendar to calculate age.
    let today = Date()
    let calendar = Calendar.current
    let todayDateComponents = calendar.dateComponents([.year],
                                                        from: today)
    let thisYear = todayDateComponents.year!
    let age = thisYear - birthdayComponents.year!

    //3. Unwrap the wrappers to get the underlying enum values.
    let unwrappedBiologicalSex = biologicalSex.biologicalSex
    let unwrappedBloodType = bloodType.bloodType

    return (age, unwrappedBiologicalSex, unwrappedBloodType)
  }
}
The getAgeSexAndBloodType() method accesses HKHealthStore, asks for the user’s date of birth, biological sex, and blood type. It also calculates the user’s age using the date of birth.
- You may have noticed this method can throw an error. It happens whenever the date of birth, biological sex, or blood type haven’t been saved in HealthKit’s central repository. Since you just entered this information into your Health app, no error should be thrown.
- Using the
Calendarclass, you can transform any given date into a set of Date Components. These are really handy when you want to get the year for a date. This code simply gets your birth year, the current year, and then calculates the difference. - The “unwrapped” variables are named that way to make it clear that you have to access the underlying enum from a wrapper class (
HKBiologicalSexObjectandHKBloodTypeObject).
Updating The User Interface
If you were to build and run now, you wouldn’t see any change to the UI because you haven’t connected this logic to it yet.
Open ProfileViewController.swift and find the loadAndDisplayAgeSexAndBloodType() method.
This method will use your ProfileDataStore to load the biological characteristics into the user interface.
Paste the following lines of code into the loadAndDisplayAgeSexAndBloodType() method:
do {
  let userAgeSexAndBloodType = try ProfileDataStore.getAgeSexAndBloodType()
  userHealthProfile.age = userAgeSexAndBloodType.age
  userHealthProfile.biologicalSex = userAgeSexAndBloodType.biologicalSex
  userHealthProfile.bloodType = userAgeSexAndBloodType.bloodType
  updateLabels()
} catch let error {
  self.displayAlert(for: error)
}
This block of code loads age, sex, and blood type as a tuple. It then sets those fields on a local instance of the UserHealthProfile model. Finally, it updates the user interface with the new fields on UserHealthProfile by calling the updateLabels() method.
Because ProfileDataStore’s getAgeSexAndBloodType() method can throw an error, your ProfileViewController has to handle it. In this case, you simply take the error and present it inside of an alert with an “O.K.” button.
All of this is great, but there’s one catch. The updateLabels() method doesn’t do anything yet. It’s just an empty declaration. Let’s hook it up to the user interface for real this time.
Locate the updateLabels() method and paste these lines of code into its body:
if let age = userHealthProfile.age {
  ageLabel.text = "\(age)"
}

if let biologicalSex = userHealthProfile.biologicalSex {
  biologicalSexLabel.text = biologicalSex.stringRepresentation
}

if let bloodType = userHealthProfile.bloodType {
  bloodTypeLabel.text = bloodType.stringRepresentation
}
This code is pretty straightforward. If you user has set an age, it will get formatted an put into the label. The same goes for biological sex and bloodType. The stringRepresentation variable converts the enum to a string for display purposes.
Build and run the app. Go into the Profile & BMI screen. Tap on the Read HealthKit Data button.

If you entered your information into the Health app earlier, it should appear in the labels on this screen. If you didn’t, you will get an error message.
Cool! You’re reading and displaying data directly from HealthKit.