How to Create a Simple FPS in Unreal Engine 5
In this Unreal Engine 5 tutorial, you’ll create a simple first-person shooter while learning how to create a first-person character equipped with a gun, and you’ll learn how to apply damage to other actors in your game. By Ricardo Santos.
Decreasing the Fire Rate
First, you need a variable to decide if the player can shoot. Open BP_Player and create a Boolean variable named CanShoot. Set its default value to true. If CanShoot equals true, the player can shoot and vice versa.
Drag the CanShoot variable into the blueprint graph and place a node to get its value. Click-drag from this variable, type AND, and select the corresponding logical operation. Change the Branch section to:
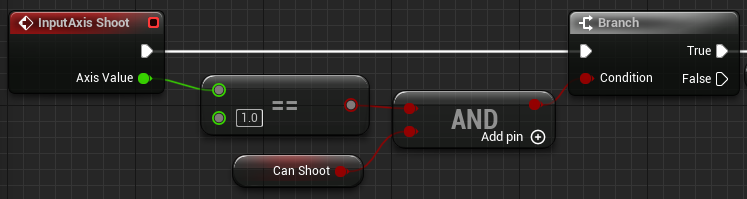
Now, the player can only shoot if the Shoot key is being pressed and CanShoot equals true.
After the gun shoots, it needs a cooldown time. So, you need to add some more nodes after the Shoot function. To do that, click-drag from the arrow on the Shoot function call, and type CanShoot to add a SetCanShoot node. Make sure to leave the checkbox on this node unchecked to set the variable to false. Next, click-drag from the SetCanShoot arrow, add a Delay node and a SetCanShoot node. Now, make sure the checkbox is checked to set the variable to true, allowing the next shot to be fired. Remember that the gun has a FireRate variable? Get the FireRate variable from EquippedGun the same way you got MaxBulletDistance. The final result should look like this:
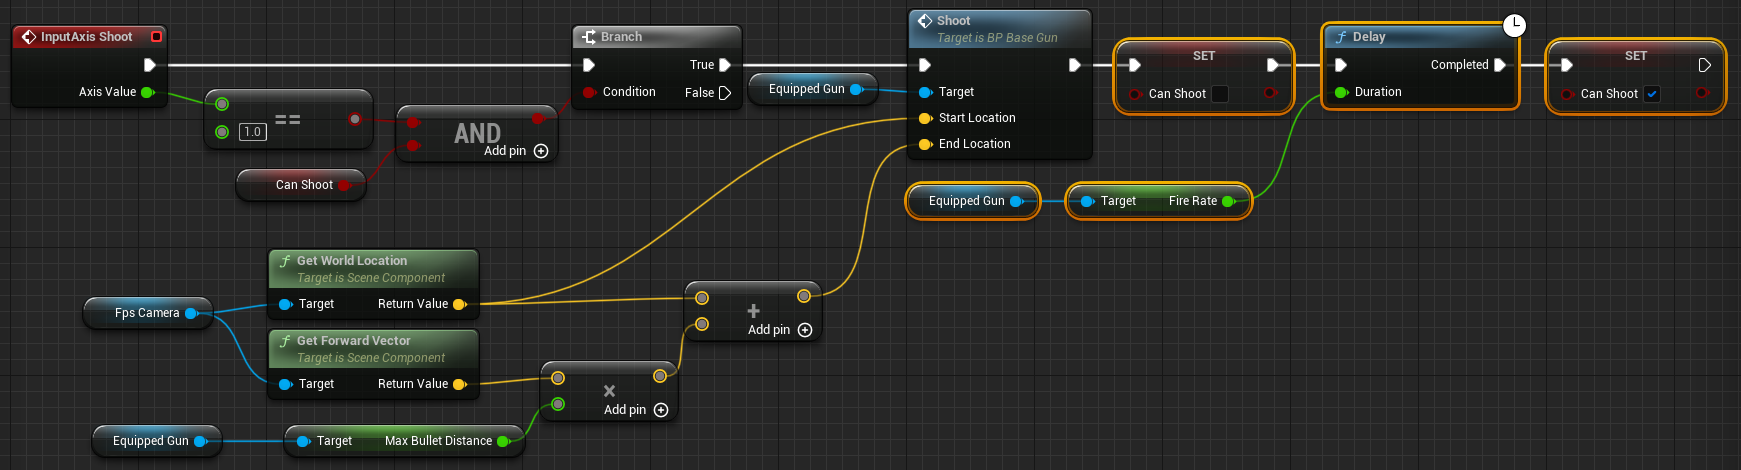
You’ve just made the following changes:
- The player can only shoot if holding left-click and CanShoot equals true.
- Once the player shoots a bullet, CanShoot is set to false. This prevents the player from shooting again.
- CanShoot is set back to true after the duration provided by FireRate.
Click Compile, and then close BP_Player. Press Play, and test out the new fire rate.
Next, you’ll make the targets and button respond to bullets by applying damage to them.
Applying Damage
In Unreal, every actor has the ability to receive damage. However, it’s up to you to decide how the actor responds to it.
For example, when receiving damage, a fighting game character would lose health. However, something like a balloon wouldn’t have health — you’d program it to pop when receiving damage.
Before you handle how the actor receives damage, you first need to apply damage. Open BP_BaseGun, and add an Apply Damage at the end of the Shoot function.

Next, you need to specify that the actor hit by the line trace should receive damage. Connect Damaged Actor to Hit Actor of the Break Hit Result.

Finally, you need to specify how much damage to apply. Get a reference to Damage and connect it to Base Damage.

Now, when you call Shoot, it will damage any actors hit by the line trace. Click Compile, and then close BP_BaseGun.
Now, you need to handle how each actor receives damage.
Handling Damage
First, you’ll handle how the targets take damage. Open BP_Target, and create an Event AnyDamage. This event executes whenever the actor receives damage that’s not zero.

Next, call the TakeDamage function and connect the Damage pins. This subtracts health from the target’s Health variable and updates the target’s color.
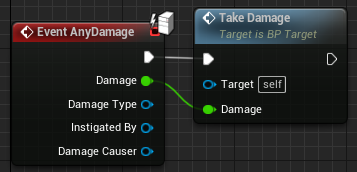
Now, when the target takes damage, it loses health. Click Compile, then close BP_Target.
Next, you need to handle how the button takes damage. Open BP_ResetButton and create an Event AnyDamage. Then, call the ResetTargets function.
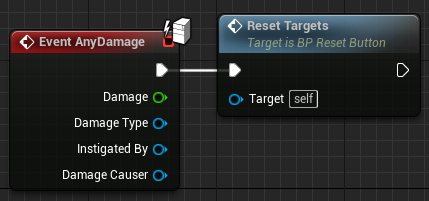
This resets all the targets when the button receives damage. Click Compile, and then close BP_ResetButton.
Press Play, and start shooting the targets. To reset the targets, shoot the button.
Where to Go From Here?
You can download the completed project files by clicking Download Materials at the top or bottom of the tutorial.
You now have an FPS base that you can easily expand on. Try creating more guns with different types of fire rates and damage. Maybe try adding reload functionality too!
We hope you enjoyed this tutorial, and if you have any questions or comments, please join the forum discussion below!