Person Segmentation in the Vision Framework
Learn how to use person segmentation via the Vision framework. By Vidhur Voora.
Displaying the Photo Greeting
Replace // TODO: Blend images in generatePhotoGreeting(greeting:) and add the following:
// 1
guard let output = blendImages(
  background: background,
  foreground: foreground,
  mask: maskImage) else {
    print("Error blending images")
    return
  }

// 2
if let photoResult = renderAsUIImage(output) {
  self.photoOutput = photoResult
}
Here’s what’s happening:
-
blendImages(background:foreground:mask:)blends the images and ensures the output isn’tnil. - Then, you convert the output to an instance of a
UIImageand set it tophotoOutput.photoOutputis a published property. It’s accessed to display the output in PhotoGreetingView.swift.
As a last step, open PhotoGreetingView.swift. Replace // TODO: Generate Photo Greeting in the action closure of Button with the following:
GreetingProcessor.shared.generatePhotoGreeting(greeting: greeting)
Here, you call generatePhotoGreeting(greeting:) to generate the greeting when Button is tapped.
Build and run on a physical device. Tap Generate Photo Greeting.

Voila! You’ve now added a custom background to your family pic. It’s time to send that to your friends and family. :]
By default, you get the best quality person segmentation. It does have a high processing cost and might not be suitable for all real-time scenarios. It’s essential to know the different quality and performance options available. You’ll learn that next.
Quality and Performance Options
The person segmentation request you created earlier has a default quality level of VNGeneratePersonSegmentationRequest.QualityLevel.accurate.
You can choose from three quality levels:
-
accurate: Ideal in the scenario where you want to get the highest quality and aren’t constrained by time. -
balanced: Ideal for processing frames for video. -
fast: Best suited for processing streaming content.

The quality of the generated mask depends on the quality level set.
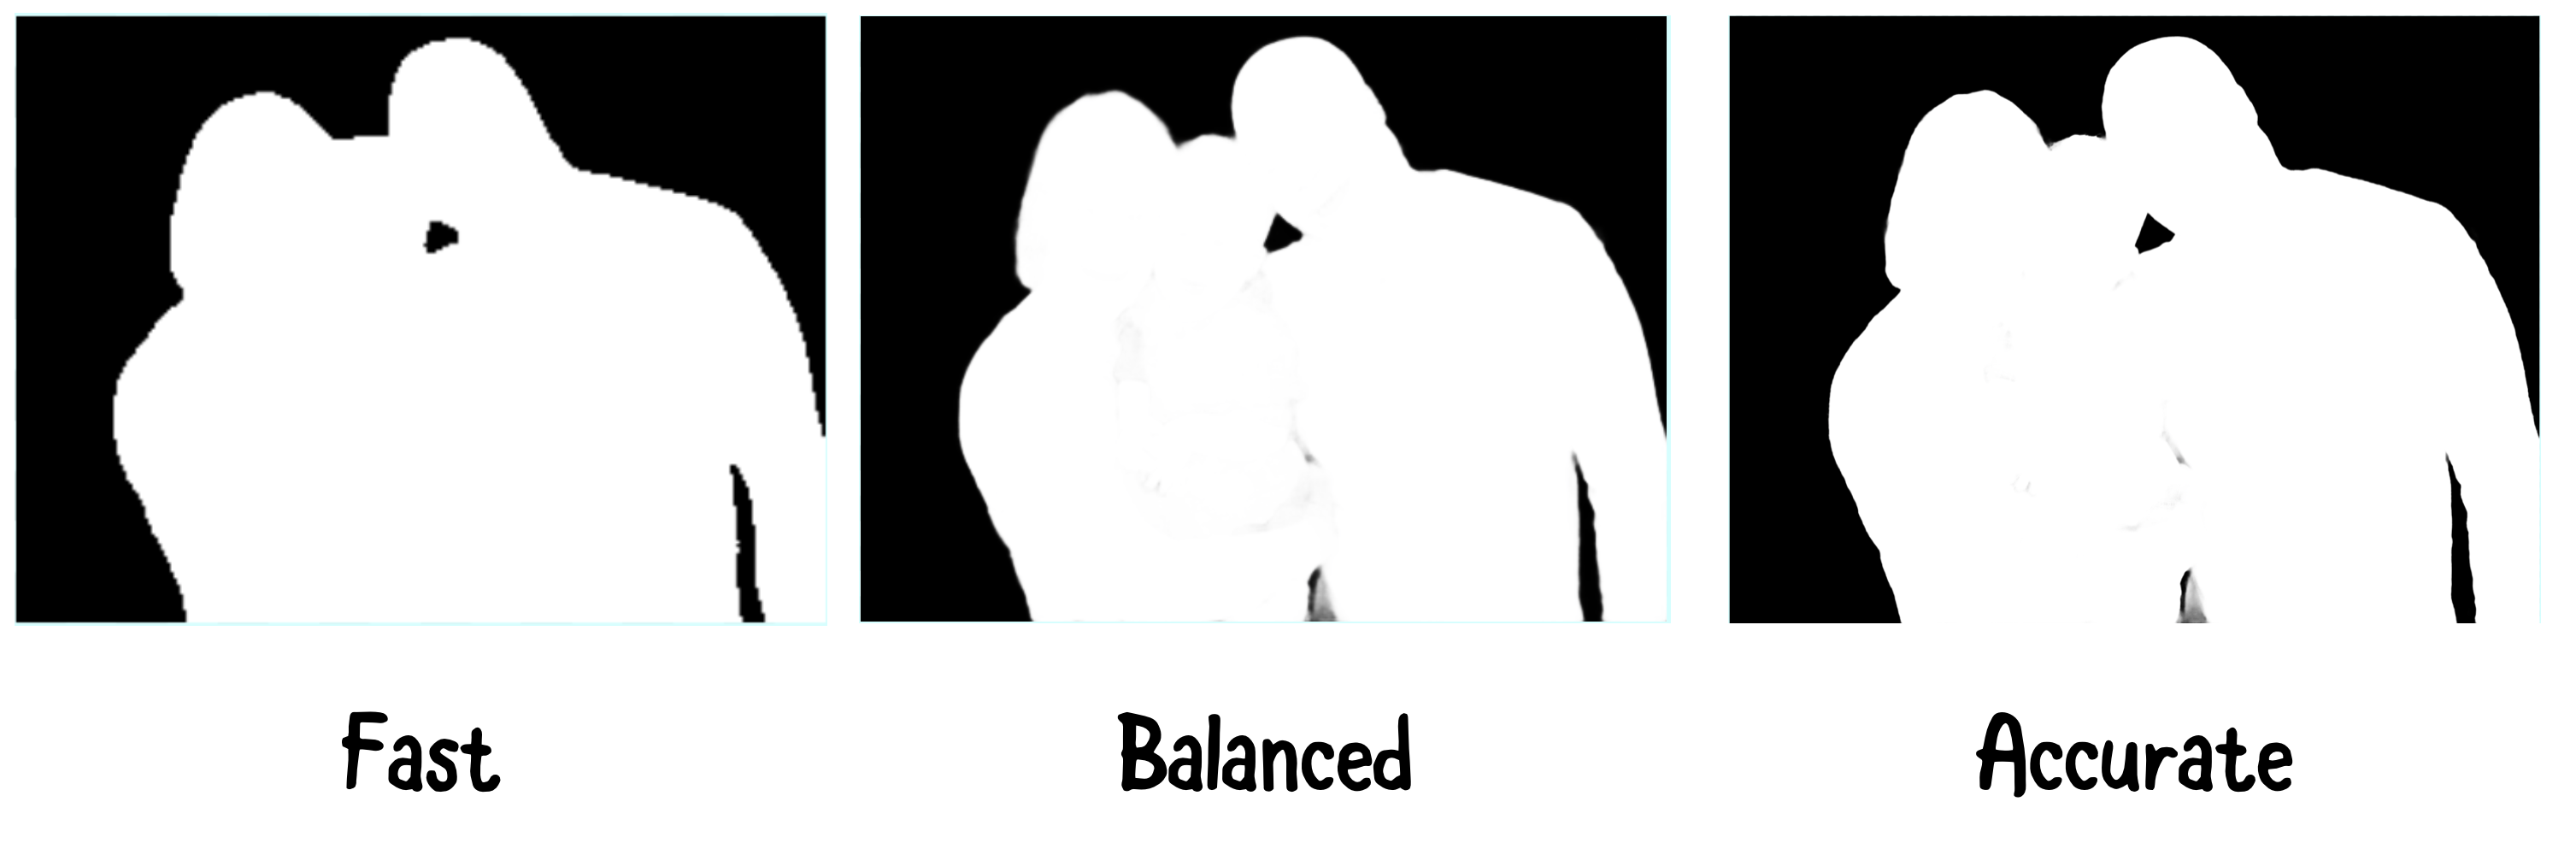
Notice that as the quality level increases, the quality of the mask looks much better. Accurate quality shows more granular details in the mask. The frame size, memory and time to process vary depending on the quality level.

The frame size for the accurate level is a whopping 64x compared to the fast quality level. The memory and the time to process for an accurate level are much higher when compared to the fast and balanced levels. This represents the trade-off on the quality of the mask and the resources needed to generate it.
Now that you know the trade-off, it’s time to generate a fun video greeting! :]
Creating Video Greeting
Open CameraViewController.swift. It has all the functionality set up to capture camera frames and render them using Metal. To learn more about setting up a camera with AVFoundation and SwiftUI, check out this tutorial and this video series.
Check out the logic in CameraViewController, which conforms to AVCaptureVideoDataOutputSampleBufferDelegate.
extension CameraViewController: AVCaptureVideoDataOutputSampleBufferDelegate {
  func captureOutput(_ output: AVCaptureOutput,
                     didOutput sampleBuffer: CMSampleBuffer,
                     from connection: AVCaptureConnection) {
    // Grab the pixelbuffer frame from the camera output
    guard let pixelBuffer = sampleBuffer.imageBuffer else {
      return
    }
    self.currentCIImage = CIImage(cvPixelBuffer: pixelBuffer)
  }
}
Here, notice that pixelBuffer is retrieved from sampleBuffer. It’s then rendered by updating currentCIImage. Your goal is to use this pixelBuffer as the foreground image and create a video greeting.
Open GreetingProcessor.swift and add the following to GreetingProcessor:
func processVideoFrame(
  foreground: CVPixelBuffer,
  background: CGImage
) -> CIImage? {
  let ciForeground = CIImage(cvPixelBuffer: foreground)

  // TODO: person segmentation request

  return nil
}
Here, you create an instance of CIImage from the foreground CVPixelBuffer so you can blend the images using Core Image filter.
So far, you’ve used the Vision framework to create, process and handle the person segmentation request. Although it’s easy to use, other frameworks offer similar functionality powered by the same technology. You’ll learn this next.
Alternatives for Generating Person Segmentation
You can use these frameworks as alternatives to Vision for generating a person segmentation mask:
-
AVFoundation: Can generate a person segmentation mask on certain newer devices when capturing a photo. You can get the mask via the
portraitEffectsMatteproperty ofAVCapturePhoto. -
ARKit: Generates the segmentation mask when processing the camera feed. You can get the mask using the
segmentationBufferproperty ofARFrame. It’s supported on devices that have A12 Bionic and later. -
Core Image: Core Image provides a thin wrapper over the Vision framework. It exposes the
qualityLevelproperty you set forVNGeneratePersonSegmentationRequest.
Next, you’ll use Core Image to generate a person segmentation mask for the video greeting.
Using Core Image to Generate Person Segmentation Mask
Replace // TODO: person segmentation request in processVideoFrame(foreground:background:) with the following:
// 1
let personSegmentFilter = CIFilter.personSegmentation()
personSegmentFilter.inputImage = ciForeground
personSegmentFilter.qualityLevel = 1

// 2
if let mask = personSegmentFilter.outputImage {
  guard let output = blendImages(
    background: CIImage(cgImage: background),
    foreground: ciForeground,
    mask: mask) else {
      print("Error blending images")
      return nil
    }
  return output
}
Here’s what that does:
Here, you set qualityLevel to 1.
- 0: Accurate
- 1 Balanced
- 2: Fast
- Creates
personSegmentFilterusing Core Image’sCIFilterand setsinputImagewith the foreground image. ThequalityLeveltakes in a number. The different quality level options are: - Fetches the mask from
outputImageofpersonSegmentationFilterand ensures it’s notnil. Then, it usesblendImages(background:foreground:mask:)to blend the images and return the result.
Open CameraViewController.swift. Replace the contents of captureOutput(_:didOutput:from:) in CameraViewController extension with the following:
// 1
guard
  let pixelBuffer = sampleBuffer.imageBuffer,
  let backgroundImage = self.background?.cgImage else {
  return
}

// 2
DispatchQueue.global().async {
  if let output = GreetingProcessor.shared.processVideoFrame(
    foreground: pixelBuffer,
    background: backgroundImage) {
    DispatchQueue.main.async {
      self.currentCIImage = output
    }
  }
}
Here’s a breakdown of the code above. It:
- Checks that
pixelBufferandbackgroundImageare valid. - Processes the video frame asynchronously by calling
processVideoFrame(foreground:background:)defined inGreetingProcessor. Then, it updatescurrentCIImagewith theoutput.
Build and run on a physical device. Tap the Video Greeting tab.

Oh no! There’s no visible camera stream. What happened?
Open GreetingProcessor.swift and put a breakpoint at guard let output = blendImages in processVideoFrame(foreground:background:). Notice the mask generated using Quick Look in the debugger.

The mask is red! You’ll need to create a Blend filter using the red mask instead of the regular white mask.
Update blendImages(background:foreground:mask:) to take a new Boolean parameter as shown below:
func blendImages(
  background: CIImage,
  foreground: CIImage,
  mask: CIImage,
  isRedMask: Bool = false
) -> CIImage? {
This uses isRedMask to determine the type of blend filter to generate. By default, its value is false.
Replace let blendFilter = CIFilter.blendWithMask() in blendImages(background:foreground:mask:isRedMask:) as shown below:
let blendFilter = isRedMask ?
CIFilter.blendWithRedMask() :
CIFilter.blendWithMask()
Here, you generate blendFilter with a red mask if isRedMask is true. Otherwise, you create with a white mask.
Next, replace:
guard let output = blendImages(
  background: CIImage(cgImage: background),
  foreground: ciForeground,
  mask: mask) else {
in processVideoFrame(foreground:background:) with the following:
guard let output = blendImages(
  background: CIImage(cgImage: background),
  foreground: ciForeground,
  mask: mask,
  isRedMask: true) else {
Here, you specify to generate the blend filter with a red mask.
Build and run on a physical device. Tap Video Greeting and point the front camera toward you.

You now see your image overlaid on a friendly greeting. Great job creating a video greeting!
You can now create a Zoom blur background filter. :]