Overlay Images and Overlay Views with MapKit Tutorial
In this tutorial, you create an app for the Six Flags Magic Mountain amusement park using the latest version of MapKit. If you’re a roller coaster fan in the LA area, you’ll be sure to appreciate this app :] By Cesare Rocchi.
Circle In The Sand - MKCircle
MKCircle is again very similar to MKPolyline and MKPolygon, except that it draws a circle, given a coordinate point as the center of the circle, and a radius that determines the size of the circle.
You can easily imagine that users would like to mark on the map where they spotted a character in the park, and have that information communicated to other app users in the park. As well, the radius of the circle representing a character could change, depending on how long it has been since that character was last spotted.
You won't go quite that far in this tutorial, but at the very least, you can load up some sample character coordinate data from a file and draw some circles on the map to simulate the location of those characters.
The MKCircle overlay is a very easy way to implement this functionality .
The resources for this tutorial contains the character location files (character-locations.zip), so make sure they're added to your project.
Each file is an array of a few coordinates where characters have been spotted:
<?xml version="1.0" encoding="UTF-8"?>
<!DOCTYPE plist PUBLIC "-//Apple//DTD PLIST 1.0//EN" "http://www.apple.com/DTDs/PropertyList-1.0.dtd">
<plist version="1.0">
<array>
        <string>{34.42481,-118.596914}</string>
        <string>{34.423383,-118.596101}</string>
        <string>{34.423628,-118.595197}</string>
        <string>{34.421832,-118.595404}</string>
</array>
</plist>
Characters will be represented by a class named PVCharacter. So create a new class under the Models group called PVCharacter as a subclass of MKCircle.
Then replace PVCharacter.h with the following:
#import <Foundation/Foundation.h>
#import <MapKit/MapKit.h>

@interface PVCharacter : MKCircle <MKOverlay>

@property (nonatomic, strong) NSString *name;
@property (nonatomic, strong) UIColor *color;

@end
The new class that you just added conforms to the MKOverlay protocol, and defines two properties: name and color.
The implementation is extremely simple — nothing additional is required.
#import "PVCharacter.h"

@implementation PVCharacter

@end
Import PVCharacter.h in PVParkMapViewController.m as in the code below:
#import "PVCharacter.h"
Now you need a method to add the character based on the data in the plist file. Add the following code to PVParkMapViewController.m:
- (void)addCharacterLocation {
    NSString *batmanFilePath = [[NSBundle mainBundle] pathForResource:@"BatmanLocations" ofType:@"plist"];
    NSArray *batmanLocations = [NSArray arrayWithContentsOfFile:batmanFilePath];
    CGPoint batmanPoint = CGPointFromString(batmanLocations[rand()%4]);
    PVCharacter *batman = (PVCharacter *)[PVCharacter circleWithCenterCoordinate:CLLocationCoordinate2DMake(batmanPoint.x, batmanPoint.y)
                                                                       radius:MAX(5, rand()%40)];
    batman.color = [UIColor blueColor];

    NSString *tazFilePath = [[NSBundle mainBundle] pathForResource:@"TazLocations" ofType:@"plist"];
    NSArray *tazLocations = [NSArray arrayWithContentsOfFile:tazFilePath];
    CGPoint tazPoint = CGPointFromString(tazLocations[rand()%4]);
    PVCharacter *taz = (PVCharacter *)[PVCharacter circleWithCenterCoordinate:CLLocationCoordinate2DMake(tazPoint.x, tazPoint.y)
                                                                       radius:MAX(5, rand()%40)];
    taz.color = [UIColor orangeColor];

    NSString *tweetyFilePath = [[NSBundle mainBundle] pathForResource:@"TweetyBirdLocations" ofType:@"plist"];
    NSArray *tweetyLocations = [NSArray arrayWithContentsOfFile:tweetyFilePath];
    CGPoint tweetyPoint = CGPointFromString(tweetyLocations[rand()%4]);
    PVCharacter *tweety = (PVCharacter *)[PVCharacter circleWithCenterCoordinate:CLLocationCoordinate2DMake(tweetyPoint.x, tweetyPoint.y)
                                                                       radius:MAX(5, rand()%40)];
    tweety.color = [UIColor yellowColor];

    [self.mapView addOverlay:batman];
    [self.mapView addOverlay:taz];
    [self.mapView addOverlay:tweety];
}
The method above performs pretty much the same operations for each character. First, it reads in the data from the plist file and selects a random location from the four locations in the file. Next, it creates an instance of PVCharacter at the previously chosen random location, and sets the radius to a random value to simulate the time variance.
Finally, each character is assigned a color and added to the map as an overlay.
You're almost done — can you recall what the last few steps should be?
Right — you still need to provide the map view with an MKOverlayView, which is done through the delegate method.
Update the delegate delegate method in PVParkMapViewController.m to reflect the following:
- (MKPolylineRenderer *)mapView:(MKMapView *)mapView rendererForOverlay:(id<MKOverlay>)overlay {
    if ([overlay isKindOfClass:PVParkMapOverlay.class]) {
        UIImage *magicMountainImage = [UIImage imageNamed:@"overlay_park"];
        PVParkMapOverlayView *overlayView = [[PVParkMapOverlayView alloc] initWithOverlay:overlay overlayImage:magicMountainImage];

        return overlayView;
    } else if ([overlay isKindOfClass:MKPolyline.class]) {
        MKPolylineRenderer *lineView = [[MKPolylineRenderer alloc] initWithOverlay:overlay];
        lineView.strokeColor = [UIColor greenColor];

        return lineView;
    } else if ([overlay isKindOfClass:MKPolygon.class]) {
        MKPolygonRenderer *polygonView = [[MKPolygonRenderer alloc] initWithOverlay:overlay];
        polygonView.strokeColor = [UIColor magentaColor];

        return polygonView;
    } else if ([overlay isKindOfClass:PVCharacter.class]) {
        MKCircleRenderer *circleView = [[MKCircleRenderer alloc] initWithOverlay:overlay];
        circleView.strokeColor = [(PVCharacter *)overlay color];

        return circleView;
    }

    return nil;
}
And finally, update loadSelectedOptions to give the user an option to turn the character locations on or off.
Update loadSelectedOptions (still in PVParkMapViewController.m) to reflect the following changes:
- (void)loadSelectedOptions {
    [self.mapView removeAnnotations:self.mapView.annotations];
    [self.mapView removeOverlays:self.mapView.overlays];
    for (NSNumber *option in self.selectedOptions) {
        switch ([option integerValue]) {
            case PVMapOverlay:
                [self addOverlay];
                break;
            case PVMapPins:
                [self addAttractionPins];
                break;
            case PVMapRoute:
                [self addRoute];
                break;
            case PVMapBoundary:
                [self addBoundary];
                break;
            case PVMapCharacterLocation:
                [self addCharacterLocation];
                break;
            default:
                break;
        }
    }
}
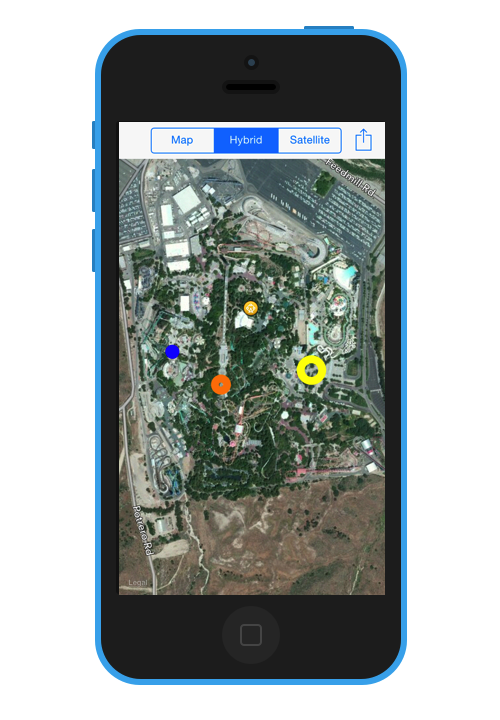
Build and run the app, and turn on the character overlay to see where everyone is hiding out!
Where to Go From Here?
That's it for this tutorial - at this point you know all about making custom Overlay Images and Overlay Views with MapKit maps.
Here's the final example project that you developed in the tutorial.
Congratulations - you've worked with some of the most important functionality that MapKit provides. With a few basic functions, you've implemented a full-blown and practical mapping application complete with annotations, satellite view, and custom overlays!
One direction to take this app is to investigate other ways of creating map overlays.
There are many different ways to generate overlays that range from very easy, to the very complex. The approach in this tutorial that was taken for the overlay_park image provided in this tutorial was the easy — yet tedious — route.
To generate the overlay, a screenshot of a satellite view of the park was used as a bottom layer in a graphics tool. The roller coasters, building locations, trees, parking lot, and other details were traced onto a new layer.
When the satellite screenshot was taken, notes were made of the latitude and longitude values of the four corners of the rectangular screenshot. These coordinates were then used to create the park's property list which is used to position the overlay on the map view.
There are much more advanced — and perhaps more efficient — methods to create overlays. A few alternate methods are to use KML files, MapBox tiles, or other 3rd party provided resources.
This tutorial didn't delve into these overlay types in order to remain focused on the task of demonstrating the MapKit framework and APIs. But if you are serious about developing mapping apps, then you would do well to investigate these other options, and discover how to hook them into your apps!
I hope you enjoyed this tutorial, and I hope to see you use MapKit overlays in your own apps. If you have any questions or comments, please join the forum discussion below!