Overlay Images and Overlay Views with MapKit Tutorial
In this tutorial, you create an app for the Six Flags Magic Mountain amusement park using the latest version of MapKit. If you’re a roller coaster fan in the LA area, you’ll be sure to appreciate this app :] By Cesare Rocchi.
I Walk The Line - MKPolyline
If you've ever been to Magic Mountain, you know that the Goliath hypercoaster is an incredible ride, and some riders like to make a beeline for it once they walk in the gate! :]
To help out these riders, you'll plot a path from the entrance of the park to the Goliath.
MKPolyline is a great solution for drawing a path that connects multiple points, such as plotting a non-linear route from point A to point B. You'll use MKPolyline in your app to draw the route that the Goliath fans should follow to ensure they get to the ride as quickly as possible!
To draw a polyline, you need a series of longitude and latitude coordinates in the order that they should be plotted. Order is important here — otherwise, you'll have a meandering mess of connected points, which won't do your riders any good!
The resources for this tutorial contains a file called EntranceToGoliathRoute.plist that contains the path information, so add it to your project.
The contents of the plist file are as follows:
<?xml version="1.0" encoding="UTF-8"?>
<!DOCTYPE plist PUBLIC "-//Apple//DTD PLIST 1.0//EN" "http://www.apple.com/DTDs/PropertyList-1.0.dtd">
<plist version="1.0">
<array>
	<string>{34.42367,-118.594836}</string>
	<string>{34.423597,-118.595205}</string>
	<string>{34.423004,-118.59537}</string>
	<string>{34.423044,-118.595806}</string>
	<string>{34.423419,-118.596126}</string>
	<string>{34.423569,-118.596229}</string>
	<string>{34.42382,-118.596192}</string>
	<string>{34.42407,-118.596283}</string>
	<string>{34.424323,-118.596534}</string>
	<string>{34.42464,-118.596858}</string>
	<string>{34.42501,-118.596838}</string>
	<string>{34.42537,-118.596688}</string>
	<string>{34.425690,-118.596683}</string>
	<string>{34.42593,-118.596806}</string>
	<string>{34.42608,-118.597101}</string>
	<string>{34.42634,-118.597094}</string>
</array>
</plist>
The property list is simply an array of strings that have the longitude and latitude coordinates of each of the points in the path.
Now you need a way to read in that plist file and create the route for the riders to follow.
Add the following code to PVParkMapViewController.m:
- (void)addRoute {
    NSString *thePath = [[NSBundle mainBundle] pathForResource:@"EntranceToGoliathRoute" ofType:@"plist"];
    NSArray *pointsArray = [NSArray arrayWithContentsOfFile:thePath];

    NSInteger pointsCount = pointsArray.count;

    CLLocationCoordinate2D pointsToUse[pointsCount];

    for(int i = 0; i < pointsCount; i++) {
        CGPoint p = CGPointFromString(pointsArray[i]);
        pointsToUse[i] = CLLocationCoordinate2DMake(p.x,p.y);
    }

    MKPolyline *myPolyline = [MKPolyline polylineWithCoordinates:pointsToUse count:pointsCount];

    [self.mapView addOverlay:myPolyline];
}
This method reads EntranceToGoliathRoute.plist, and enumerates over the contained array where it converts the individual coordinate strings to CLLocationCoordinate2D structures.
It's remarkable how simple it is to implement your polyline in your app; you simply create an array containing all of the points, and pass it to MKPolyline! It doesn't get much easier than that.
Now you need to add an option to allow the user to turn the polyline path on or off.
Update loadSelectedOptions to match the code below:
- (void)loadSelectedOptions {
    [self.mapView removeAnnotations:self.mapView.annotations];
    [self.mapView removeOverlays:self.mapView.overlays];
    for (NSNumber *option in self.selectedOptions) {
        switch ([option integerValue]) {
            case PVMapOverlay:
                [self addOverlay];
                break;
            case PVMapPins:
                [self addAttractionPins];
                break;
            case PVMapRoute:
                [self addRoute];
                break;
            default:
                break;
        }
    }
}
Finally, to tie it all together, you need to update the delegate method to return the actual view to be rendered on the map view.
Update mapView:rendererForOverlay: to handle the case of a polyline overview, as follows:
- (MKOverlayRenderer *)mapView:(MKMapView *)mapView rendererForOverlay:(id<MKOverlay>)overlay {
    if ([overlay isKindOfClass:PVParkMapOverlay.class]) {
        UIImage *magicMountainImage = [UIImage imageNamed:@"overlay_park"];
        PVParkMapOverlayView *overlayView = [[PVParkMapOverlayView alloc] initWithOverlay:overlay overlayImage:magicMountainImage];

        return overlayView;
    } else if ([overlay isKindOfClass:MKPolyline.class]) {
        MKPolylineRenderer *lineView = [[MKPolylineRenderer alloc] initWithOverlay:overlay];
        lineView.strokeColor = [UIColor greenColor];

        return lineView;
    }

    return nil;
}
The process of displaying the polyline view is very similar to previous overlay views. However, in this case, you do not need to create any custom view objects. You simply use the MKPolyLineRenderer framework provided, and initialize a new instance with the overlay.
MKPolyLineRenderer also provides you with the ability to change certain attributes of the polyline. In this case, you've modified the the stroke color to show as green.
Build and run your app, enable the route option, and it should appear on the screen as in the screenshot below:
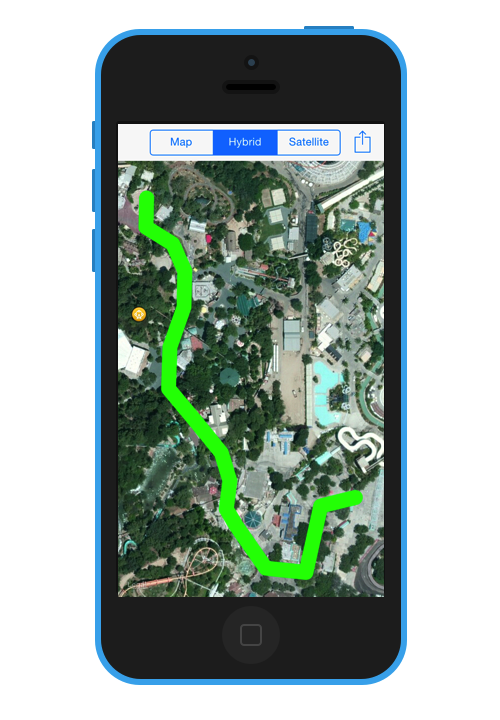
Goliath fanatics will now be able to make it to the coaster in record time! :]
It would be nice to show the park patrons where the actual park boundaries are, as the park doesn't actually occupy the entire space shown on the screen.
Although you could use MKPolyline to draw a shape around the park boundaries, MapKit provides another class that is specifically designed to draw closed polygons: MKPolygon.
Don't Fence Me In - MKPolygon
MKPolygon is remarkably similar to MKPolyline, except that the first and last points in the set of coordinates are connected to each other to create a closed shape.
You'll create an MKPolygon as an overlay that will show the park boundaries. The park boundary coordinates are already defined in the MagicMountain.plist; go back and look at initWithFilename: to see where the boundary points are read in from the plist file.
Add the following code to PVParkMapViewController.m:
- (void)addBoundary {
    MKPolygon *polygon = [MKPolygon polygonWithCoordinates:self.park.boundary
                                                     count:self.park.boundaryPointsCount];
    [self.mapView addOverlay:polygon];
}
The implementation of addBoundary above is pretty straightforward. Given the boundary array and point count from the park instance, you can quickly and easily create a new MKPolygon instance!
Can you guess the next step here? It's very similar to what you did for MKPolyline above.
Yep, that's right — update loadSelectedOptions to handle the new option of showing or hiding the park boundary, as shown below:
- (void)loadSelectedOptions {
    [self.mapView removeAnnotations:self.mapView.annotations];
    [self.mapView removeOverlays:self.mapView.overlays];
    for (NSNumber *option in self.selectedOptions) {
        switch ([option integerValue]) {
            case PVMapOverlay:
                [self addOverlay];
                break;
            case PVMapPins:
                [self addAttractionPins];
                break;
            case PVMapRoute:
                [self addRoute];
                break;
            case PVMapBoundary:
                [self addBoundary];
                break;
            default:
                break;
        }
    }
}
MKPolygon conforms to MKOverlay just as MKPolyline does, so you need to update the delegate method again.
Update the delegate method in PVParkMapViewController.m:
- (MKOverlayRenderer *)mapView:(MKMapView *)mapView rendererForOverlay:(id<MKOverlay>)overlay {
    if ([overlay isKindOfClass:PVParkMapOverlay.class]) {
        UIImage *magicMountainImage = [UIImage imageNamed:@"overlay_park"];
        PVParkMapOverlayView *overlayView = [[PVParkMapOverlayView alloc] initWithOverlay:overlay overlayImage:magicMountainImage];

        return overlayView;
    } else if ([overlay isKindOfClass:MKPolyline.class]) {
        MKPolylineRenderer *lineView = [[MKPolylineRenderer alloc] initWithOverlay:overlay];
        lineView.strokeColor = [UIColor greenColor];

        return lineView;
    } else if ([overlay isKindOfClass:MKPolygon.class]) {
        MKPolygonRenderer *polygonView = [[MKPolygonRenderer alloc] initWithOverlay:overlay];
        polygonView.strokeColor = [UIColor magentaColor];

        return polygonView;
    }

    return nil;
}
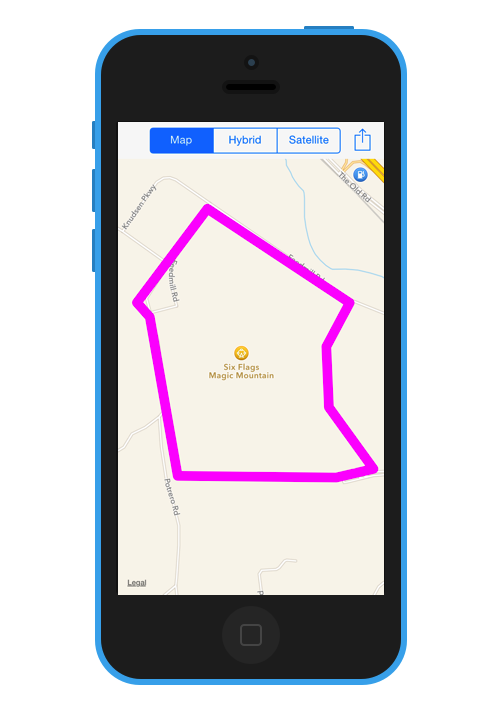
The update to the delegate method is as straightforward as before. You create an MKOverlayView as an instance of MKPolygonRenderer, and set the stroke color to magenta.
Run the app to see your new boundary in action!
That takes care of polylines and polygons. The last drawing method to cover is drawing circles as an overlay, which is neatly handled by MKCircle.