Create Your Own Level Editor: Part 2/3
In this second part of the tutorial, you will implement a portion of the editing capabilities of your level editor. You’ll work through adding popup menus, dynamically positioning and sizing your objects on screen, and much more. By Barbara Reichart.
Adding New Game Objects - Ropes
Adding new ropes to the level requires a little more thought. If you simply let the user add a rope wherever they want, most of the levels will be invalid since a rope needs to be connected to two different bodies. These bodies can either be two different pineapples, or a pineapple and the background.
You want to ensure that a user cannot create any invalid levels by creating ropes that aren't connected to two valid bodies.
One way to do this is to only accept a pineapple as the first anchor. You can then accept any other object, except the first pineapple, as the second anchor.
But how do you know which step the user is currently on so that you can determine whether you're placing the first or the second anchor?
You can use a state machine for this. Take a look at the following diagram that shows the state machine to be used in this project:
How to add a rope - presented to you by the state chart ;)
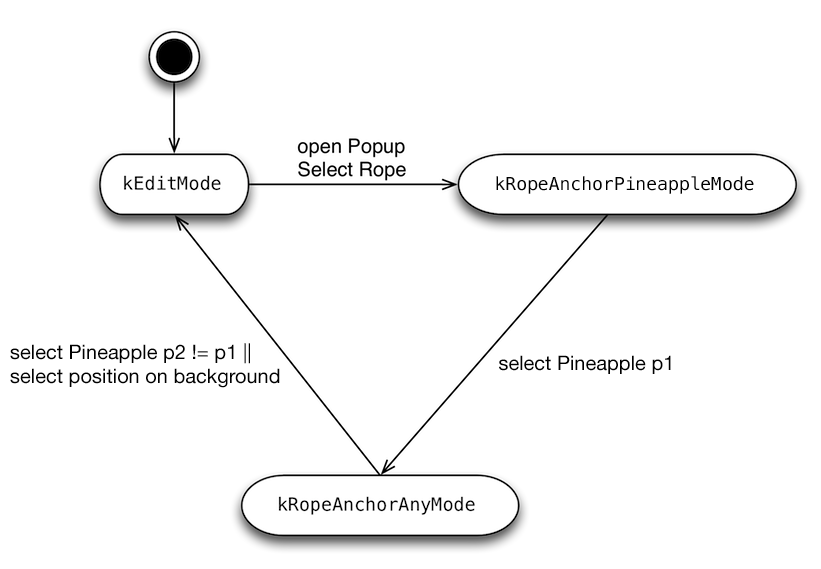
To implement this, you'll require three states:
- kEditMode, where the user can move objects, delete objects, and add new objects. As soon as the user choses to add a rope, the level editor switches to the second state.
- kRopeAnchorPineappleMode, where only pineapples can be selected. When a selection is made, the mode switches to the third state.
- kRopeAnchorAnyMode, where the user is limited to choosing between any pineapples other than the first one or any position on the background. Once a choice is made, the editor switches back to the first mode.
Switch to LevelEditor.mm and add the following code directly after the imports:
enum {
    kEditMode,
    kRopeAnchorPineappleMode,
    kRopeAnchorAnyMode
} typedef editorMode;
The code above creates an enum for the aforementioned states to simplify your implementation of the state machine.
Add the following code to the @interface block of LevelEditor.mm:
    editorMode mode;
    RopeModel* newRope;
Here, you add an instance variable that stores the current mode, along with a variable to store a reference to the new rope.
Although using states in your code to prevent the creation of invalid levels is useful, you should also indicate the current state to the user. By visually indicating state transitions to the user, it's readily apparent which mode they are currently working in and what actions they can perform.
You'll indicate the current state by adding a color effect to the screen. Red will indicate items that cannot be selected, and green for items that can be selected.
Add the following method to LevelEditor.mm:
-(void)setMode:(editorMode)newMode {
    mode = newMode;
    switch (mode) {
        case kRopeAnchorPineappleMode:
            background.color = kDefaultDisabledColor;
            for (CCSprite* pineapple in [pineapplesSpriteSheet children]) {
                pineapple.color = kDefaultSelectableColor;
            }
            break;
        case kRopeAnchorAnyMode:
            background.color = kDefaultSelectableColor;
            for (CCSprite* pineapple in [pineapplesSpriteSheet children]) {
                if (pineapple.tag == newRope.bodyAID) {
                    pineapple.color = kDefaultDisabledColor;
                } else {
                    pineapple.color = kDefaultSelectableColor;
                }
            }
            break;
        case kEditMode:
        default:
            background.color = kDefaultBackgroundColor;
            for (CCSprite* pineapple in [pineapplesSpriteSheet children]) {
                pineapple.color = ccc3(255, 255, 255);
            }
            break;
    }
}
So how does the code above work? First, you store the new mode, then you create a switch statement to distinguish between the three different states, where the kEditMode state is assumed to be the default.
For each state, you use CCSprite’s color property to color the object on the screen appropriately:
-
In state
kRopeAnchorPineappleMode, you set the background color to disabled, and enable all pineapples. - In state
kRopeAnchorMode, you change the coloring so that the background is now active, as well as all pineapples — except the one withnewRope's first anchor's ID. - Finally, in
kEditMode, set the background color and the color of all pineapples to their default color.
It's now time to see whether this code does actually what you want!
Find createRopeAt: in LevelEditor.mm and replace the current dummy implementation with the following:
-(void)createRopeAt:(CGPoint)position {
    [self setMode:kRopeAnchorPineappleMode];
    newRope = [[RopeModel alloc] init];
    [popupMenu setMenuEnabled:NO];
}
When the user decides to create a new rope, you set the mode to kRopeAnchorPineappleMode. This will highlight all of the pineapples, which indicates to the user that only these objects are available as the first anchor for the rope. Next, the new rope is set up with an empty model. Finally, you close the popup menu since it's not needed anymore.
Build and run your project, and select the rope in the popup menu. You'll see the background turn red and the pineapples all turn green, as in the screenshot below:

Well, that looks pretty neat, but you still can't actually add a new rope yet! Have a look at the state chart again and figure out what you have to do next:
How to add a rope - presented to you by the state chart ;)
Ah — you need to detect if the player touched a pineapple. To do this you'll need a method which takes a position on the screen as a parameter and returns the CCSprite containing the pineapple at that position.
Add the following code to LevelEditor.mm:
-(CCSprite*)pineappleAtPosition:(CGPoint)position {
    for (CCSprite* pineapple in [pineapplesSpriteSheet children]) {
        if (CGRectContainsPoint(pineapple.boundingBox, position)) {
            return pineapple;
        }
    }
    return nil;
}
The above code iterates over all of the pineapples. For each pineapple, it uses CGRectContainsPoint to see if the given position is within the pineapple's boundingBox. If so, the appropriate pineapple is returned. If the given point doesn't fall within any of the pineapple's bounding boxes, then the method will return nil.
Now you'll need a method that will perform the selection of the first anchor point.
Add the following code to LevelEditor.mm:
-(void)selectFirstAnchor:(CGPoint)touchLocation {
    // if user tapped on pineapple set it as anchor of the new rope
    CCSprite* tappedPineapple = [self pineappleAtPosition:touchLocation];
    if (tappedPineapple) {
        [newRope setAnchorA:[CoordinateHelper screenPositionToLevelPosition:tappedPineapple.position]];
        newRope.bodyAID = tappedPineapple.tag;
        [self setMode:kRopeAnchorAnyMode];
    }
}
The above method takes a touch location as input. It then looks for a pineapple at that location. If it finds one, it sets the anchor of the rope to the location of the pineapple. This creates the visual impression that the rope is connected to the pineapple.
After the anchor is set, you store the ID of the anchor in the rope, Finally, the method kicks off the transition to the next state to allow the user to select the second anchor.
Head back to ccTouchBegan: in LevelEditor.mm and change it as follows:
-(BOOL)ccTouchBegan:(UITouch *)touch withEvent:(UIEvent *)event {
    CGPoint touchLocation = [touch locationInView:touch.view];
    touchLocation = [[CCDirector sharedDirector] convertToGL:touchLocation];

    switch (mode) {
        case kEditMode:
            [self togglePopupMenu:touchLocation];
            break;
        case kRopeAnchorPineappleMode:
            [self selectFirstAnchor:touchLocation];
            break;
        case kRopeAnchorAnyMode:

            break;
    }
    return YES;
}
The above code is slightly more complicated than before. Now, it uses a switch statement to distinguish between the different states.
In kEditMode, the user can freely toggle the popup menu. However, in kRopeAnchorPineappleMode the user can only select a pineapple as the first anchor point, and the popup menu will not show up.
Build and run your app, open the popup menu and select the rope. Next, select a pineapple to attach the rope to. You should see the transition between kEditMode, kRopeAnchorPineappleMode, and kRopeAnchorAnyMode, as shown in the successive screenshots below:
Visualizations of the different edit modes for the LevelEditor
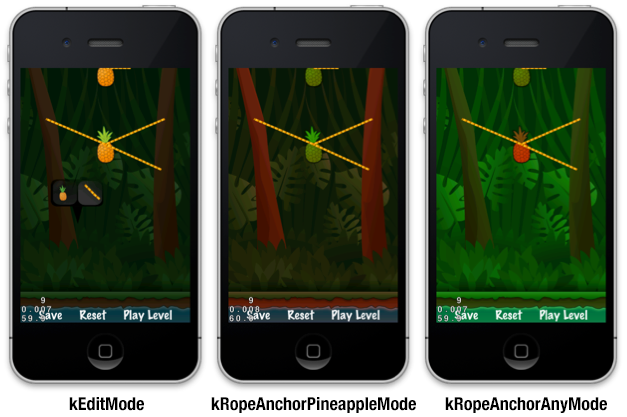
The visualization works, and the screen cycles between the different colored states, and the user can select the first anchor point.
But the ability to select the second anchor point still missing!
Luckily, the implementation of selectSecondAnchor: is pretty similar to selectFirstAnchor.
Add the following code to LevelEditor.mm:
-(void)selectSecondAnchor:(CGPoint)touchLocation {
    // set second end of rope, can be either background or other pinapple, but not same pinapple as first one
    CCSprite* tappedPineapple = [self pineappleAtPosition:touchLocation];
    if (tappedPineapple && tappedPineapple.tag != newRope.bodyAID) {
        [newRope setAnchorB:[CoordinateHelper screenPositionToLevelPosition:tappedPineapple.position]];
        newRope.bodyBID = tappedPineapple.tag;
    }
    if (!tappedPineapple) {
        [newRope setAnchorB:[CoordinateHelper screenPositionToLevelPosition:touchLocation]];
        newRope.bodyBID = -1;
    }
    [self createRopeSpriteFromModel:newRope];
    [fileHandler addRopeFromModel: newRope];
    [self setMode:kEditMode];
}
The above code handles the selection of the second anchor. When the user selects a second pineapple, everything works nearly the same as in kRopeAnchorPineappleMode. The only difference here is that you check the tag for the pineapple and make sure it is different from the one selected as the first anchor.
In case the user taps somewhere on the background, you use the touch location as the position for the anchor and set the ID to -1. In both cases, you then create the rope from the model and switch back to kEditMode.
You're nearly done, but first you need to tie everything together and take your editor for a test run!
Switch to LevelFileHandler.m and add the following method:
-(void)addRopeFromModel:(RopeModel*)newRope {
    [LevelFileHandler sortArrayById: self.ropes];
    if (!newRope.id) {
        NSNumber* firstUnusedID = [LevelFileHandler firstUnusedIdInArray:self.ropes];
        newRope.id = firstUnusedID.intValue;
    }
    [self.ropes addObject:newRope];
}
This method sorts the rope array. After that, it checks whether the rope already has an ID. If not, it requests one and sets this as the ID for the new rope. Finally, the new rope is added to the ropes array.
Now add the method prototype to LevelFileHandler.h so that the method is publicly accessible:
-(void)addRopeFromModel:(RopeModel*)newRope;
But don't forget the most crucial step — setting the second anchor point when the screen is touched. Otherwise, nothing will happen when the user tries to anchor the end of the rope!
Add the following line to ccTouchBegan:, directly after the case kRopeAnchorAnyMode: line:
[self selectSecondAnchor:touchLocation];
Build and run your app to give the editor another test drive. Add a few new pineapples and ropes to make sure that part works as designed, as shown in the screenshot below:

If you tap "Play Level", you should even be able to play the level with the changes you made!