How To Export Blender Models to OpenGL ES: Part 3/3
In this third part of our Blender to OpenGL ES tutorial series, learn how to implement a simple shader to showcase your model! By Ricardo Rendon Cepeda.
The Phong Reflection Model
Also called Phong illumination, this is the mathematical model that will light your scene. But first, let’s discuss the normal matrix.
Most lighting calculations are done in eye space to account for viewer-perceived effects such as specular highlights. The model-view matrix exists in object space, so you need a way to translate normals into eye space.
A normal is a vector exclusively representing an orientation, while the model-view matrix contains translation and scale data on top of that. The 3×3 upper-left matrix of the model-view matrix actually contains orientation data exclusively, but it can be distorted by a non-uniform scale operation, as shown below:
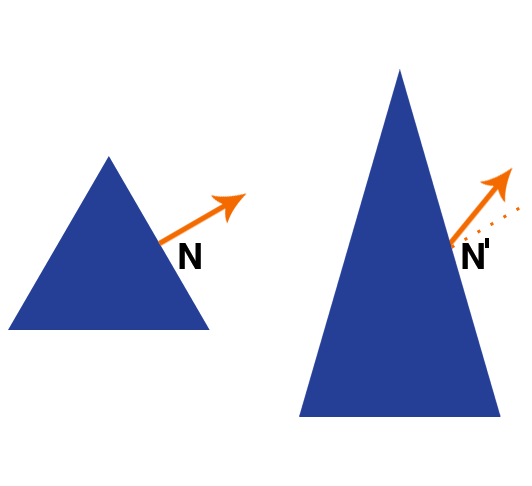
N is a normal on the triangle before any modifications. After stretching the triangle along the y-axis, N’ would be the resulting “normal” if the model-view matrix were applied to the normal N. Clearly, this result is wrong because it is no longer perpendicular to the triangle.
Normals are essential to Phong illumination, so you need a way to transform them into eye space while conserving their orientation—enter the normal matrix. A full mathematical explanation is available from Lighthouse3D, but all you need to know is that the normal matrix is the 3×3 inverse-transpose of the model-view matrix.
Once you’ve cured your math headache, let’s implement that definition! Open up MainViewController.m and add the following lines inside setMatrices, at the very bottom:
// Normal Matrix
// Transform normals from object-space to eye-space
bool invertible;
GLKMatrix3 normalMatrix = GLKMatrix4GetMatrix3(GLKMatrix4InvertAndTranspose(modelViewMatrix, &invertible));
if(!invertible)
    NSLog(@"MV matrix is not invertible");
glUniformMatrix3fv(self.phongShader.uNormalMatrix, 1, 0, normalMatrix.m);
That looks quite nice. GLKit is phenomenal in providing a top-notch 3D math library, which makes the normal matrix implementation a breeze. Don’t worry about invertible and its warning—you won’t have any problems with it in this tutorial, but GLKit requires it.
Moving on, who’s ready for more math? You are!
Phong components, from Wikipedia

The image above describes the three main components of a surface in the Phong reflection model. Let’s introduce a new term, ambient, which accounts for the uniform lighting that affects an entire scene equally, caused by the scattering of light. Think of it as the base intensity and color of your scene; in the real world, rarely do you find yourself in “pitch black” conditions. In the above graphic, the object is rendered under a pure white light, which your implementation will also assume.
There’s an additional term, shininess, not pictured above, which simply defines the size of your material’s specular highlights. There is an inverse relationship between shininess and highlights: a shiny mirror has a clear reflection with small highlights, whereas glossy paper has a blurry reflection with large highlights.
Phong vectors, modified from Wikipedia

The Phong reflection model requires four vectors to calculate the perceived color and intensity of light on a surface point:
- L, which is the directional vector from the surface point to the light source.
- N, which is the normal of the surface point.
- R, which is the reflection of the ray of light L against the normal N.
- V, which is the direction from the surface point towards the viewer.
All vectors are normalized, since this model only uses the direction of these vectors to perform the scene’s illumination. More sophisticated lighting models, like area or spotlights, factor in the distance of these objects.
Perfect! Given the physical complexities of real light, the Phong reflection model does a great job of simplifying things into four material properties and four surface vectors. The full equation combining all components with a single light source, for a surface point Ip, is:

It may seem long, but it’s very easy to analyze by parts:
-
Material: Ambient (
ka); Diffuse (kd); Specular (ks); Shininess (α). -
Light: Ambient (
ia); Diffuse (id); Specular (is). -
Vectors: Light (
L); Normal (N); Reflection (R); Viewer (V).
Furthermore, the equation is well separated into ambient, diffuse and specular terms, where L.N and (R.V)^α may even be referred to as the diffuse and specular factors, respectively.
OK, its time to implement the Phong reflection model! You’ll be writing your lighting algorithm in the fragment shader, a practice also referred to as per-pixel lighting, as opposed to per-vertex lighting in the vertex shader. In Part 1, you calculated your scene’s lighting by using GLKLightingTypePerPixel, which is exactly what you’re replicating here. Straight from the docs, here are the definitions for both lighting types:
- Per-vertex lighting indicates that the lighting calculations are performed at each vertex in a triangle and then interpolated across the triangle.
- Per-pixel lighting indicates that the inputs to the lighting calculation are interpolated across a triangle and the lighting calculations are performed at each fragment.
So basically, use per-vertex lighting to boost your performance and use per-pixel lighting to improve your image quality. In this case, your scene is so small that you can use per-pixel lighting for a better-looking model without incurring a noticeable performance hit.
Open up Phong.fsh and replace the contents of main() with the following:
// 1
// Material
highp vec3 ka = vec3(0.05);
highp vec3 kd = uDiffuse;
highp vec3 ks = uSpecular;
highp float alpha = 1.0;

// 2
// Light
highp vec3 ia = vec3(1.0);
highp vec3 id = vec3(1.0);
highp vec3 is = vec3(1.0);

// 3
// Vectors
highp vec3 L = normalize(vec3(1.0, 1.0, 1.0));
highp vec3 N = normalize(vNormal);
highp vec3 V = normalize(vec3(0.0, 0.0, 1.0));
highp vec3 R = reflect(L, N);

// 4
// Illumination factors
highp float df = max(0.0, dot(L, N));
highp float sf = pow(max(0.0, dot(R, V)), alpha);

// 5
// Phong reflection equation
highp vec3 Ip = ka*ia + kd*id*df + ks*is*sf;

gl_FragColor = vec4(Ip, 1.0);
All in all, your shader is still quite a short program performing a specific function. Let’s see what’s going on:
- You carry on the diffuse (
kd) and specular (ks) components of your material from your starship model. Ambient shading (ka) is 5% white and shininess (alpha) is 1 (no effect on the highlights). Since your starship model is made up of hard and flat triangular faces, it doesn’t have the curved shape necessary to really showcase specular highlights. - All light components are pure white, meaning that your model’s materials are in charge.
- As mentioned before, all vectors in the Phong reflection model are normalized. Just like your
GLKBaseEffectimplementation, your light source is in the top-right corner of the scene, behind the viewer. Similarly, the viewer is looking at the model straight-on, with the line of sight into the screen. - There is no such thing as negative lighting (true black is
0.0), so themax()function ensures your diffuse and specular factors are always in range. If you’re wondering, a negative dot product between two vectors would occur if they are facing in opposite directions. - Finally, plug all of your components into the equation.
Build and run! Your starship looks fantastic and you can now see all the different shading intensities and even the cyan color that was hard to appreciate with GLKBaseEffect.

That was a very hard section, but I hope the rendering was worth it! You’re quickly turning into a fearless graphics programmer. :O