Automator for Mac OS X: Tutorial and Examples
Learn how to use Automator for Mac OS X to automate tedious workflows in this tutorial with five complete examples. By Neil North.
Perform SQL queries on an SQLite file using Automator
If you need to use a database within your app, the most likely format is SQLite. It’s light and compact, and is commonly used by Core Data. When you’re developing cross-platform apps, SQLite works great on Android. Using Automator can make managing the database more efficient.
Normally, you’d probably need buy an app to do tasks like set up sample data in your SQLite file, run a query to get data out of your SQLite database, or perform table maintenance. But not after you learn to use Automator, which can make performing SQL functions and queries on your SQLite databases easy!
To start, you’ll make a simple workflow which will allow you to run any queries you want on a selected database.
In Automator, select File from the menu bar and then New. This time, select Workflow as the type, as you’ll only be running it from Automator.

Since there is no file passed into the workflow at the beginning, you’ll have to get the file. In this example, you’ll be using the DataStore file from a Core Data project. Note that one is included in the sample files for this tutorial.
Drag the Get Specified Finder Items action onto your workflow, select Add and find the DataStore.sqlite file.

Now that you have the file in your workflow, you can start working with it.
Drag a Execute SQL action onto your workflow. This can run any SQL you want on the database.
Note: If you’re unfamiliar with SQL (Structured Query Language) and plan on using SQLite files a lot, then I would recommend trying w3schools SQL tutorial and our .
In the SQL commands section, you can run as many SQL commands as you want, separated with ;. For now though, you’ll run a query which will work on any Core Data database.
<span style="color: #993333; font-weight: bold;">SELECT</span> <span style="color: #66cc66;">*</span> <span style="color: #993333; font-weight: bold;">FROM</span> Z_PRIMARYKEY; |
<span style="color: #993333; font-weight: bold;">SELECT</span> <span style="color: #66cc66;">*</span> <span style="color: #993333; font-weight: bold;">FROM</span> Z_PRIMARYKEY;
When this action runs, its output will be the result of the query. In this case it should contain one line for each entity model you’ve set up.
Now what you need is to be able to see the results returned by the query.
The “View Results” Action
So far you’ve made a lot of assumptions based on what you believe the current variables being passed to the output to be. If you’re working on much bigger workflows, or need instant feedback of what the current output is then this action is useful.
Drag the View Results action from the library onto your workflow under Execute SQL. You don’t need to put anything into this box as just a place to display information.
Click the Run button at the top right to see what happens.

You can now see the results of the SQL query in plain text.
Feel free to experiment with the View Results action to fully understand what the output of each action is. For example if you were to drag it above Execute SQL, the result would be something like:
(

  "/Users/northy/Desktop/DataStore.sqlite"

)
The output of the Get Specified Finder Items action will be the filepaths of all files included in the action.
Making a standalone application to add data from CSV to Database
There may be occasions where you need to add sample data to a database or multiple databases — like when you’re making a demo or testing a new app. You could use a Folder Action to handle this, but the sample project requires you to work with multiple files of different natures, specifically a CSV file and a SQLite database. This can become confusing when using a Folder Action, so for this lesson you’re going to make an Application.
Applications are just like every other application in your applications folder. They are single files which can take an input by drag and dropping a file or folder onto them:

The application you’re going to make takes a CSV file as its input (found in the sample files provided), and adds the data to the SQLite database you were just working with.
You’ll start by creating a table in the database for your sample data. The idea is your app will be a names database for smart people, so you need a table to store names. You’ll create the table by running a SQL create table query in the workflow you just created.
Replace the SQL in the Execute SQL action with the following:
<span style="color: #993333; font-weight: bold;">create</span> <span style="color: #993333; font-weight: bold;">table</span> people<span style="color: #66cc66;">(</span>firstname varchar<span style="color: #66cc66;">,</span> lastname varchar<span style="color: #66cc66;">)</span>; |
<span style="color: #993333; font-weight: bold;">create</span> <span style="color: #993333; font-weight: bold;">table</span> people<span style="color: #66cc66;">(</span>firstname varchar<span style="color: #66cc66;">,</span> lastname varchar<span style="color: #66cc66;">)</span>;
This query will create your table with the name people and will contain two fields: first name and last name.
The feedback you get in your view results action won’t tell you much. The green tick means there wasn’t any errors, so you can assume the table was created correctly:

Now that you have added the People table to your database, you can create an application to automate adding CSV data.
In Automator, go to File then New from the menu bar. This time, select Application.
The file you’re going to pass into the application is a CSV file (comma delimited data files). They are text files where each line represents a new row of data and a comma separates each field. The one located in the sample file looks something like this:

The CSV file will pass in as the first output to connect to. Next, you need to add a few actions to format the text, convert it to SQL and store it in a variable.
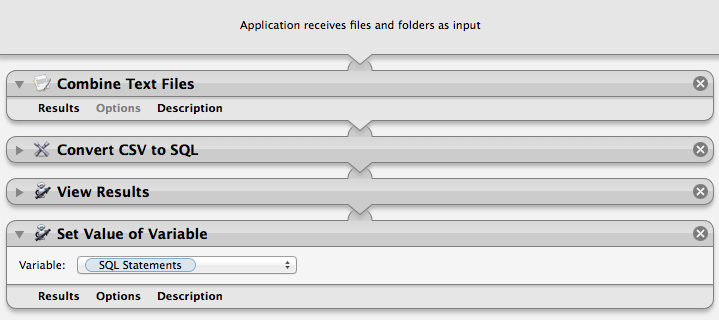
The first action to add is Combine Text Files:

This is necessary in case you drag multiple CSV files into the application; it will loop through the contents of each text file and combine everything into one. Also, the file you drag into the application passes in its file path, so you want to make sure you’re getting the file’s contents.
Next, drag onto the workflow a Convert CSV to SQL action. You’ll see a segmented control which allows you to edit the text before, per row and after. Enter the following SQL on each:
Before:
begin transaction; |
begin transaction;
Per Row:
<span style="color: #993333; font-weight: bold;">INSERT</span> <span style="color: #993333; font-weight: bold;">INTO</span> people <span style="color: #66cc66;">(</span>firstname<span style="color: #66cc66;">,</span> lastname<span style="color: #66cc66;">)</span> <span style="color: #993333; font-weight: bold;">values</span> <span style="color: #66cc66;">(</span><span style="color: #ff0000;">"%{1}@"</span><span style="color: #66cc66;">,</span><span style="color: #ff0000;">"%{2}@"</span><span style="color: #66cc66;">)</span>;
|
<span style="color: #993333; font-weight: bold;">INSERT</span> <span style="color: #993333; font-weight: bold;">INTO</span> people <span style="color: #66cc66;">(</span>firstname<span style="color: #66cc66;">,</span> lastname<span style="color: #66cc66;">)</span> <span style="color: #993333; font-weight: bold;">values</span> <span style="color: #66cc66;">(</span><span style="color: #ff0000;">"%{1}@"</span><span style="color: #66cc66;">,</span><span style="color: #ff0000;">"%{2}@"</span><span style="color: #66cc66;">)</span>;
After:
end transaction; |
end transaction;
You have now written SQL instructions to insert rows into your table for each line in the CSV file, or, combined CSV data.
If you were to run this action on the sample names.CSV file, the resulting SQL will be as follows:
{"begin transaction;

INSERT INTO people (firstname, lastname) values (\"Ray\",\"Wenderlich\");

INSERT INTO people (firstname, lastname) values (\"Adam\",\"Burkepile\");

INSERT INTO people (firstname, lastname) values (\"Charlie\",\"Fulton\");

INSERT INTO people (firstname, lastname) values (\"Matt\",\"Galloway\");

end transaction;

"}
Next, add a View Results action to your workflow. While you don’t need to see the results at this point, you should be aware that at the time of creating this tutorial, there is a bug in the current version of Automator (2.4) where the variables may react strangely to certain text files. Having a View Results action seems to mitigate the bug.
Now add a Set Value of Variable action, create a new variable called SQL Statements.
The workflow should now look like:
Now what you need to do is set it up so the user (which will be you in a moment) picks a database for the SQL, then apply the SQL to the chosen database.
Add an Ask for Finder Items action to your workflow, this will allow you to select the database where you wish to run the SQL statements.
Change its options to ignore this action’s input, change the prompt to Choose a SQLite Database: and set Start at: to a default location where you save SQLite files or leave it on Desktop.

Drag a Set Value of Variable action underneath it and don’t bother setting the variable now; you’ll come back to it later.
Add a Get Value of Variable action, set the variable to SQL Statements and options to Ignore this Action’s Inputs.
Add an Apply SQL action, select New Variable from the Database dropdown list. Name the new variable SQLite Database.

Now you can go back to the Set Value of Variable action (third action from the bottom of the workflow) and change it to SQLite Database.

Congratulations, you’ve now made an application! Save the file somewhere on your Desktop for easy access.
To recap the workflow you just created:
- You first bring in all CSV files dropped onto the application.
- You then combine them into a single text string, and convert it into SQL statements, and save it in a variable.
- Next, you ask the user to supply a database file and save the path to a variable.
- Finally, you pass your SQL statements into the Apply SQL action, which runs on the provided SQLite file.
To test it out, drag and drop your names.csv file on top of the application you just saved.
It will then ask you to supply an SQLite database:

That’s it! The process is done. How can you check that it has worked?
Go back to the previous workflow (the one you used to create the table) and change the SQL to:
<span style="color: #993333; font-weight: bold;">SELECT</span> <span style="color: #66cc66;">*</span> <span style="color: #993333; font-weight: bold;">FROM</span> people; |
<span style="color: #993333; font-weight: bold;">SELECT</span> <span style="color: #66cc66;">*</span> <span style="color: #993333; font-weight: bold;">FROM</span> people;
Then run the workflow:

Look at you! You now have experience with all of the available SQL actions. Is your mind overflowing with ideas on how to use them to automate your database related projects? It should be!
So far you’ve only scratched the surface of what you can do with Automator actions. In the next and final practical example you’ll have another look at AppleScript, and how you can use outputs from your other actions.