Automator for Mac OS X: Tutorial and Examples
Learn how to use Automator for Mac OS X to automate tedious workflows in this tutorial with five complete examples. By Neil North.
Trying it Out
Open up Xcode, create a new project (or open an existing project) and select some text.
Next, either right-click on the text or go up to the menu bar, select Xcode. In the Services menu you should now see your new service. Go ahead and run it.

If it all goes right, you should see your selected text in your text editor:

This makes a new document with Command-N, waits half a second, then pastes the text into the new document. Experiment with what best suits your needs!
tell application "TextEdit"
	activate
	delay 0.5
	tell application "System Events" to keystroke "n" using {command down}
	delay 0.5
	tell application "System Events" to keystroke "v" using {command down}
end tell
tell application "TextEdit"
	activate
	delay 0.5
	tell application "System Events" to keystroke "n" using {command down}
	delay 0.5
	tell application "System Events" to keystroke "v" using {command down}
end tell
So that’s how you can automate copying and pasting into application. Next up, you’ll learn how to use Automator to rename and auto-resize a batch of images for iOS projects.
Batch Renaming and Resizing Images
Apple woke up to the fact that preparing images for iOS development can result in poor quality images, so they have included the asset catalog in iOS 7 to make it easier to track image assets.
Note: To learn more about the asset catalog in iOS 7, check out Chapter 9 in iOS 7 by Tutorials, “What’s New in Xcode 5.”
You still need to create all of the required images, and it’s still a best practice to follow the previous naming conventions. What’s cool about Automator is that you can delegate the tedious task of processing and renaming to an automated action. Imagine how much easier image processing will be!
If you’ve been thinking about getting an app to help you resize and rename files, don’t do it! You can easily make one yourself with Automator.
There are a few ways to do this, but try using Folder Actions first. They allow you to set up a folder that runs a specific workflow on every file placed within.
Folder actions can revolutionize your workflow. Here are some examples of how you can use them:
- Drag and drop a single file into a folder set up with an action of your choosing, and the workflow will automatically apply to that file.
- Select multiple images, drag and drop them onto the folder and the workflow will work through each file in a loop sequence.
- Use this folder as your default save location for files. This way you have a “set and forget” solution, so your files will always be prepped and ready to use when you go looking for them.
Creating a Folder Action
Open Automator and select New to create a new project. Select Folder Action and click Choose. and you’ll see the input at the top of the workflow is different again:
![]()
Here you can choose the folder to apply this folder action to.
From the dropdown menu select Other… and go to the location you want your folder. If you don’t have a location in mind, just create it on the desktop for now. To do this, select New Folder and call it Prepare Images for iOS.
Open this folder via finder and add two more folders in it, one called Processed the other called Processed @2x, this is where photos will go after processing.
Your folder structure should now look like:

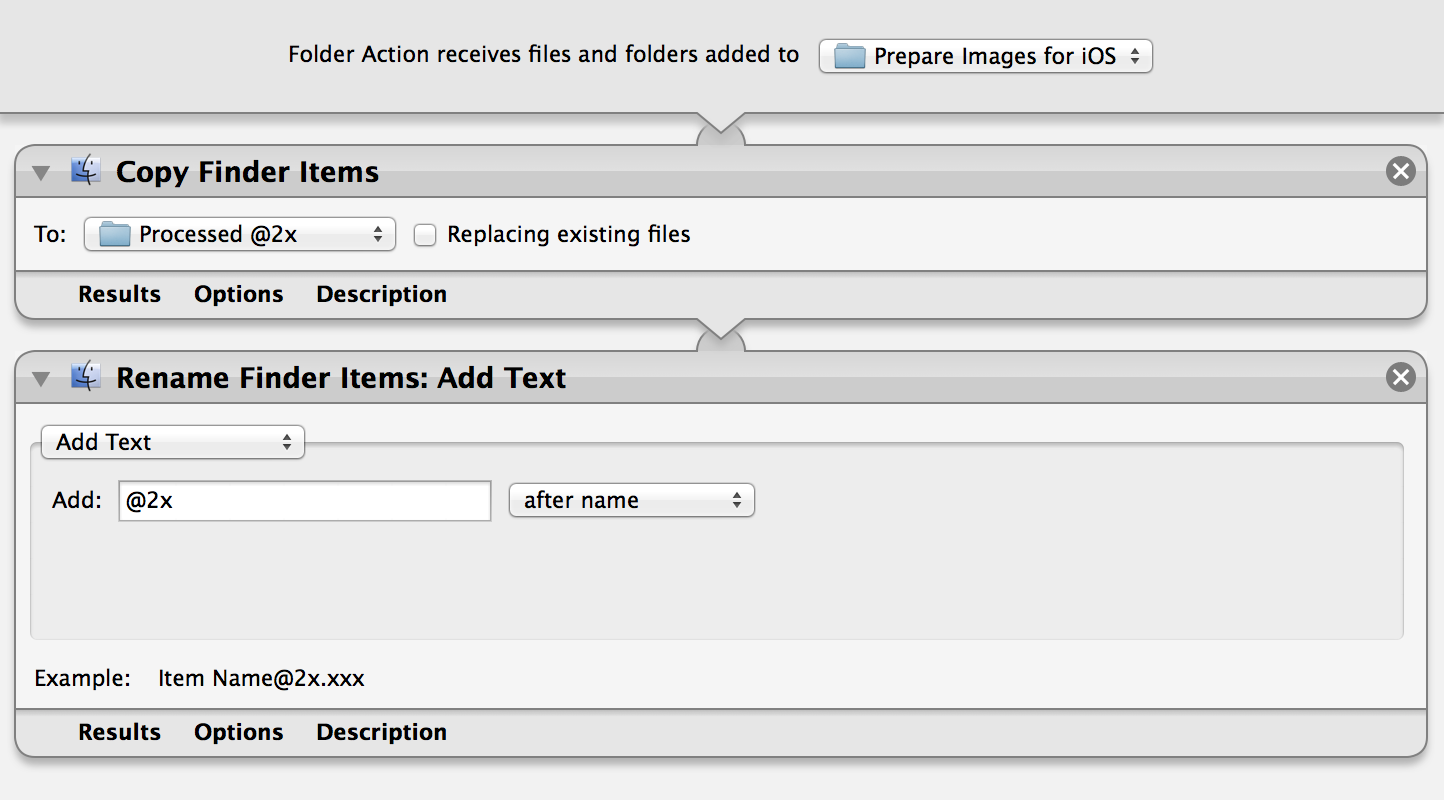
Go back to the Automator project and add the Copy Finder Items action from the library to the workflow. Remember to use the search box if you’re having trouble finding it.
In the To: dropdown list select Other… and locate the folder named Processed @2x.
Your workflow should now look like this:

This moves the files from the Prepare Images for iOS folder to the Processed @2x subfolder.
Next, you’ll rename the file so that it has @2x at the end of the file name but before the file extension.
From your library add the action called Rename Finder Items. Make sure the dropdown box at the top of the action is set to Add Text. In the Add: area type @2x and set it to After Name. Note that there is a small text label below this section which gives you an example of how the filename will look after this modification:
Go to File then Save, call it Prepare for iOS.
This is all you need do for full resolution images, but you’ll also need half resolution versions with the original filename.
To try this out, go to your desktop and right-click the Prepare Images for iOS folder, go down to Services and select Folder Actions Setup…
Below is an example of a folder set up to run 2 workflows:

Use the checkboxes to enable or disable folder actions, as well as the individual scripts. How simple is that?
But don’t get ahead of yourself! Work through this next exercise to make it work with a single workflow, and focus on learning about variables.
Using Automator Variables
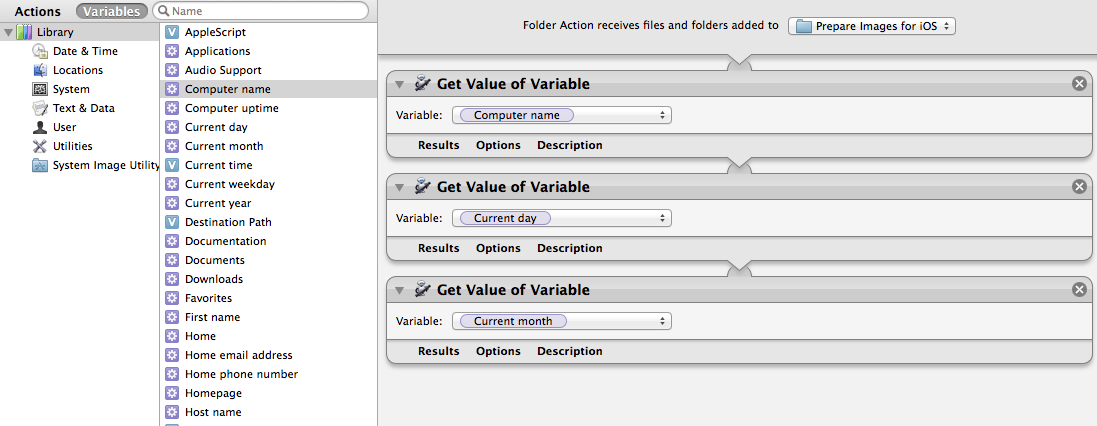
Have a look at your variables tab, and you’ll see a bunch of standard information which can be collected from the system: date and time, system information, random numbers etc. You can drag each of these onto the workflow so its value is accessed via the output.
Next, you’re going use a variable to store filename of the original image passed into the workflow, so that you preserve the original file.
Back in Automator in your current folder action project, add the Set Value of Variable action to your workflow at the top above Copy Finder Items.
Click New Variable… from the dropdown list and name it Original Input. Your workflow should now look like this:

Now that the original filename is stored in a variable, you need to retrieve it from the variable after finishing with the @2x version.
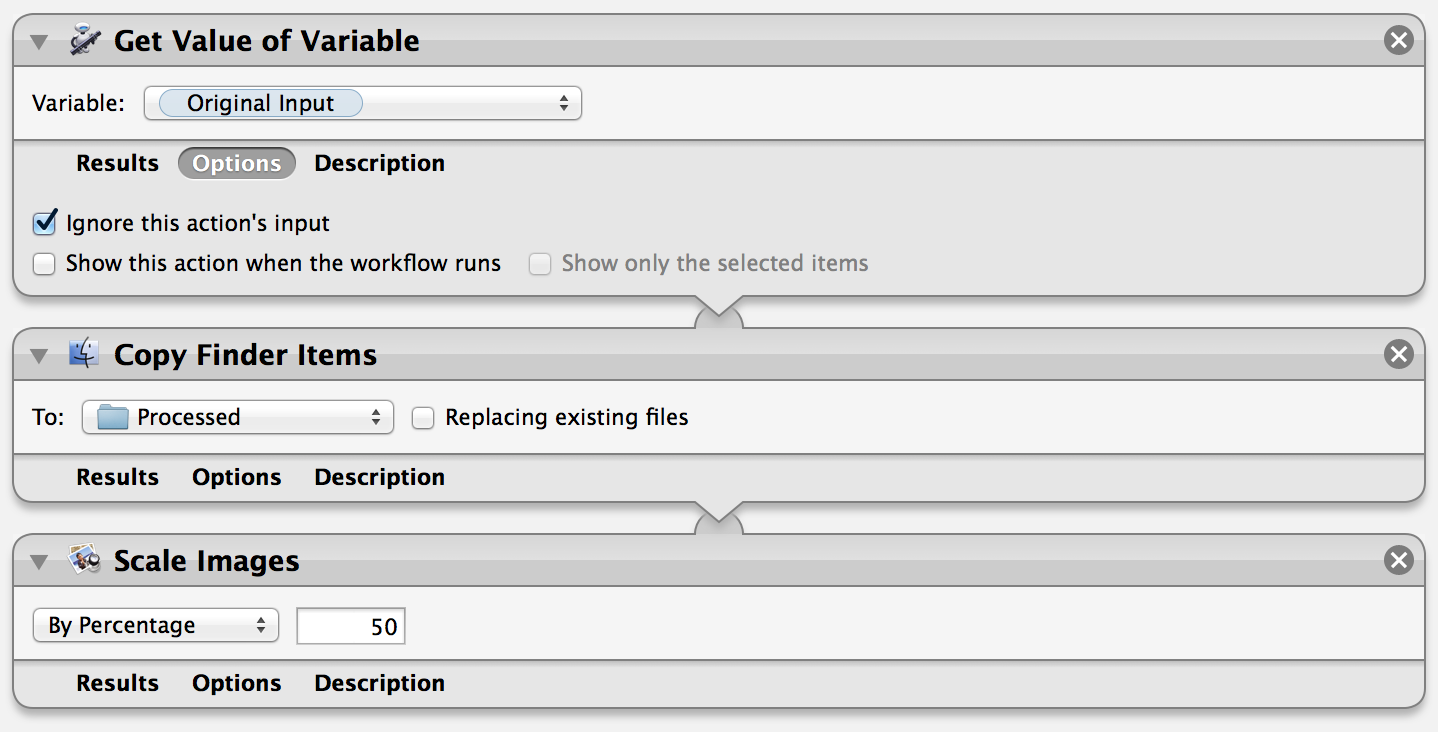
Find Get Value of Variable from the actions list, drag it onto the bottom of your workflow, and make sure the Variable selected is Original Input.
All actions on the workflow return an output. The output of the “Rename Finder Items” step is the array of renamed files. However, in this case you don’t care about those filenames and just want to work with the array of files you squirreled away in the Original Input variable earlier.
To fix this, you can disconnect an action from previous outputs. Simply expand the Options of the Get Value of Variable and select Ignore this action’s input. When you make this change you’ll notice that it’s no longer connected to the output of the above action.

Now you can finish this up by adding another Copy Finder Items action under the Get Value of Variable action and setting it to your Processed folder.
Then add a Scale Images action to your workflow, set it to scale by percentage and adjust the value to 50%.
Go to File, select Save. You’re done – let’s try this out!
Find some images you can try out (such as that LOLcat image from earlier) and drag and drop them into the Prepare Images for iOS folder.
In your Prepare Images for iOS folder you can see the file(s) you dragged in:

Have a look in your Processed @2x folder you’ll find the same images, but renamed with @2x – indicating the kitty is ready for retina. Meow.

In your Processed folder, file names are unchanged. If you look at the dimensions you’ll find they are half the original dimensions:

Well done! You now have full control over your image assets. Besides working with Retina, you can use this same process to prep images for iPad, iPhone and iWhatever. To do this, all you need is the ration or change for each device, and a single high resolution image.
Beyond that, you can even automate actions for photo manipulation. For example, you can add filters, like posterize and vignette. If you’re working on an image-rich project, look into using Automator – it’ll probably save time and sanity!