Unity 4.3 2D Tutorial: Scrolling, Scenes and Sounds
In this final long awaited part of the Unity 2D series, you will create the conga line as well as the win and lose states for the game. By Chris LaPollo.
Winning and Losing
Players of Zombie Conga win the game when they build a long enough conga line. You maintain the conga in ZombieController.cs, so open that file in MonoDevelop.
Add the following code to OnTriggerEnter2D, inside the block that handles cat collisions, just after the line that adds other.transform to congaLine:
if (congaLine.Count >= 5) {
  Debug.Log("You won!");
  Application.LoadLevel("CongaScene");
}
This code checks if the conga line contains at least five cats. If so, it logs a win message to the Console and then calls Application.LoadLevel to reload the current scene, named CongaScene. While it includes "level" in its name, LoadLevel actually loads Unity scenes. See the Application class documentation to find out more about what this class has to offer.
Don't worry – reloading CongaScene is only for testing. You'll change this later to show a win screen instead.
5 in the if check to any number you'd like.Save the file (File\Save) and switch back to Unity.
Play the scene. Once you get five cats in your conga line, you'll see "You won!" in the Console and the scene will reset to its start state.

![]()
Winning isn't as satisfying if there's no way to lose, so take care of that now.
Switch back to ZombieController.cs in MonoDevelop and add the following variable to the class:
private int lives = 3;
This value keeps track of how many lives the zombie has remaining. When this reaches zero, it's Game Over.
Add the following code to OnTriggerEnter2D, inside but at the end of the block of code that handles collisions with enemy objects:
if (--lives <= 0) {
  Debug.Log("You lost!");
  Application.LoadLevel("CongaScene");
}
This code subtracts one from lives and then checks to see if there are any lives left. If not, it logs a message to the Console and then calls Application.LoadLevel to reload the current scene. Once again, this is only for testing – you'll change it later to show a lose screen.
Save the file (File\Save) and switch back to Unity.
Play the scene now and hit three old ladies. No, don't do that. Play the game, and in the game, let three old ladies hit you. You'll see "You lost!" in the Console and the scene will reset to its start state.

![]()
And that's it! Zombie Conga works, even if it is a bit unpolished. In the remainder of this tutorial, you'll add a few finishing touches, including additional scenes, some background music and a sound effect or two.
Additional Scenes
To finish up the game, you'll add the following three screens to Zombie Conga:
A splash screen to show when the game launches.

A win screen to reward the player for a job well done.

A lose screen to express your disappointment with the player's lack of skill.

So just draw those images and when you're done, come back and learn how to add them to the game. Shouldn't take but a minute.

Ok, I really don't have time to wait for you to do your doodles. Just download and unzip these resources so we can get going.
The file you downloaded includes two folders: Audio and Backgrounds. Ignore Audio for now and look at Backgrounds, which contains a few images created by Mike Berg. You'll use these images as backgrounds for three new scenes.
You first need to import these new images as Sprites. You learned how to do this way back in Part 1 of this series, so this would be a good time to see how much you remember.
Try creating Sprite assets from the images in Backgrounds. To keep things organized, add these new assets in your project's Sprites folder. Also, remember to tweak their settings if necessary to ensure they look good!
[spoiler title="Need help creating Sprites?"]Creating Sprites was covered extensively in Unity 4.3 2D Tutorial: Getting Started, so there won't be much detail here. If you need more help, review that tutorial again.
To create a Sprite asset, you first need to add the files to the project. The easiest way is to drag them into the Project browser from your Finder/Explorer.
If Unity is still in 2D mode, which you set up back in Part 1, then these images were turned into Sprites automatically. If not, you need to change each asset's Texture Type to Sprite in the Inspector.
![]()
Each of the images is 1136x640 pixels, which is too large for Unity's default texture size of 1024x1024. To make them look their best, you should adjust each Sprite's Max Size to 2048.

Finally, while they all look fine with the default Format of Compressed, I prefer to set StartUp's Format to 16 bits.

[/spoiler]
You should now have three new Sprites in the Project browser, named StartUp, YouWin and YouLose, as shown below:
![]()
Before creating your new scenes, make sure you don't lose anything in the current scene. Save CongaScene by choosing File\Save Scene in Unity's menu.
Choose File\New Scene to create a new scene. This brings up an empty scene with a Main Camera.

Choose File\Save Scene as..., name the new scene LaunchScene and save it inside Assets\Scenes.
Add a StartUp Sprite to the scene, positioned at (0,0,0). You should have no problem doing this yourself, but the following spoiler will help if you've forgotten how.
[spoiler title="Need help adding a sprite?"]To add the Sprite, simply drag StartUp from the Project browser into the Hierarchy.
Select StartUp in the Hierarchy and make sure its Transform's Position is (0,0,0).[/spoiler]
With the background in the scene, see if you can set up LaunchScene's camera yourself. When you're finished, your Game view should show the entire StartUp image, like this:

If you need any help, check the following spoiler.
[spoiler title="Need help setting up the scene?"]Just like you did with CongaScene, you'll want LaunchScene's camera to have an orthographic projection with a size of 3.2.
Select Main Camera in the Hierarchy. In the Inspector, choose Orthographic for Projection and set Size to 3.2, as shown below:

[/spoiler]
At this point, you've set up LaunchScene. Play the scene and you should see the following:
Be honest: how long did you stare at it waiting for something to happen?
You want Zombie Conga to start out showing this screen, but then load CongaScene so the user can actually play. To do that, you'll add a simple script that waits a few seconds and then loads the next scene.
Create a new C# script named StartGame and add it to Main Camera.
Open StartGame.cs in MonoDevelop and replace its contents with the following code:
using UnityEngine;

public class StartGame : MonoBehaviour {

  // Use this for initialization
  void Start () {
    Invoke("LoadLevel", 3f);
  }

  void LoadLevel() {
    Application.LoadLevel("CongaScene");
  }
}
This script uses two techniques you saw earlier. Inside Start, it calls Invoke to execute LoadLevel after a three second delay. In LoadLevel, it calls Application.LoadLevel to load CongaScene.
Save the file (File\Save) and switch back to Unity.
Run the scene. After three seconds, you'll see the following exception in the Console.
![]()
This exception occurs because Unity doesn't know about your other scene. Why not? It's right there in the Project browser, isn't it?
Yes, it's there, but Unity doesn't assume that you want to include everything in your project in your final build. This is a good thing, because you'll surely create many more assets than you ever use in your final game.
In order to tell Unity which scenes are part of the game, you need to add them to the build.
Inside Unity's menu, choose File\Build Settings... to bring up the Build Settings dialog, shown below:
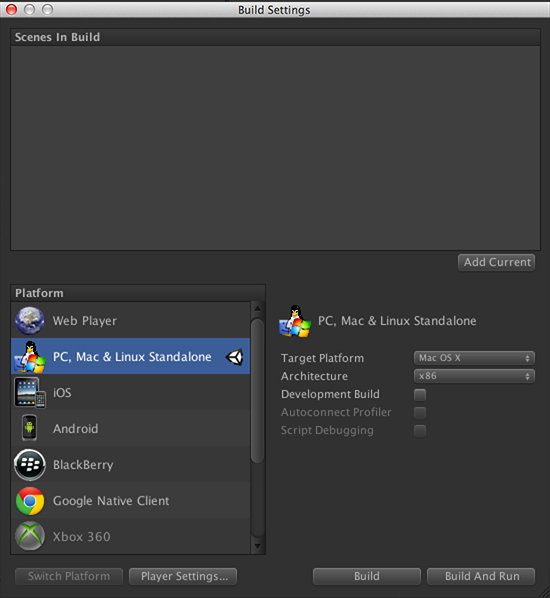
The lower left of the dialog includes the different platforms for which you can build. Don't worry if your list doesn't look the same as the above image.
The current platform for which you've been building – most likely, PC, Mac & Linux Standalone – should be highlighted and include a Unity logo to indicate it's selected.
To add scenes to the build, simply drag them from the Project browser into the upper area of Build Settings, labeled Scenes In Build. Add both LaunchScene and CongaScene to the build, as shown below:
As you can see in the following image, levels in the Scenes In Build list are numbered from zero. You can drag levels to rearrange their order, and when running your game outside of Unity, your player starts at level zero. You can also use index numbers rather than scene names when calling LoadLevel.

Close the dialog and run the scene. This time, the startup screen appears and then the game play starts after three seconds.

You should now create and add to your game two more scenes: WinScene and LoseScene. These should each display the appropriate background image – YouWin and YouLose, respectively. After three seconds, they should reload CongaScene.
Simply repeat the steps you took to create LaunchScene. The difference is that for these two scenes, you can reuse StartGame.cs rather than creating a new script. Or, check out the following spoiler if you'd like a shortcut.
[spoiler title="Want a shortcut for creating your scenes?"]Rather than make each new scene, simply duplicate the existing LaunchScene and replace the image.
To do so, first, save LaunchScene via File\Save Scene to ensure you don't lose any of your work.
Then, save your scene again, but this time use File\Save Scene as... and name it WinScene.
Delete StartUp from the Hierarchy and replace it with YouWin from the Project browser.
That's it. Save the scene (File\Save) and then repeat the process to create LoseScene.
[/spoiler]
After creating your new scenes, add them to the build. Your Build Settings should now look similar to this, although the order of your scenes after LaunchScene really doesn't matter.

Once these scenes are in place, you need to change your code to launch them rather than print messages to the Console.
Open ZombieController.cs in MonoDevelop.
Inside OnTriggerEnter2D, find the following lines:
Debug.Log("You won!");
Application.LoadLevel("CongaScene");
And replace them with this line:
Application.LoadLevel("WinScene");
This will load WinScene instead of just reloading CongaScene.
Now fix OnTriggerEnter2D so it loads LoseScene at the appropriate time.
[spoiler title="Not sure where to load the scene?"]Still in ZombieController.cs, find the following lines in OnTriggerEnter2D:
Debug.Log("You lost!");
Application.LoadLevel("CongaScene");
And replace them with this line:
Application.LoadLevel("LoseScene");
Now, when players lose, they'll know it.
[/spoiler]
Save the file (File\Save) and switch back to Unity.
At this point, you can play the game in its entirety. For the best experience, switch to LaunchScene before playing. After start up, play a few rounds, making sure you win some and you lose some. Hmm. That's sounds pretty cool – I should trademark it.

With all your scenes in place, it's time to get some tunes up in this tut!