Advanced VR Movement in Unity Tutorial
Bring fluid movement to your VR games – and avoid making your players sick – in this tutorial on advanced movement in Unity! By Eric Van de Kerckhove.
Dash Teleport
Until now, you’ve been teleporting instantly to your destination. There’s another way to move around though: using dash teleporting. Dash teleporting means that you “dash” to the final position, which makes the camera smoothly move towards the destination.
Remove the VRTK_Height Adjust Teleport component from Play Area and replace it with the VRTK_DashTeleport component.

This component is derived from the Height Adjust Teleport, so teleporting will behave the same as before except for the dash movement. The replacement was all you needed.
Play the scene and teleport around; you’ll notice you’ll be jolted forward after confirming the teleport destination.
Body Physics
Time to take a leap of faith. Play the scene, get to the top of the tower and try walking over the edge. Once you’re there, look down.

Nothing happens. This is the default behavior for the VRTK setup — the height adjustment only happens after teleporting, not when walking around.
To add gravity and ground collision, add a VRTK_BodPyhysics component to Play Area.

The default values are great for semi-realistic falling and stepping on things like slopes. Try it out in play mode: teleport to the small blue tower first and step over the edge; you’ll drop down to the ground.

If you’re comfortable with that, try the big tower next.
Another good reason to add body physics to your setup is that it allows you to add climbing, which you’ll look at next.
Climbing
One of most fun things to do in VR is to climb around Tomb Raider style toward your objective. With the help of VRTK, you can make almost any surface climbable. Need a fence to climb, a ladder or a wall of Jell-o? No problem, because in this section, you’ll prepare a ladder for climbing.
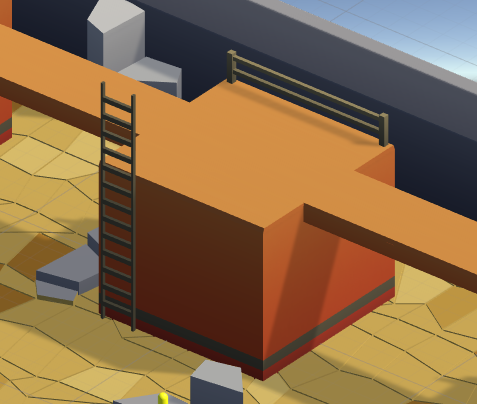
Find the ladder under the AdvancedFullChapter9 GameObject and select it.

You’ll notice it has a convex mesh collider attached to it, but you can use any kind of collider for the climbing to work.
Open the VRTK setup wizard by selecting Window ▸ VRTK ▸ Setup Interactable Object in the top menu.

While you could add the needed components manually, it’s usually much faster to use the setup wizard.
Check the Hold Button To Grab toggle, and set the Grab Attach Mechanic to Climbable. Uncheck Add RigidBody and Add Haptics.

Click the Setup selected object(s) button to apply the changes. This adds a few new components to the ladder, including VRTK_Climbable Grab Attach.

This is a special kind of grab component that communicates with the Play Area. Only objects with this component attached are climbable. You generally don’t want players to climb up all the walls unless they’re Spiderman or something.
For climbing to fully function, you’ll also need to add a new component to the Play Area. Select Play Area and add a VRTK_PlayerClimb component to it.

This is the crucial part that allows climbing to work; it manipulates the position of your virtual body when you grab a climbable object. For example, if you grab the ladder and move the controller that grabbed it downwards, you’ll pull yourself up and vice-versa.
The custom settings are linked automatically if the components are present on the same GameObject, or any of its children, and the last two are optional.
To deal with players putting their head into objects like walls and seeing straight through (instantly breaking all immersion in the progress), you can add a fade to black effect. To do this, you need two things: a way to know when the player’s head collides with a solid object, and a script that can fade the headset view to black and back again.
Once again, VRTK has you covered.
Add both a VRTK_HeadsetCollision and a VRTK_HeadsetCollisionFade component to the Play Area. After adding the latter, you’ll notice the VRTK_HeadsetFade component was automatically added.

VRTK_HeadsetCollision reports to VRTK_HeadsetCollisionFade when the player’s head hits an object, which in turn calls VRTK_HeadsetFade to fade the player’s view to black.
The final pieces of the puzzle are the VRTK_InteractGrab and VRTK_InteractTouch components. These are used by the climbing components to locate and use the controllers.

That all that’s needed to implement climbing.
Play the scene and teleport next to the ladder. Squeeze the controller while hovering over the ladder to grab it and pull yourself up. You can alternate between the controllers to climb all the way up like you would in real life.

Any object can be made climbable. For example, climbing the huge tower instead of teleporting to the top would make for an exciting challenge. You’re welcome!
Where to Go From Here?
You can download the final project for this tutorial using the “Download Materials” button at the top or bottom of this page.
Congratulations, you made it to the end of this tutorial. If you had trouble following along, you can always review the final project for this tutorial.
To recap, in this tutorial you learned how to:
- Teleport on terrain.
- Use destination points to cover large distances.
- Use fixed positions for teleport locations.
- Dash teleport.
- Use body physics.
- Climb objects.
This was just the tip of the iceberg. There are many more ways of changing and enhancing the movement in VR. For example, vehicles like cars, boats and planes are an excellent way to avoid motion sickness and let the player move around quickly. Grappling hooks are also a neat option for movement.
If you have questions or comments about this tutorial, please add them in the section below!