Advanced VR Movement in Unity Tutorial
Bring fluid movement to your VR games – and avoid making your players sick – in this tutorial on advanced movement in Unity! By Eric Van de Kerckhove.
This is an abridged version of a chapter from our new book: Unity AR & VR by Tutorials. Enjoy!
Movement is an essential part of any VR experience, and the most common way to move a player is with teleportation. One of the reasons teleportation is so popular in VR is because it helps to avoid motion sickness — the human body doesn’t like it when there’s a mismatch between what it sees and what it feels.
However, there are other ways to move besides teleportation, and this tutorial will not only cover the basics of teleportation, but also those other modes of transportation.
In this tutorial, you’ll learn how to:
- Teleport on terrain.
- Use destination points to cover large distances.
- Use fixed positions for teleport locations.
- Dash teleport.
- Use body physics.
- Climb objects.
Getting Started
First, download the materials for this tutorial using the Download Materials button at the top or bottom of this page.
To begin, open the starter project for this tutorial in Unity and look around the scene.
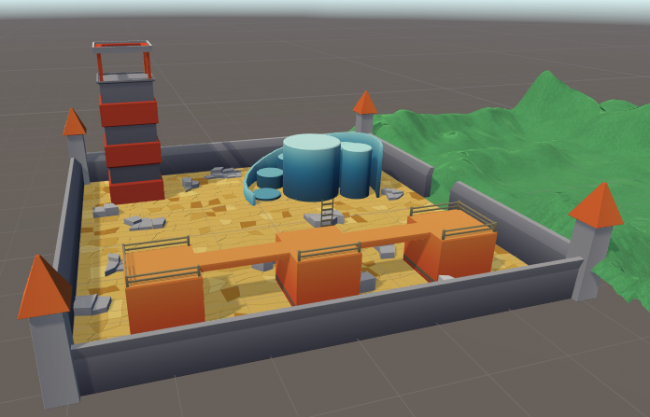
This scene consists of two sections: the obstacle field and the terrain. In this tutorial, you’ll only need to add GameObjects and components to the terrain.
Now, look at the assets:

The scene doesn’t contain a VRTK SDK Manager so you won’t be able to look around the world for yourself just yet. To remedy this, drag the [VRTK_SDK_MANAGER] prefab from the Razeware\Prefabs folder into the root of the Hierarchy.

Get your VR headset and controllers ready, then press the Play button to get a good look at everything from the ground level.
To teleport, use the left controller.

Not sure how teleportation works? No worries, because next up is a quick introduction to how teleporting works.
Terrain Teleportation
Before adding any components, you should first understand how the VRTK_Height Adjust Teleport component that’s attached to the Play Area works. When you point the laser pointer at a collider and let go, a raycast is shot toward the endpoint. Both the play area and the player within get transported to the position of that point.

This also means it can adapt to any type of collider, including terrain colliders. You can try this out by playing the scene and teleporting onto the green terrain.

Perfect! With that out of the way, it’s time to explore some exciting ways of extending and replacing the movement system.
Destination Points
While you were playing with teleportation, you may have realized that you can’t move to locations you can’t see. For example, if you wanted to teleport to the top of the tower from the ground, you won’t be able to because you can’t see it from the ground.

However, there’s a way to set up “portals” between two points using destination points.
Add a new empty GameObject to the Hierarchy, name it Destination Points and reset its Transform. This acts as a folder for all of the destination points.
Now, create another empty GameObject, parent it to Destination Points and name it Teleport. Reset its Transform as well. This holds the destination points to teleport up and down the tower.
Drag a DestinationPoint prefab from the VRTK\Prefabs folder onto Teleport to parent it. Set its Position to (X:-15, Y:0, Z:-16), and double-click the DestinationPoint in the Hierarchy to get a better look at it.

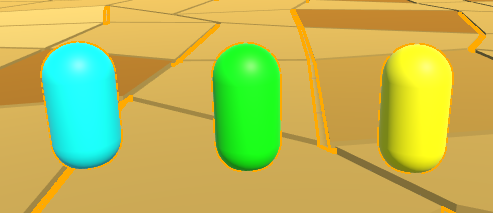
Unlike in The Matrix, this blue pill can take you wherever you desire.
If this blue pill looks yellow in your editor, that’s because a destination point has three child GameObjects:
- defaultCursor: Blue, shown by default.
- hoverCursor: Green, gets shown when you hover over it with a laser pointer.
- lockedCursor: Yellow, shown if Enable Teleport is turned off on the main destination point component.
These are all placed at (X:0, Y:0, Z:0) by default, so they overlap. Here’s a blown out view of all three:
Having just one of these won’t do you any good though. Duplicate DestinationPoint, name it High Point, and move it to (X:-20, Y:21.5, Z:-17.5). This positions it at the top of the tower:

It’s time to link them up: select DestinationPoint and drag High Point onto the Destination Location slot.
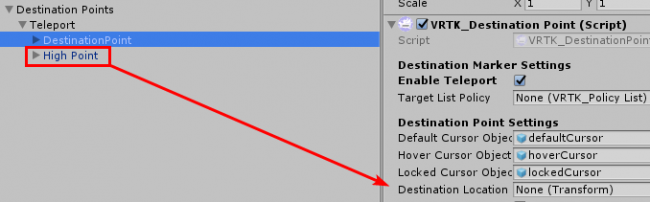
Now select High Point and drag DestinationPoint to its Destination Location. This creates a connection between them in two directions so that you can teleport freely between them.

Play the scene and try it out. Point the teleport line toward the bottom destination point and let go like you’d do on the floor. If all goes well, you’ll teleport to the top of the tower. While you’re up there, enjoy the view.

Fixed Teleportation
Some VR games don’t allow you to teleport everywhere. Instead, they rely on fixed hotspots to limit the player’s movement. This is ideal for creating immersive experiences and puzzle games like Myst and Riven. To create this behavior, you’ll need to use destination points again.

Create an empty GameObject and name it Fixed. Parent it to Destination Points and reset its Transform.

This serves as the root for the teleport hotspots. Now drag an instance of DestinationPoint from the VRTK\Prefabs folder onto Fixed to parent it. Name it Fixed Point and change its Position to (X:-22, Y:1.5, Z:-10.5).
This positions it on top of one of the rocks next to the tower:

This destination point doesn’t need a Destination Location as the destination is the object itself. Create another eleven Fixed Point GameObjects, parenting them to Fixed, and setting them up with the following positions:
- (X:-27, Y:1.4, Z:-3.6)
- (X:1.4, Y:1.2, Z:6.6)
- (X:-13, Y:0.6, Z:2.6)
- (X:-18, Y:2.7, Z:4.9)
- (X:-21, Y:4.7, Z:10)
- (X:-20, Y:5.8, Z:15.6)
- (X:-15, Y:7.8, Z:18.6)
- (X:-9, Y:9.2, Z:18.5)
- (X:11, Y:1, Z:-4.2)
- (X:-11.5, Y:10, Z:15)
- (X:-11, Y:10, Z:7)
You should now have a group of destination points spread all over the scene:

Everything is now in place for fixed teleportation, except one crucial detail: the player can still teleport around freely, so there’s no reason to the use the fixed points yet.
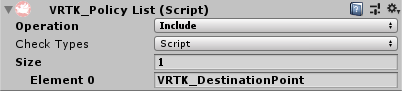
To limit the places the player is allowed to teleport, add a VRTK_PolicyList component to the Play Area under [VRTK_SETUP].

Because you’re limiting teleportation to only the destination points, set the Operation on the policy list to Include, set Check Types to Script only, and enter VRTK_DestinationPoint in Element 0.
Drag the policy list component to the Target List Policy slot on the VRTK_Height Adjust Teleport component to make it use the list.

That’s it. Play the scene and teleport around. As you do, notice how you can only use the destination points to move around.

You can scatter more fixed points around and create a “scenic” route around the level by duplicating the existing ones and moving them to the terrain, for example. In a full game, you’d likely place them next to things like machines and other objects the player can manipulate.
Before moving on to the next section, remove the Target List Policy from the VRTK_Height Adjust Teleport component by setting it to None.

You’ll need free movement for the next mechanics to work correctly.