Firebase Tutorial: Getting Started
Learn Firebase fundamentals including saving data, real-time sync, authentication, user status and offline support. By Lea Marolt Sonnenschein.
Sign up/Sign in
With a free Kodeco account you can download source code, track your progress, bookmark, personalise your learner profile and more!
Create accountAlready a member of Kodeco? Sign in
Sign up/Sign in
With a free Kodeco account you can download source code, track your progress, bookmark, personalise your learner profile and more!
Create accountAlready a member of Kodeco? Sign in
Contents
Firebase Tutorial: Getting Started
35 mins
- Getting Started
- Setting up a Firebase Account
- Creating a Connection to Firebase
- Structuring Data
- Understanding Firebase References
- Adding New Items to the List
- Retrieving Data
- Synchronizing Data to the Table View
- Removing Items From the Table View
- Checking Off Items
- Sorting the Grocery List
- Authenticating Users
- Registering Users
- Logging Users In
- Observing Authentication State
- Setting the User in the Grocery List
- Logging Users Out
- Monitoring Users’ Online Status
- Updating the Online User Count
- Displaying a List of Online Users
- Enabling Offline
- Where to Go From Here?
Setting the User in the Grocery List
Go to GroceryListTableViewController.swift and add a new property:
var handle: AuthStateDidChangeListenerHandle?
You’ll use this handle the same way you did in LoginViewController.
Then, add the following to the bottom of viewWillAppear(_:):
handle = Auth.auth().addStateDidChangeListener { _, user in
  guard let user = user else { return }
  self.user = User(authData: user)
}
Here you attach an authentication observer to the Firebase auth object, which in turn assigns user when a user successfully signs in.
Add the following to viewDidDisappear(_:):
guard let handle = handle else { return }
Auth.auth().removeStateDidChangeListener(handle)
Once again, you remove the observers when you no longer need them.
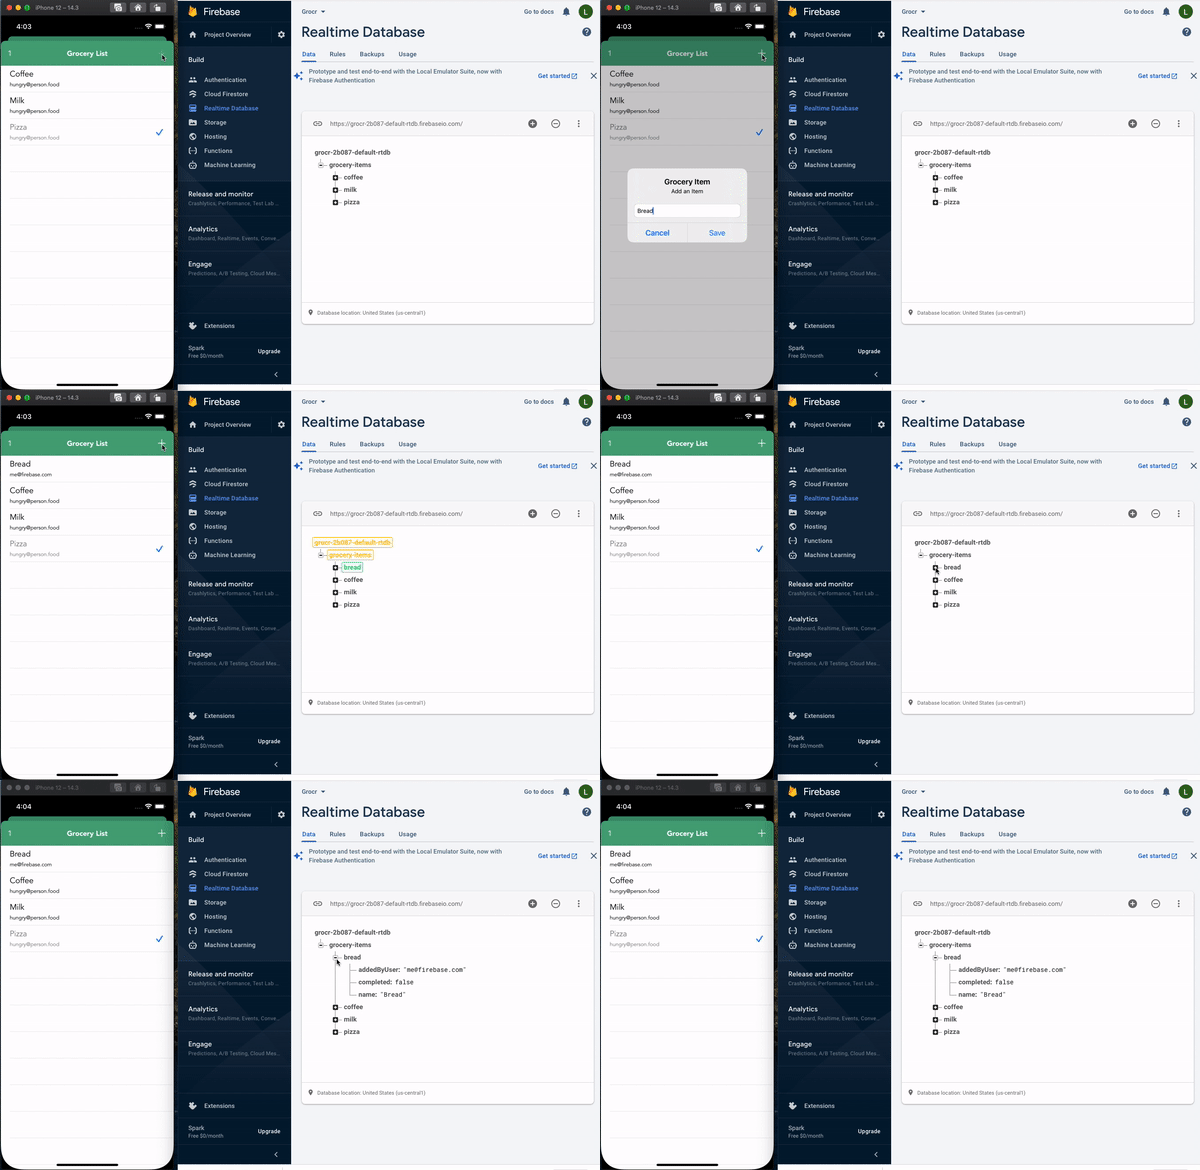
Build and run. If a user is logged in, the app bypasses LoginViewController and segues to GroceryListTableViewController. When users add items, their email shows in the cell’s detail.
Since users can log in, they should be able to log out, too.
Logging Users Out
Open OnlineUsersTableViewController.swift and replace the code inside signOutDidTouch(_:) with:
// 1
guard let user = Auth.auth().currentUser else { return }
let onlineRef = Database.database().reference(withPath: "online/\(user.uid)")
// 2
onlineRef.removeValue { error, _ in
  // 3
  if let error = error {
    print("Removing online failed: \(error)")
    return
  }
  // 4
  do {
    try Auth.auth().signOut()
    self.navigationController?.popToRootViewController(animated: true)
  } catch let error {
    print("Auth sign out failed: \(error)")
  }
}
Here’s a code breakdown:
For this app, it doesn’t make sense to show users as online after they log out. So, you manually remove them here.
- First, you get the
currentUserand createonlineRefusing itsuid, a unique identifier representing the user. - You call
removeValueto delete the value foronlineRef. While Firebase automatically adds the user toonlineupon sign in, it doesn’t remove the user on sign out. Instead, it only removes users when they become disconnected. - Within the completion closure, you first check if there’s an error and simply print it if so.
- Then you call
Auth.auth().signOut()to remove the user’s credentials from the keychain. If there isn’t an error, you dismiss the view controller. Otherwise, you print out the error.
Build and run. Tap the left navigation item. Then tap Sign Out and you’ll return to the login page.
Success! The app now has basic user authentication.
Next, you’ll monitor users’ online status.
Monitoring Users’ Online Status
It’s time to detect which users are online. Open GroceryListTableViewController.swift and add:
let usersRef = Database.database().reference(withPath: "online")
var usersRefObservers: [DatabaseHandle] = []
The usersRef Firebase reference points to an online location that stores a list of online users. You see the same pattern here with usersRefObservers. It’s a good practice to explicitly keep track of your observers and remove them when you’re done.
Next, add the following to the bottom of addStateDidChangeListener(_:) inside viewWillAppear(_:):
// 1
let currentUserRef = self.usersRef.child(user.uid)
// 2
currentUserRef.setValue(user.email)
// 3
currentUserRef.onDisconnectRemoveValue()
In the code above, you:
- Create a child reference using a user’s
uid. Firebase generates a uniqueuidwhenever a user creates a new account. - Use this reference to save the current user’s email.
- Call
onDisconnectRemoveValue()oncurrentUserRef. This removes the value at the reference’s location after the connection to Firebase closes, like when a user quits your app. This is perfect for monitoring users who have gone offline.
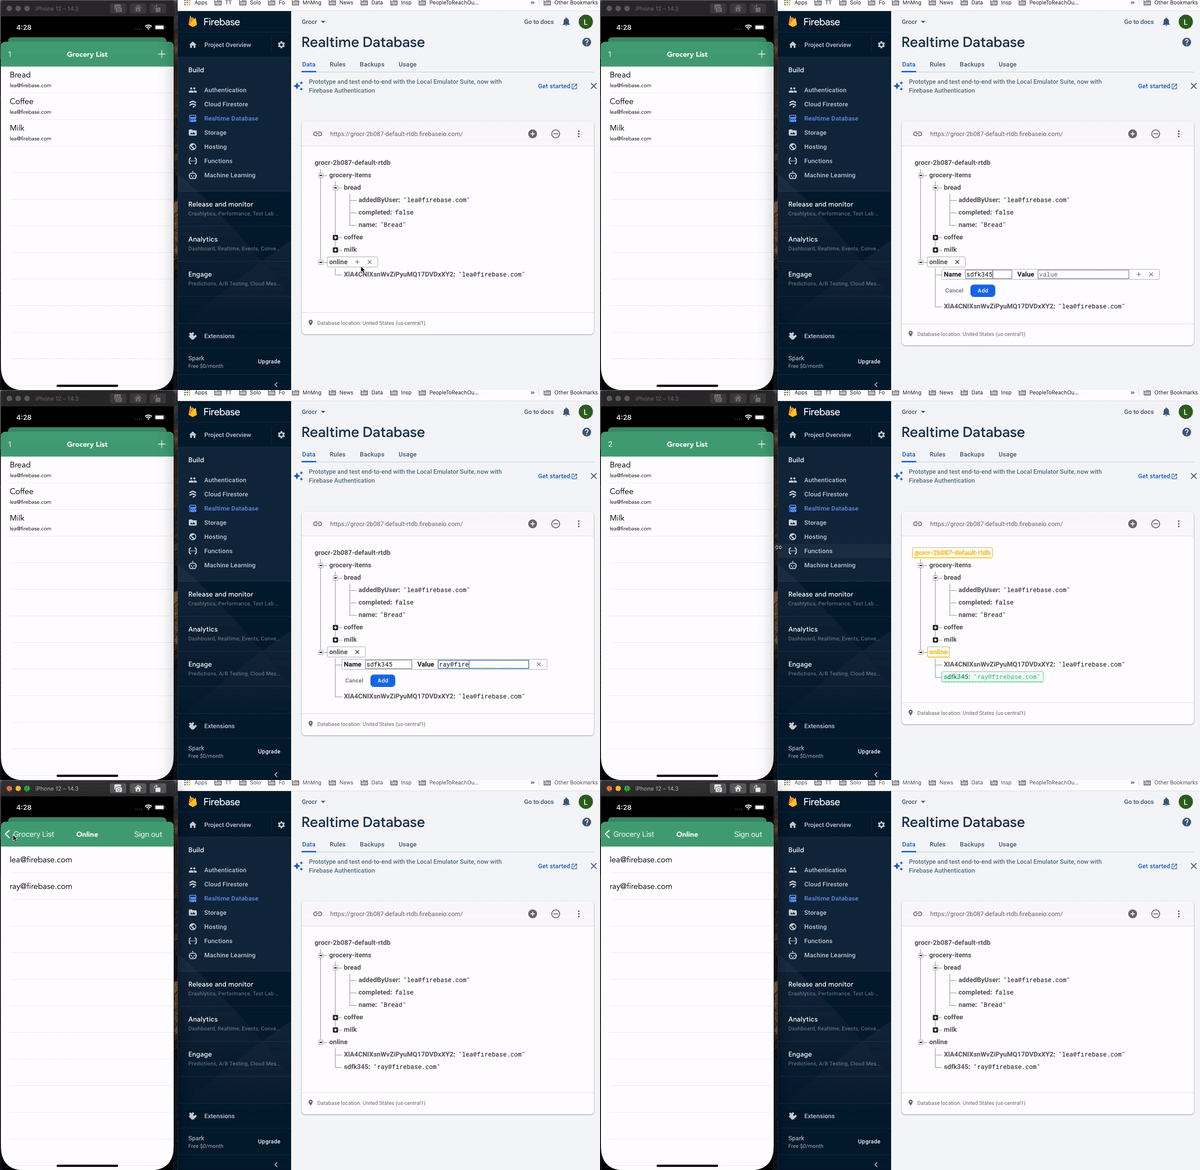
Build and run. When the view loads, the current user’s email is added as a child in the online location.
Great! Now it’s time to change the bar button item’s number as the user count grows.
Updating the Online User Count
Still in GroceryListTableViewController.swift, add the following code to viewWillAppear(_:):
let users = usersRef.observe(.value) { snapshot in
  if snapshot.exists() {
    self.onlineUserCount.title = snapshot.childrenCount.description
  } else {
    self.onlineUserCount.title = "0"
  }
}
usersRefObservers.append(users)
This code creates an observer that monitors online users. When users go online and offline, the title of onlineUserCount updates with the current user count.
Now, add the following to the bottom of viewDidDisappear(_:):
usersRefObservers.forEach(usersRef.removeObserver(withHandle:))
usersRefObservers = []
This removes associated observers on usersRef.
Next, you’ll display a list of online users.
Displaying a List of Online Users
Open OnlineUsersTableViewController.swift. As you did before, add a local reference to Firebase’s online users record in the class’s properties section:
let usersRef = Database.database().reference(withPath: "online")
var usersRefObservers: [DatabaseHandle] = []
Then, in viewDidLoad, remove:
currentUsers.append("hungry@person.food")
It’s no longer needed.
Next, in viewWillAppear(_:), add:
// 1
let childAdded = usersRef
  .observe(.childAdded) { [weak self] snap in
    // 2
    guard
      let email = snap.value as? String,
      let self = self
    else { return }
    self.currentUsers.append(email)
    // 3
    let row = self.currentUsers.count - 1
    // 4
    let indexPath = IndexPath(row: row, section: 0)
    // 5
    self.tableView.insertRows(at: [indexPath], with: .top)
  }
usersRefObservers.append(childAdded)
Here you:
- Create an observer that listens for changes in
usersRef, when a new child is added. This is different than observing a value change because it only passes the added child to the closure. - Take the value from the snapshot and append it to the local array.
- You’re going to add a new row. The new row index is the count of the local array minus one because the indexes managed by the table view are zero-based.
- Create the corresponding
NSIndexPathusing the calculated row index. - Insert the row using an animation that inserts the cell from the top.
This code renders items as users come online.
Since users can also go offline, the table needs to react to it by removing them. Add the following below the code you just added:
let childRemoved = usersRef
  .observe(.childRemoved) {[weak self] snap in
    guard
      let emailToFind = snap.value as? String,
      let self = self
    else { return }

    for (index, email) in self.currentUsers.enumerated()
    where email == emailToFind {
      let indexPath = IndexPath(row: index, section: 0)
      self.currentUsers.remove(at: index)
      self.tableView.deleteRows(at: [indexPath], with: .fade)
    }
  }
usersRefObservers.append(childRemoved)
This time, you listen for the removal of children from usersRef. You search the local array, using the email address, to find the corresponding child item. Once located, you delete the associated row from the table.
Next in viewDidDisappear(_:) add:
usersRefObservers.forEach(usersRef.removeObserver(withHandle:))
usersRefObservers = []
This removes relevant observers from usersRef.
removeAllObservers() that you can call on a database object to remove all observers. However, keep in mind that removeAllObservers() will remove all observers on a particular node, regardless of where and when in the code they were added.Build and run.
Tap Online in the Firebase users dashboard. The current user’s email will appear in the table.
With a bit of trickery, you can add a user to Online. Once you do, it shows in the list. Click Remove in the Dashboard and the user fades from existence.
Booyah! The table updates when you add or remove users.


