How To Make A Simple Drawing App with UIKit and Swift
Learn how to make your own drawing app, including different colors and brushes, using UIKit and Core Graphics in this tutorial! By Jean-Pierre Distler.
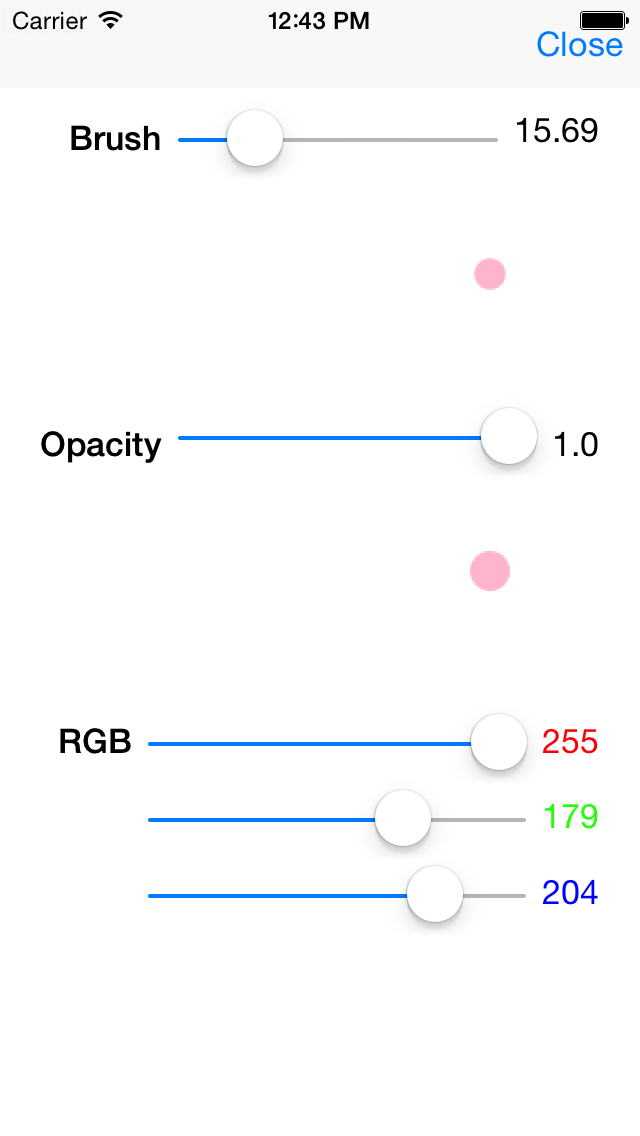
Finishing Touches — A Custom Color Selector
Currently, you have 10 color buttons on your drawing canvas screen. However, with the custom RGB color selector, the discriminating artists using your app will have the ability to control to pick any available color from the RGB range.
There are a set of RGB color sliders in the settings screen that you will implement next.
Since you’ve provided a preview of the brush size and opacity, you might as well provide a preview of the new brush color! :] The preview will be shown in both preview image views – as well, the opacity and brush preview will be shown in the RGB color. No need for an extra image; you’ll re-use what you already have!
Open SettingsViewController.swift and add the following properties:
var red: CGFloat = 0.0
var green: CGFloat = 0.0
var blue: CGFloat = 0.0
You’ll use these to save the current RGB values.
Now add the implementation of colorChanged:
red = CGFloat(sliderRed.value / 255.0)
labelRed.text = NSString(format: "%d", Int(sliderRed.value)) as String
green = CGFloat(sliderGreen.value / 255.0)
labelGreen.text = NSString(format: "%d", Int(sliderGreen.value)) as String
blue = CGFloat(sliderBlue.value / 255.0)
labelBlue.text = NSString(format: "%d", Int(sliderBlue.value)) as String

drawPreview()
This is the method that will be called when you move any of the RGB sliders. In above code, notice how all you’re doing is updating the property values and updating the labels.
If you build and run your project now you will notice that your color changes will not be shown in the previews. To show them you need a small change in drawPreview(). Search the lines that call CGContextSetRGBStrokeColor and replace all 0.0 values with the variables red, green and blue.
In the first half of the method, replace the call to CGContextSetRGBStrokeColor with the following:
CGContextSetRGBStrokeColor(context, red, green, blue, 1.0)
And in the second half, replace the call to CGContextSetRGBStrokeColor with the following:
CGContextSetRGBStrokeColor(context, red, green, blue, opacity)
Now that you have the brush and opacity samples drawing with all the correct settings, you’ll want to show them right when the settings screen appears. Add the following implementation of add viewWillAppear to the class:
override func viewWillAppear(animated: Bool) {
  super.viewWillAppear(animated)

  sliderBrush.value = Float(brush)
  labelBrush.text = NSString(format: "%.1f", brush.native) as String
  sliderOpacity.value = Float(opacity)
  labelOpacity.text = NSString(format: "%.1f", opacity.native) as String
  sliderRed.value = Float(red * 255.0)
  labelRed.text = NSString(format: "%d", Int(sliderRed.value)) as String
  sliderGreen.value = Float(green * 255.0)
  labelGreen.text = NSString(format: "%d", Int(sliderGreen.value)) as String
  sliderBlue.value = Float(blue * 255.0)
  labelBlue.text = NSString(format: "%d", Int(sliderBlue.value)) as String

  drawPreview()
}
As you can see this method just presets all labels and sliders with the correct values. The drawPreview call ensures that the preview image views also show the correct thing.
Finally, open ViewController.swift. As before, you’ll need to make sure the current color make it across to the settings screen so add the following lines to the end of prepareForSegue:
settingsViewController.red = red
settingsViewController.green = green
settingsViewController.blue = blue
This will pass on the current red, green and blue values so the RGB sliders are set correctly.
Finally, find settingsViewControllerFinished in the class extension and add the following lines to that method:
self.red = settingsViewController.red
self.green = settingsViewController.green
self.blue = settingsViewController.blue
In the above code, as the SettingsViewController closes, the updated RGB values are being fetched as well.
All right — time for another build and run stage! Put the Color Picker through its paces. The selected RGB color, which is displayed in RGBPreview, is now the default brush stroke color on the drawing canvas!
But what good is all of these wonderful works of art if you can’t share them with the world? Since you can’t stick the pictures up on your refrigerator, you’ll share them with the world in the final step of this tutorial! :]
Finishing Touches – Share and Enjoy!
In this final step, you’ll use the iOS share sheet to send your works of art out there into the world!
There are two parts to this: first, you need to get the drawing as a UIImage object; then, you just pass it on to UIActivityViewController to decides which sharing options will work best depending on what accounts and services are available.
In ViewController.swift, add the following implementation to share():
UIGraphicsBeginImageContext(mainImageView.bounds.size)
mainImageView.image?.drawInRect(CGRect(x: 0, y: 0,
  width: mainImageView.frame.size.width, height: mainImageView.frame.size.height))
let image = UIGraphicsGetImageFromCurrentImageContext()
UIGraphicsEndImageContext()

let activity = UIActivityViewController(activityItems: [image], applicationActivities: nil)
presentViewController(activity, animated: true, completion: nil)
This method is pretty simple – first it renders out the drawing from mainImageView to a new UIImage. Then, UIActivityViewController does most of the heavy lifting! All you need to do is pass it an array of things to share; in this case, that’s just the single image.
The second parameter to the initializer applicationActivities lets you limit the activities, so passing nil means iOS will provide as many share options as possible. Your drawing deserves no less!
Build and run the app, and create your masterpiece! When you hit Share, you’ll now be able to let the world know of your talents.

Where To Go From Here?
Here is the DrawPad-final-6_3 with all of the code from the above tutorial.
You can play around a bit more with the brush strokes and also investigate the drawing of arcs and rectangles using Quartz2D. A good start would be to have a look at Quartz 2D Programming Guide” . There are number of beginner and advanced-level concepts there with which you can play around to create awesome shapes and patterns.
If you want to learn how to draw more smooth lines, you should also check out this smooth line drawing article by Krzysztof Zablocki. It’s based on Cocos2D but you can use the same technique in UIKit.
I hope you enjoyed this tutorial as much as I did! Feel free to post your questions and comments on the forum — and feel free to share your masterpieces you created with your new app! :]