UIDocument From Scratch
Learn how to add document support to your app using UIDocument. By Lea Marolt Sonnenschein.
There are a few ways to store data in the iOS ecosystem:
- UserDefaults for small amounts of data.
- Core Data for large amounts of data.
- UIDocuments when you base your app around the concept of individual documents the user can create, read, update and delete.
The iOS 11 additions of UIDocumentBrowserViewController and the Files app have made life significantly simpler by providing easy access to manage files in apps. But what if you wanted more granular control?
In this tutorial, you’ll learn how to create, retrieve, edit and delete UIDocuments to the iOS file system from scratch. This covers four topics:
- Creating data models.
- Subclassing
UIDocument. - Creating and listing
UIDocuments. - Updating and deleting
UIDocuments.
Protocols and delegate patterns,
and Error handling in Swift. If you aren’t, review these tutorials before you get started.
Getting Started
In this tutorial, you’ll create an app called PhotoKeeper, which allows you to store and name your favorite photos. Use the Download Materials button at the top or bottom of this tutorial to download the starter project.
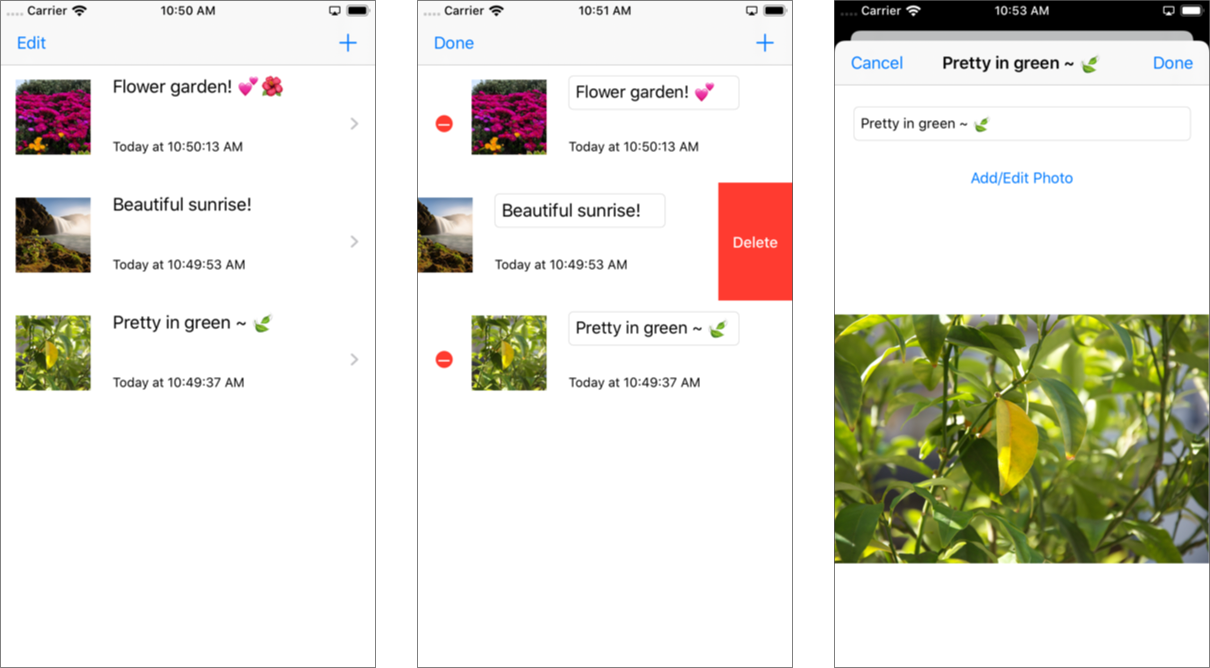
Open the starter project. Then, build and run.

You can add entries to a table view by tapping the + button on the right and edit them by tapping the Edit button on the left.
The app you’ll end up with will allow you to select and name your favorite photos. You’ll also be able to change the photo or title or delete it entirely.
Data Models
UIDocument supports two different classes for input/output:
- Data: A simple data buffer. Use this when your document is a single file.
- FileWrapper: A directory of file packages which the OS treats as a single file. It’s great when your document consists of multiple files you want to load independently.
The data model for this tutorial is quite simple: It’s just a photo! So, it might seem that using Data would make the most sense.
However, you want to show a thumbnail of a photo in the master view controller before the user opens a file. If you used Data, you’d have to open and decode every single document from the disk to get the thumbnails. Since the images can be quite large, this could lead to slow performance and high memory overhead.
So, you’re going to use FileWrapper instead. You’ll store two documents inside the wrapper:
- PhotoData represents the full-size photo.
- PhotoMetadata represents the photo thumbnail. It’s a small amount of data that the app can load quickly.
First, define some constants. Open Document.swift and add this at the top of the document, right after import UIKit:
extension String {
  static let appExtension: String = "ptk"
  static let versionKey: String = "Version"
  static let photoKey: String = "Photo"
  static let thumbnailKey: String = "Thumbnail"
}
Keep in mind:
- “ptk” is your app’s specific file extension, so you can identify the directory as a document your app knows how to handle.
- “Version” is the key to encode and decode the file’s version number so you can update the data structure if you want support older files in the future.
-
“Photo” and “Thumbnail” are keys for
NSCoding.
Now open PhotoData.swift and implement the PhotoData class:
class PhotoData: NSObject, NSCoding {
  var image: UIImage?

  init(image: UIImage? = nil) {
    self.image = image
  }

  func encode(with aCoder: NSCoder) {
    aCoder.encode(1, forKey: .versionKey)
    guard let photoData = image?.pngData() else { return }

    aCoder.encode(photoData, forKey: .photoKey)
  }

  required init?(coder aDecoder: NSCoder) {
    aDecoder.decodeInteger(forKey: .versionKey)
    guard let photoData = aDecoder.decodeObject(forKey: .photoKey) as? Data else {
      return nil
    }

    self.image = UIImage(data: photoData)
  }
}
PhotoData is a simple NSObject that holds the full-size image and its own version number. You implement the NSCoding protocol to encode and decode these to a data buffer.
Next, open PhotoMetadata.swift and paste this after the imports:
class PhotoMetadata: NSObject, NSCoding {
  var image: UIImage?

  init(image: UIImage? = nil) {
    self.image = image
  }

  func encode(with aCoder: NSCoder) {
    aCoder.encode(1, forKey: .versionKey)

    guard let photoData = image?.pngData() else { return }
    aCoder.encode(photoData, forKey: .thumbnailKey)
  }

  required init?(coder aDecoder: NSCoder) {
    aDecoder.decodeInteger(forKey: .versionKey)

    guard let photoData = aDecoder.decodeObject(forKey: .thumbnailKey)
      as? Data else {
      return nil
    }
    image = UIImage(data: photoData)
  }
}
PhotoMetadata does the same as PhotoData, except the image it stores will be much smaller. In a more fully-featured app, you could be storing other information about the photo in here (like notes or ratings), which is why it’s a separate type.
Congrats, you now have the model classes for PhotoKeeper!
Subclassing UIDocument
UIDocument is an abstract base class. This means you must subclass it and implement certain required methods before it can be used. In particular, you have to override two methods:
-
load(fromContents:ofType:)This is where you read the document and decode the model data. -
contents(forType:)Use this to write the model into the document.
First, you’ll define some more constants. Open Document.swift and then add this right above the class definition for Document:
private extension String {
  static let dataKey: String = "Data"
  static let metadataFilename: String = "photo.metadata"
  static let dataFilename: String = "photo.data"
}
You’ll use these constants to encode and decode your UIDocument files.
Next, add these properties to the Document class:
// 1
override var description: String {
  return fileURL.deletingPathExtension().lastPathComponent
}

// 2
var fileWrapper: FileWrapper?

// 3
lazy var photoData: PhotoData = {
  // TODO: Implement initializer
  return PhotoData()
}()

lazy var metadata: PhotoMetadata = {
  // TODO: Implement initializer
  return PhotoMetadata()
}()

// 4
var photo: PhotoEntry? {
  get {
    return PhotoEntry(mainImage: photoData.image, thumbnailImage: metadata.image)
  }

  set {
    photoData.image = newValue?.mainImage
    metadata.image = newValue?.thumbnailImage
  }
}
Here’s what you did:
- You override
descriptionto return the title of the document by taking thefileURL, removing the “ptk” extension and grabbing the last part of the path component. -
fileWrapperis the OS file system node representing the directory that contains your photo and metadata. -
photoDataandphotoMetadataare the data models used to interpret the photo.metadata and photo.data subfiles thefileWrappercontains. These are lazy variables, and you’ll be adding code to pull them from files later on. -
photois the property used to access and update your main and thumbnail image when you make changes. It’s aliasedPhotoEntrytype simply contains your two images.
Next, it’s time to add the code to write the UIDocument to disk.
First, add these methods below the properties you’ve just added:
private func encodeToWrapper(object: NSCoding) -> FileWrapper {
  let archiver = NSKeyedArchiver(requiringSecureCoding: false)
  archiver.encode(object, forKey: .dataKey)
  archiver.finishEncoding()

  return FileWrapper(regularFileWithContents: archiver.encodedData)
}

override func contents(forType typeName: String) throws -> Any {
  let metaDataWrapper = encodeToWrapper(object: metadata)
  let photoDataWrapper = encodeToWrapper(object: photoData)
  let wrappers: [String: FileWrapper] = [.metadataFilename: metaDataWrapper,
                                         .dataFilename: photoDataWrapper]

  return FileWrapper(directoryWithFileWrappers: wrappers)
}
encodeToWrapper(object:) uses NSKeyedArchiver to convert the object that implements NSCoding into a data buffer. Then it creates a FileWrapper file with the buffer and adds it to the directory.
To write data to your document, you implement contents(forType:). You encode each model type into a FileWrapper, then create a dictionary of wrappers with filenames as keys. Finally, you use this dictionary to create another FileWrapper wrapping the directory.
Great! Now you can implement reading. Add the following methods:
override func load(fromContents contents: Any, ofType typeName: String?) throws {
  guard let contents = contents as? FileWrapper else { return }

  fileWrapper = contents
}

func decodeFromWrapper(for name: String) -> Any? {
  guard
    let allWrappers = fileWrapper,
    let wrapper = allWrappers.fileWrappers?[name],
    let data = wrapper.regularFileContents
    else {
      return nil
    }

  do {
    let unarchiver = try NSKeyedUnarchiver.init(forReadingFrom: data)
    unarchiver.requiresSecureCoding = false
    return unarchiver.decodeObject(forKey: .dataKey)
  } catch let error {
    fatalError("Unarchiving failed. \(error.localizedDescription)")
  }
}
You need load(fromContents:ofType:) to implement reading. All you do is initialize the fileWrapper with the contents.
decodeFromWrapper(for:) does the opposite of encodeToWrapper(object:). It reads the appropriate FileWrapper file from the directory FileWrapper and converts the data contents back to an object via the NSCoding protocol.
The last thing to do is implement the getters for photoData and photoMetadata.
First, replace the lazy initializer for photoData with:
//1
guard
  fileWrapper != nil,
  let data = decodeFromWrapper(for: .dataFilename) as? PhotoData
  else {
    return PhotoData()
}

return data
Then, replace the lazy initializer for photoMetadata with:
guard
  fileWrapper != nil,
  let data = decodeFromWrapper(for: .metadataFilename) as? PhotoMetadata
  else {
    return PhotoMetadata()
}
return data
Both lazy initializers do pretty much the same thing, but they look for fileWrappers with different names. You try to decode the appropriate file from the fileWrapper directory as an instance of your data model class.