UICollectionView Custom Layout Tutorial: A Spinning Wheel
In this UICollectionView custom layout tutorial, you’ll learn how create a spinning navigation layout, including managing view rotation and scrolling. By Rounak Jain.
Preparing the Layout
The first time the collection view appears on screen, the UICollectionViewLayout method prepareLayout() is called. This method is also called each time the layout is invalidated.
This is one of the most crucial methods of the layout process, because it’s where you create and store layout attributes. Make it happen by adding the following to CircularCollectionViewLayout:
override func prepareLayout() {
  super.prepareLayout()

  let centerX = collectionView!.contentOffset.x + (CGRectGetWidth(collectionView!.bounds) / 2.0)
  attributesList = (0..<collectionView!.numberOfItemsInSection(0)).map { (i)
      -> CircularCollectionViewLayoutAttributes in
    // 1
    let attributes = CircularCollectionViewLayoutAttributes(forCellWithIndexPath: NSIndexPath(forItem: i,
        inSection: 0))
    attributes.size = self.itemSize
    // 2
    attributes.center = CGPoint(x: centerX, y: CGRectGetMidY(self.collectionView!.bounds))
    // 3
    attributes.angle = self.anglePerItem*CGFloat(i)
    return attributes
  }
}
In short, you iterate over each item in the collection view and execute the closure. Keep reading for a line-by-line explanation:
- Create an instance of
CircularCollectionViewLayoutAttributesfor each index path, and then set its size. - Position each item at the center of the screen.
- Rotate each item by the amount
anglePerItem * i, in radians.
map, is part of the Swift standard library and creates a new array with the results of the closure for each element in the range. You can find out more about the functional programming side of Swift here.To properly subclass UICollectionViewLayout you’ll also have to override the following methods, which return the layout attributes for the items in the given rect, and the item at the given index path respectively. The collection view will call these method numerous times throughout the layout process, as well as when the user scrolls the collection view, so it’s important that they’re efficient – hence why you create and cache the layout attributes in prepareLayout(). Add them below prepareLayout():
override func layoutAttributesForElementsInRect(rect: CGRect) -> [AnyObject]? {
  return attributesList
}

override func layoutAttributesForItemAtIndexPath(indexPath: NSIndexPath)
    -> UICollectionViewLayoutAttributes! {
  return attributesList[indexPath.row]
}
The first method simply returns the entire array of attributes, and the second method returns the attributes for the item at the given index path. This approach is OK for the purposes of this tutorial since you only have a small number of items, but usually you would want to iterate over the array and check whether the frame of the layout attributes intersects with the given rect, and only return those layout attributes whose frame does intersect. This would result in the collection view only drawing those items that should be on-screen, or which are about to come on screen.
Build and run. You’ll see cells appear on screen, but rather than rotating around an external point, they rotate around themselves. It’s not quite the desired effect, but it is cool, don’t you think?

Any guess as to why this is happening?
Did Someone Say Anchor Point?
Do you remember the discussion about the anchor point of the cell? You didn’t set it yet, hence the rotation is a touch crazy and not quite what you were looking to achieve.

The anchor point is a property of CALayer around which all rotations and scaling transforms take place. The default value of this property is the center, as you saw in the last build and run.
For the actual anchor point, the x value will remain 0.5, as you’ll observe in the diagram below. The y value, however, will be radius + (itemSize.height / 2), and since the anchor point is defined in the unit coordinate space, you’ll divide the result by itemSize.height.

So jump back to prepareLayout(), and right below the definition of centerX define anchorPointY:
let anchorPointY = ((itemSize.height / 2.0) + radius) / itemSize.height
And inside the map(_:) closure, right before the return statement, add this line:
attributes.anchorPoint = CGPoint(x: 0.5, y: anchorPointY)
Next, open CircularCollectionViewCell.swift and override applyLayoutAttributes(_:) with the following:
override func applyLayoutAttributes(layoutAttributes: UICollectionViewLayoutAttributes!) {
  super.applyLayoutAttributes(layoutAttributes)
  let circularlayoutAttributes = layoutAttributes as! CircularCollectionViewLayoutAttributes
  self.layer.anchorPoint = circularlayoutAttributes.anchorPoint
  self.center.y += (circularlayoutAttributes.anchorPoint.y - 0.5) * CGRectGetHeight(self.bounds)
}
Here, you’re using the superclass implementation to apply the default properties like center and transform, but since anchorPoint is a custom property, you have to apply that manually. You also update center.y to the center of the layout circle to compensate for the change in anchorPoint.y.
Build and run. You’ll see the cells are now laid out in a circle and when you scroll they…wait, what’s going on here? They’re just moving off-screen rather than rotating!?
It’s going to be terribly difficult to find the right book! :]

Improving Scrolling
The most challenging part of laying out the items is done, congratulations! :]

Now you just have to just play around with angle values to implement scrolling.
Jump back to CircularCollectionViewLayout and add the following to the bottom of the class:
override func shouldInvalidateLayoutForBoundsChange(newBounds: CGRect) -> Bool {
  return true
}
Returning true from this method tells the collection view to invalidate it’s layout as it scrolls, which in turn calls prepareLayout() where you can recalculate the cells’ layout with updated angular positions.
angle is defined as the angular position of the 0th item. You’ll implement scrolling by converting contentOffset.x into a suitable value from angle.
contentOffset.x goes from 0 to collectionViewContentSize().width - CGRectGetWidth(collectionView!.bounds) as you scroll. Call the extreme value of contentOffset.x as maxContentOffset. At 0, you want the 0th item at the center, and at the extreme, you want the last item at the center of the screen, which means the last item’s angular position will be zero.
The state of your navigation wheel at the start (left) and the end (right)
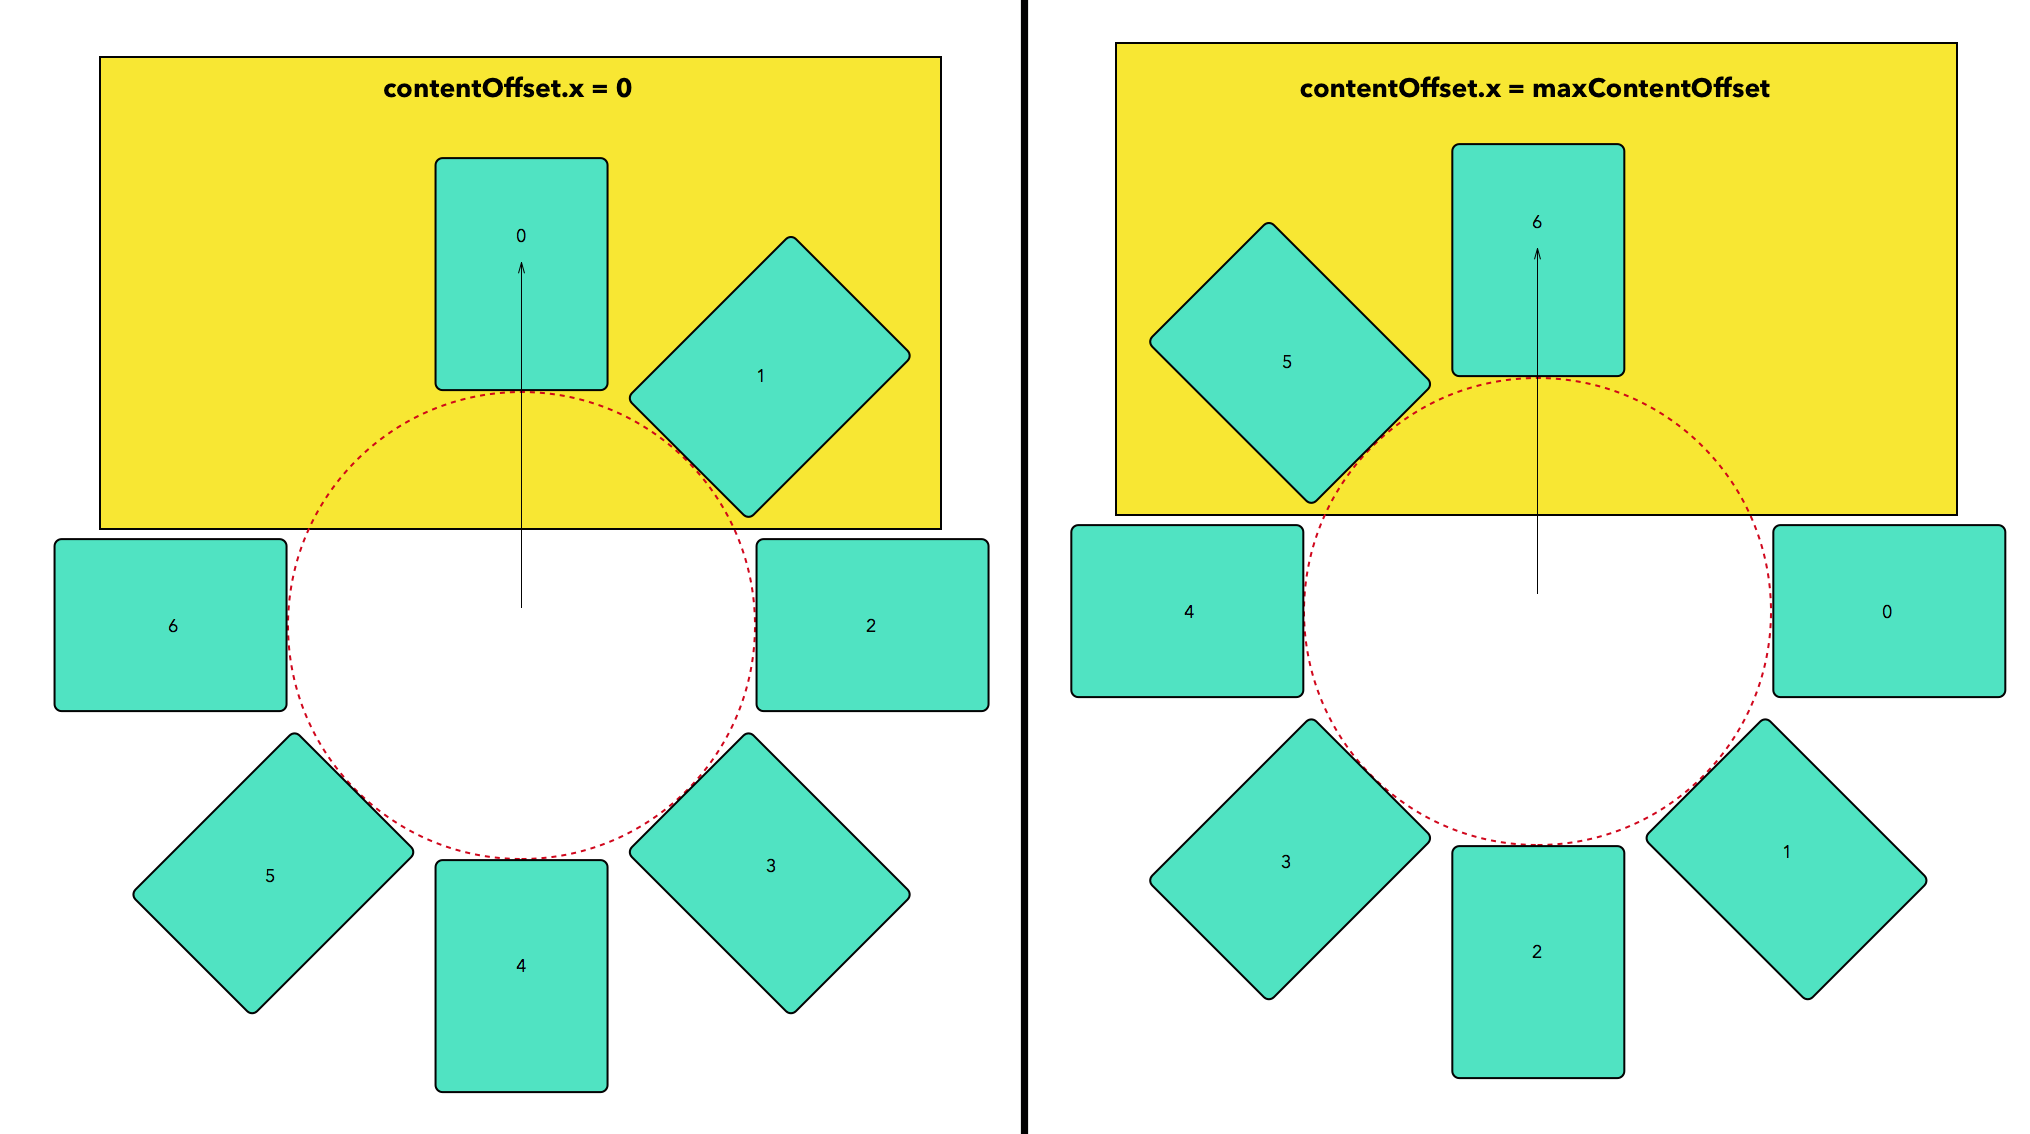
Consider the scenario on the right, and what would happen if you solve the following equation with angle_for_last_item = 0. You would get this:
angle_for_last_item = angle_for_zero_item + (totalItems - 1) * anglePerItem
0 = angle_for_zero_item + (totalItems - 1) * anglePerItem
angle_for_zero_item = -(totalItems - 1) * anglePerItem
Defining -(totalItems - 1) * anglePerItem as angleAtExtreme, you can write:
contentOffset.x = 0, angle = 0
contentOffset.x = maxContentOffset, angle = angleAtExtreme
From here, it’s quite easy to interpolate angle for any value of contentOffset.x using the following formula:
angle = -angleAtExtreme * contentOffset.x / maxContentOffset
Keeping all this math in mind, add the following properties below the declaration for itemSize:
var angleAtExtreme: CGFloat {
  return collectionView!.numberOfItemsInSection(0) > 0 ?
    -CGFloat(collectionView!.numberOfItemsInSection(0) - 1) * anglePerItem : 0
}
var angle: CGFloat {
  return angleAtExtreme * collectionView!.contentOffset.x / (collectionViewContentSize().width -
    CGRectGetWidth(collectionView!.bounds))
}
Next, replace this line in prepareLayout():
attributes.angle = (self.anglePerItem * CGFloat(i))
with this one:
attributes.angle = self.angle + (self.anglePerItem * CGFloat(i))
This adds the value of angle to each item, so that rather than being a constant, its angular position is a function of contentOffset.x.
Build and run. Scroll across the screen and you’ll see that the items now rotate as you scroll. Much better!

Since you used the value of contentOffset.x to derive the value for angular position, you get features like rubber banding, extremes checking and deceleration for free — without having to write any additional code. Bet you feel smarter already!