iOS 9 Storyboards Tutorial: What’s New in Storyboards?
Storyboards have loads of cool new features in iOS 9 — learn all about them in this iOS 9 storyboards tutorial. By Caroline Begbie.
Storyboards within a team
Distributed development of storyboards has always been a challenge; in fact, many developers still avoid storyboards out of fear of the dreaded merge conflict. But storyboard references can help you avoid the complications of team storyboard development.
Consider the following scenario: you’re writing Prepped with a fellow apocalypse survivor, whose task it is to create the functionality to handle the diary entries. She’s built it using a separate storyboard, and now you need to add it to your own storyboard hierarchy…before the zombies descend upon your little enclave.
In the project navigator, select the top level Prepped group, located just below the project itself. Click File\Add Files to “Prepped”. Navigate to the Prepped folder, and select the Diary folder. Ensure that Copy items if needed is checked in the dialog box, and that Added folders is set to Create groups. Ensure that Add to targets is ticked for Prepped. Click Add to add the folder and its contents to the project.
In Main.storyboard, drag a storyboard reference from the Object Library into an empty space on the storyboard:

Ctrl-drag from the existing tab bar controller scene to the storyboard reference:

In the pop-up that appears, choose view controllers from the Relationship Segue section.
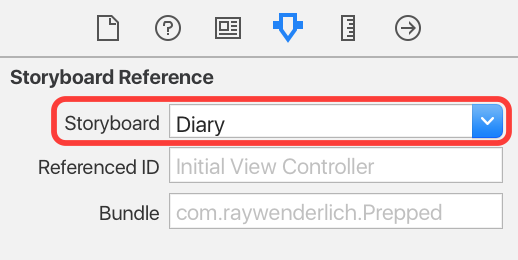
Select the storyboard reference you just added. In the Attributes Inspector set the Storyboard to Diary:
Build and run your app; you’ll see one tab to handle Checklists, and another tab for the Diary entries – the functionality your teammate worked on. You can now add Diary entries using the storyboard scenes and code created by your sister-in-arms:

Focusing on a storyboard
Isn’t it annoying when you have to tap through a bunch of scenes in your app, when you’re just trying to test one single scene buried deep in the stack? With storyboard references you can isolate the scenes you’re interested in into their own storyboard and instruct the app to launch straight into that. You’ll do that now for the checklist item section.
In Checklists.storyboard highlight the Checklist Detail View Controller, Add Item Navigation Controller and Add Item View Controller scenes:

Select Editor\Refactor to Storyboard and name the new storyboard ChecklistDetail.storyboard. Ensure that the Group is still set to Checklists.
Just as you did for the Checklists storyboard, select the Checklist Detail View Controller scene in ChecklistDetail.storyboard, and use the Attributes Inspector to check Is Initial View Controller. The Checklist Detail View Controller should now have an arrow on its left to indicate it’s the first scene in the storyboard.
Click on the Prepped project at the top of the project navigator, then click on Prepped target and choose the General tab. Change Main Interface to ChecklistDetail.storyboard:

Build and run your app; you’ll see the checklist detail scene loads first:

Where are the navigation and tab bar? Since the view controller is no longer embedded in a navigation or tab bar controller, you won’t see those two elements while you’re working on the items storyboard.
ChecklistDetailViewController has already been set up to load initial sample data.Views in the scene dock
A lesser-known feature of storyboard scenes is the scene dock. Most people don’t even notice it’s there – did you? You’ll find it at the top of the currently selected scene in a storyboard:

Out of the box, the scene dock contains references to the current view controller, the first responder, and any available unwind segues. But did you know you can add your own views to the scene dock? You’ve always been able to do so, but Xcode 7 lets you design these attached views within Interface Builder.
Any views you add in the scene dock won’t be added to your view controller’s initial subviews array; instead, you can add IBOutlets to them and make use of them at runtime.
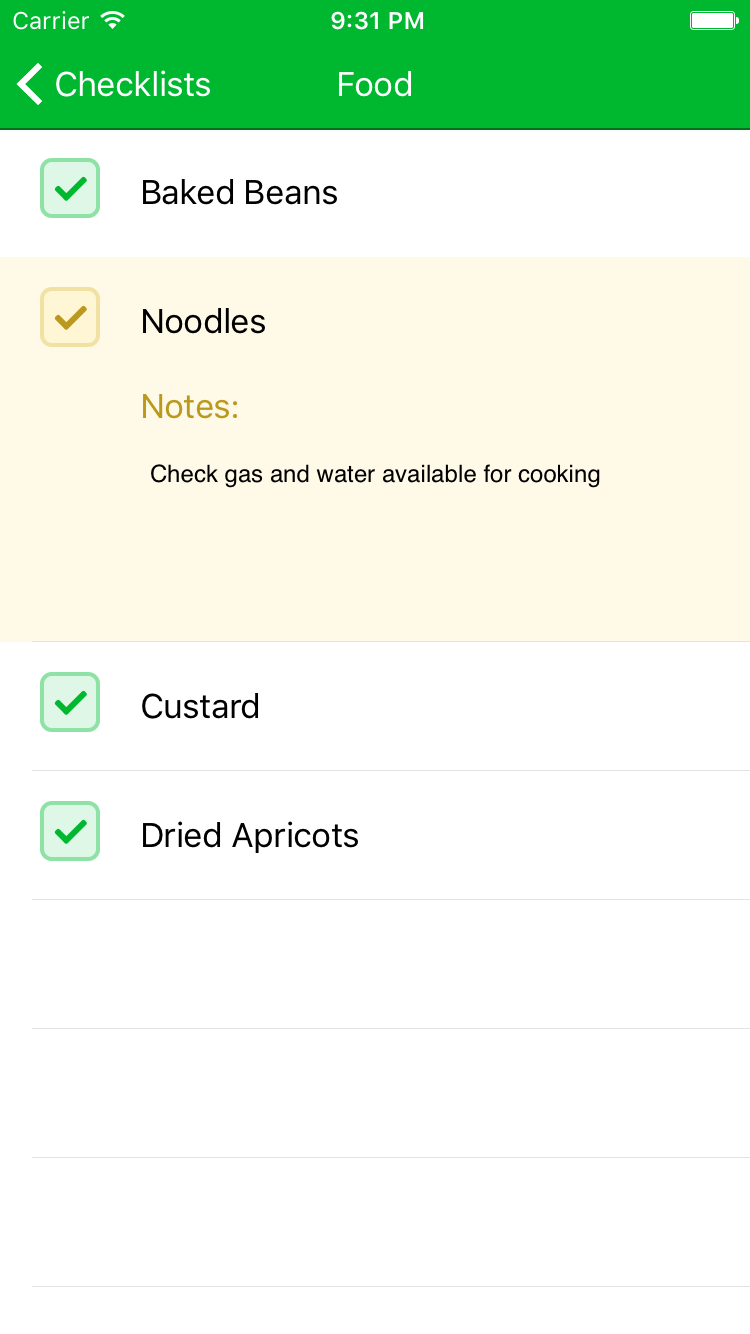
Selecting a checklist item in Prepped highlights its table row with a boring gray color. You will now perform the amazing feat of changing the color of the selected row with no code at all — thanks to the scene dock!
In ChecklistDetail.storyboard, select Checklist Detail View Controller and drag a view from the Object Library onto the scene dock:

The new view will appear just above the scene dock. You can add subviews and controls to these docked views, just as you would any other view.

Select the view you added and use the Attributes Inspector to change the background color of the view to #FFFAE8.
The size of the view in the storyboard doesn’t really matter, since it will be stretched automatically when it’s used in the cell. However, if you want it to take up less room you can resize it by dragging its top, left and right edges.
In the document outline, Ctrl-drag from ChecklistItemCell to the new view. Choose selectedBackgroundView from the connections pop-up:
Build and run your app; tap any row, and it’s highlighted with by your new view. Pretty neat — and without a stitch of code!

Conditional views using the scene dock
Often, you’ll have a view that you only want to show under certain conditions. Designing a view like this amongst all the other views in a view controller was always rather difficult in storyboards. The advantage of having a view in the scene dock is that you can create it visually without interfering with the rest of your view controller’s subviews. You can then add it to the view hierarchy in code when it’s needed.
The checklist items in Prepped’s sample data have notes accompanying them; you’re now going to create a view to display an item’s note. When you tap the table view row for an item, the row will expand to display the associated note. Tapping the row again or tapping a different row collapses the row and removes the note view from that row.
Still in ChecklistDetail.storyboard, drag a new view onto the scene dock, next to the selected background view you created in the last section. Select the view, and use the Size Inspector to set its width to 320 and its height to 128.
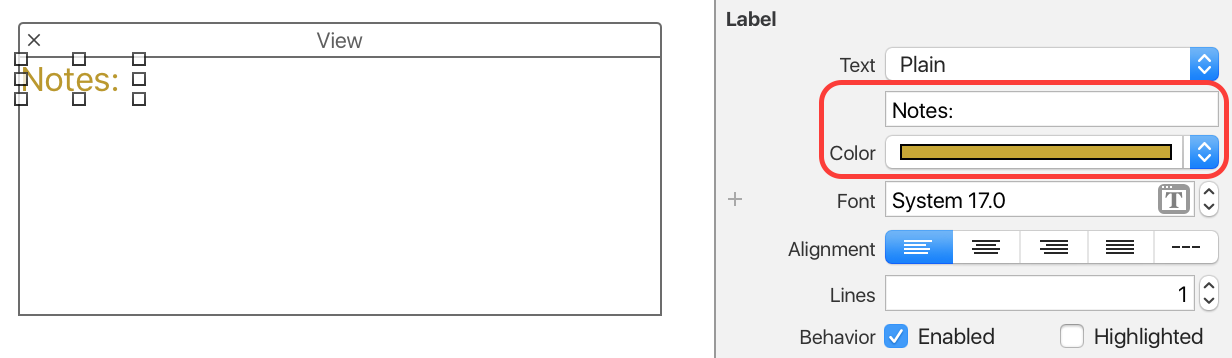
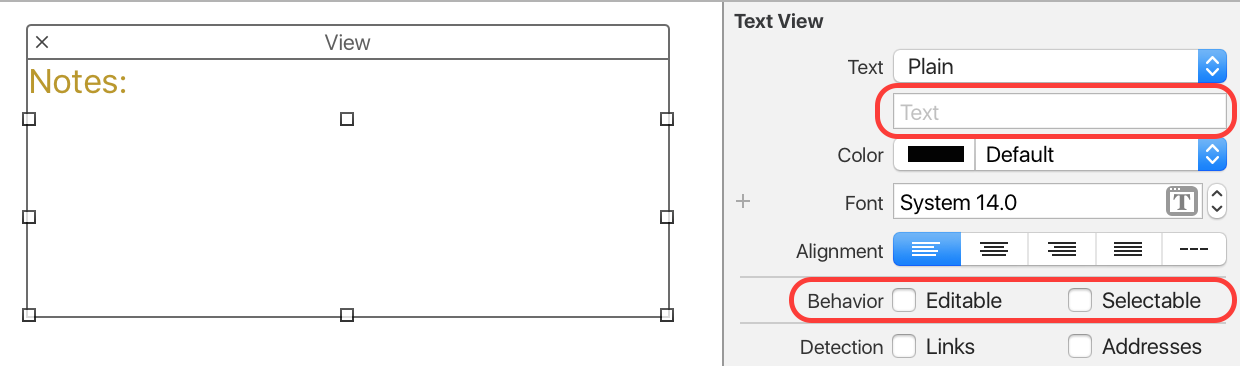
Drag a label from the Object Library onto the new view and use the Attributes Inspector to change the label text to “Notes:”. You may have to resize the label so that the text fits. Change the label’s text color to #BB991E:
Next, drag a text view from the Object Library onto the new view. Remove its default Lorem ipsum text using the Attributes Inspector. Uncheck Behavior Editable and Selectable. Resize and rearrange the label and text views so they touch the edges of their container so that it looks like this:
You’ll now connect this notes view to an IBOutlet in the view controller. Even though there are multiple cell instances on the screen at one time, there will be only one notes view instance at any time, so it won’t be an issue to connect this view to an outlet.
With ChecklistDetail.storyboard open in the main editor, open ChecklistDetailViewController.swift in the assistant editor. You may have to close the document outline using the icon beneath the storyboard to get enough space:
![]()
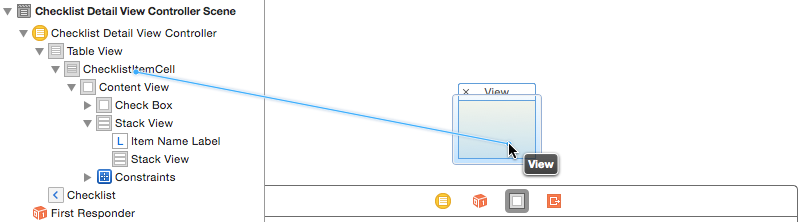
Ctrl-drag from the new view to ChecklistDetailViewController to create an outlet for the view just below the existing checklist property. Ensure that you are dragging from the view’s background, not from the text view or label. You can also drag from the view’s icon in the scene dock.

Name the outlet notesView and click Connect. The outlet will appear as a property in ChecklistDetailViewController.
Now Ctrl-drag from the text view to ChecklistDetailViewController to create another outlet just below the one you just made. Name the outlet notesTextView and click Connect.
Finally, it’s time to write some code! :] You’ll use another new feature of iOS 9, UIStackView, to add and remove the notes view from a cell with an animation.
In ChecklistDetailViewController.swift, add the following method to the bottom of the main class implementation:
func addNotesViewToCell(cell: ChecklistItemTableViewCell) {
  notesView.heightAnchor
    .constraintEqualToConstant(notesViewHeight)
    .active = true
  notesView.clipsToBounds = true

  cell.stackView.addArrangedSubview(notesView)
}
This method ensures Auto Layout defines the the notes view’s height, then adds it to the cell’s stack view’s arrangedSubviews collection. It also sets clipsToBounds to true to prevent the text view from spilling outside of the cell when you perform a swipe-to-delete.
The height needs to be set using Auto Layout since the stack view derives its own height from the heights of its arrangedSubviews. If you don’t set the height here, the cell won’t grow when you add the notes view.
Next, add the following method below addNotesViewToCell(_:):
func removeNotesView() {
  if let stackView = notesView.superview as? UIStackView {
    stackView.removeArrangedSubview(notesView)
    notesView.removeFromSuperview()
  }
}
This removes the notes view from the stack view’s arrangedSubviews as well from its set of visible subviews.
Next, you need to put these methods to use. Still in ChecklistDetailViewController.swift, find the table view delegate extension for ChecklistDetailViewController and add the following code:
override func tableView(tableView: UITableView,
  didSelectRowAtIndexPath indexPath: NSIndexPath) {
    // 1
    guard let cell = tableView.cellForRowAtIndexPath(indexPath) as?
      ChecklistItemTableViewCell else {
        return
    }

    // 2
    tableView.beginUpdates()
    // 3
    if cell.stackView.arrangedSubviews.contains(notesView) {
      removeNotesView()
    } else {
      addNotesViewToCell(cell)

      // 4
      notesTextView.text = checklist.items[indexPath.row].notes
    }

    // 5
    tableView.endUpdates()
}
This method does the following:
- Uses a Swift 2.0
guardstatement to ensure that there is a valid cell of the right type at the selected index path before continuing. - Calls
tableView.beginUpdates()to animate the changes to the cell’s height. - Removes the notes view if the cell’s stack view already contains it; otherwise, add the notes view.
- Updates the notes text view to contain the notes for the selected checklist item.
- Finally, calls
tableView.endUpdates()to commit the changes.
Finally — don’t forget that you changed the project’s main interface earlier on. To change the project’s main interface back to the main storyboard: click on the Prepped project in the project navigator, click on the Prepped target and then click on the General tab. Change Main Interface to Main.storyboard:

Build and run your app; tap any cell and you should see the notes view appear. Using a stack view means you didn’t need to set any frames manually or add any constraints to the cell other than the one that defines the height of the notes view. In previous versions of iOS, this would’ve been rather more tricky to implement.