Introduction to the Sprite Kit Scene Editor
Do you dislike creating your game’s levels programmatically? Learn how to do it using SpriteKit’s Scene Editor here! By Morten Faarkrog.
Adding Zombie Sprites
Now that you know how to add a sprite it’s time to practice by adding some brain-hungry zombies to the mix! In this level, you’ll add five zombie sprites. Every zombie sprite will have a unique position but all will have the following properties:
- Name: zombie
- Texture: zombie
- Size: 50 x 50
- Lighting, Shadow Cast and Shadowed Mask: 1
- Body Type: Alpha mask
- Allows Rotation & Affected By Gravity: Disabled
- Category Mask: 2
- Contact Mask: 1
Now, add five zombie sprites with the following positions using the above properties.
- 1: (900, 1800)
- 2: (200, 800)
- 3: (900, 1100)
- 4: (150, 150)
- 5: (950, 550)
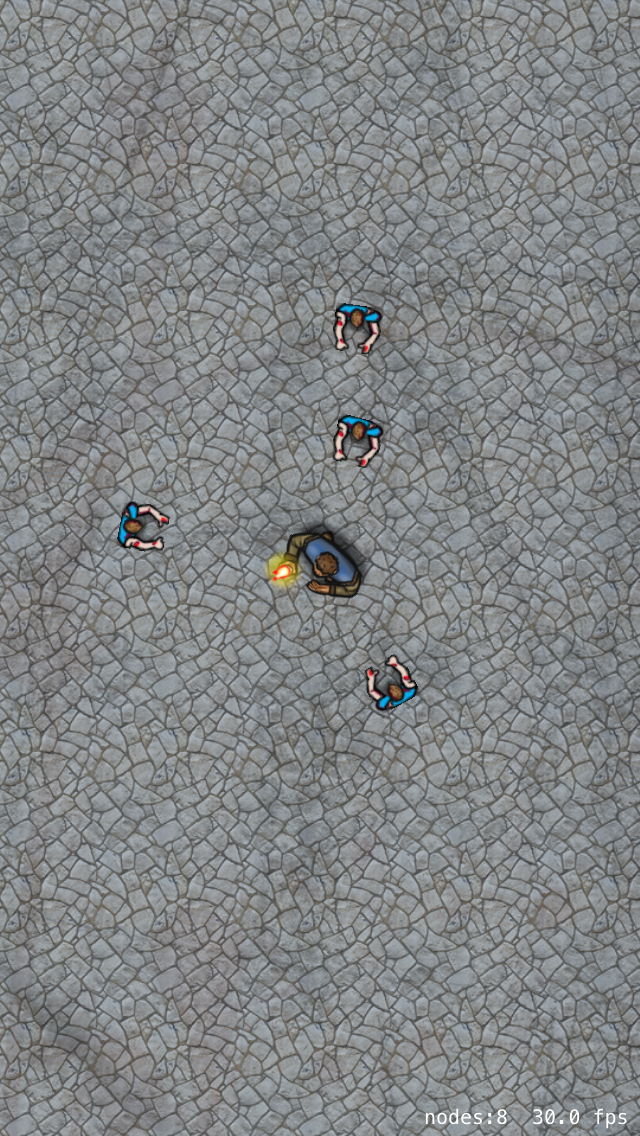
Done? Awesome! Your game scene should now look like this:

So, there is a little more coding to do. You didn’t actually think that you could get out of a tutorial with zero coding, did you?
Just like you did with the player, you need to add a few lines of code before these zombies will operate with the rest of the game. Open GameScene.swift, and add the following lines to didMoveToView(_:) right after the line where you set up the player:
// Setup zombies
for child in self.children {
  if child.name == "zombie" {
    if let child = child as? SKSpriteNode {
      zombies.append(child)
    }
  }
}
These lines will find every child node with the name zombie and add them to an array of zombies – that sounds truly terrifying! This array will eventually move the zombies around the screen.
Build and run the game and the zombies should now be chasing you. Yikes! Hope you’ve been keeping up on your cardio.

Adding a Goal, Walls and a Background
All this running about is tiresome, and the zombies have you trapped. Your player might as well be the main course at a buffet as far as they are concerned.
It would be great to have a way to complete the level, don’t you think?
Go ahead and add a goal to the lower-right corner. Select a Color Sprite from the Object Library and drop it on the scene. Then add the following properties to the sprite:
- Name: goal
- Texture: goal
- Size: 50 x 170
- Position: x: 1055, y: 135
- Lighting, Shadow Cast, and Shadowed Mask: 1
- Body Type: Bounding rectangle
- Dynamic, Allows Rotation & Affected By Gravity: Disabled
- Category Mask: 3
- Contact Mask: 1
Just like before, you need to use this sprite in your code. Open GameScene.swift, and add the following lines to didMoveToView(_:) right after the lines where you set up the zombies:
// Setup goal
goal = self.childNodeWithName("goal") as? SKSpriteNode
Your game scene should now look like this:
When running the game, it’s hard to tell where the boundaries of the level are. In order to fix this you’ll need some walls around your level, in fact, you’ll need four walls with the following properties:
- Lighting, Shadow Cast, and Shadowed Mask: 1
- Body Type: bounding rectangle
- Dynamic, Allows Rotation & Affected By Gravity: disabled
Add the four walls using the above and customize them with these properties:
Wall 1:
- Texture: wall_50x1920
- Position: (25, 960)
- Size: 50 x 1920
Wall 2:
- Texture: wall_50x1700
- Position: (1055, 1070)
- Size: 50 x 1700
Wall 3:
- Texture: wall_1080x50
- Position: (540, 1895)
- Size: 1080 x 50
Wall 4:
- Texture: wall_1080x50
- Position: (540, 25)
- Size: 1080 x 50
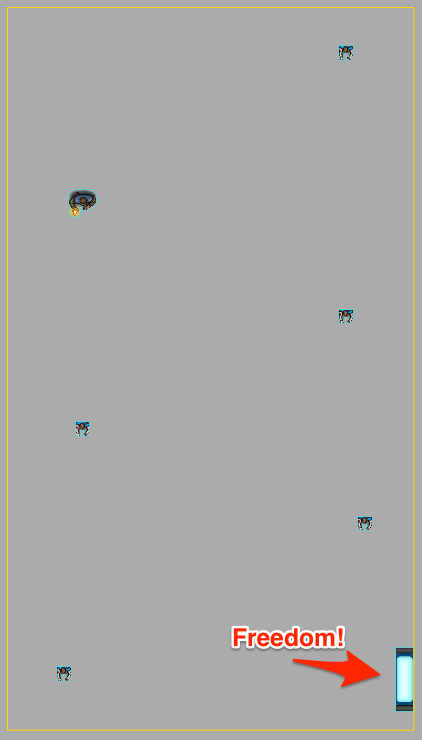
Good job! Your game scene should now look as follows:

Last, but not least, add a background to the game scene. Select a Color Sprite from the Object Library and drop it on the scene. Add the following properties to the sprite:
- Texture: background
- Size: 1080 x 1920
- Position: (540, 960)
- Lighting Mask: 1
- Z-position: -1 (This layers the background behind all other nodes.)
Build and run the game. As you run around the level the walls should keep you in place – see if you can get to the goal before the zombies get to you.

Camera Positioning with SKCameraNode
Being able to view the whole level at once isn’t really the best experience. The player and the zombies look too small, and the game feels a bit too predictable. To fix this, you’ll just need to implement a camera node.
In iOS 9, Apple introduced a new class called SKCameraNode, which is an object used to specify a position in the scene from which it can render. Because the camera is a node, it can be moved just like any other node in the scene using actions, physics and so on. When a scene renders with a camera node, two things happen:
- The scene renders so that the origin of the camera node is placed directly in the middle of the scene.
- The inverse of the camera node’s xScale, yScale and zRotation properties are applied to all nodes in the scene.
What this means is that if, for example, the camera is moved 20 pixels to the right, then the scene is rendered as if everything else moved 20 pixels to the left.
Note: For a more in-depth description of the camera node, watch the WWDC 2015 talk What’s New in Sprite Kit. At about three minutes, you meet the SKCameraNode.
Adding a Camera to the Scene
So now you might be wondering if – possibly even dreading – the camera node is something you’ll have to create programmatically. The answer is, as you might expect, that you can create it using the scene editor. Whew!
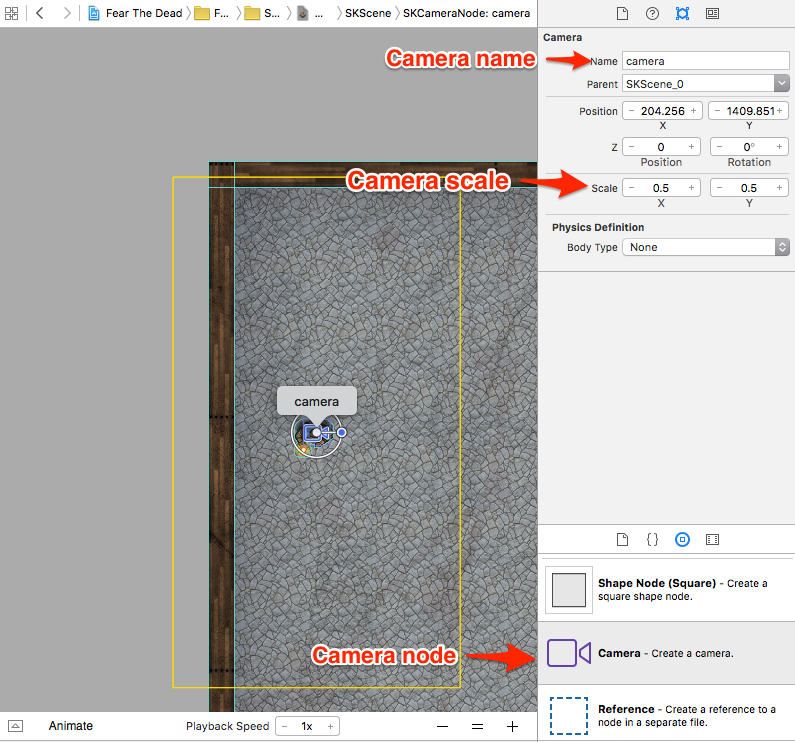
Go to the Object Library, and locate the Camera node. Next, drag and drop it onto the scene on top of the player; it doesn’t have to be exactly on top as the camera’s position is updated in code. Open the Attributes Inspector, and change its name to be equal to camera and its scale to be equal to x = 0.5, y = 0.5, which is a quarter of the level’s total area).
If you were to run the game right now, the camera would not yet be activated because you need to tell the game scene to use the camera node as its camera.
Click outside the level’s boundary, and set its Camera property to be equal to the camera node you just created.

With this done, the camera should work as expected. Good job! Build and run the game and you should now only see a fourth of the level at any given time. The camera should also follow the player as you move it around.