CallKit Tutorial for iOS
Learn how your app can use CallKit for system-level phone integration and how to build a directory extension for call blocking and identification. By Andrew Kharchyshyn.
CXProviderDelegate
The next step is to ensure protocol conformance. Still in ProviderDelegate.swift, declare a new extension to conform to CXProviderDelegate:
// MARK: - CXProviderDelegate
extension ProviderDelegate: CXProviderDelegate {
  func providerDidReset(_ provider: CXProvider) {
    stopAudio()

    for call in callManager.calls {
      call.end()
    }

    callManager.removeAllCalls()
  }
}
CXProviderDelegate specifies only one required method, providerDidReset(_:). The provider invokes this method when reset, giving your app the opportunity to clean up any ongoing calls and revert to a clean state. In this implementation, you’ll terminate the ongoing audio session and dispose of any active calls.
Now that ProviderDelegate offers a way to report incoming calls, it’s time to use it!
Open AppDelegate.swift and start by adding a new property to the class:
var providerDelegate: ProviderDelegate!
Add the following to application(_:didFinishLaunchingWithOptions:) before the return:
providerDelegate = ProviderDelegate(callManager: callManager)
The provider delegate is ready for use! Add the following method to AppDelegate.swift:
func displayIncomingCall(
  uuid: UUID,
  handle: String,
  hasVideo: Bool = false,
  completion: ((Error?) -> Void)?
) {
  providerDelegate.reportIncomingCall(
    uuid: uuid,
    handle: handle,
    hasVideo: hasVideo,
    completion: completion)
}
This method lets other classes access the provider delegate’s helper method.
The final piece of the puzzle is hooking up this call to the user interface. Open CallsViewController.swift, which is the controller for the main screen of the app. Find the empty implementation of unwindForNewCall(_:) and replace it with the following code:
// 1.
guard
  let newCallController = segue.source as? NewCallViewController,
  let handle = newCallController.handle
  else {
    return
}

let videoEnabled = newCallController.videoEnabled

// 2.
let backgroundTaskIdentifier =
  UIApplication.shared.beginBackgroundTask(expirationHandler: nil)

DispatchQueue.main.asyncAfter(deadline: .now() + 1.5) {
  AppDelegate.shared.displayIncomingCall(
    uuid: UUID(),
    handle: handle,
    hasVideo: videoEnabled
  ) { _ in
    UIApplication.shared.endBackgroundTask(backgroundTaskIdentifier)
  }
}
The snippet does the following:
- Extracts the properties of the call from
NewCallViewController, which is the source of this unwind segue. - The user can suspend the app before the action completes, so it should use a background task.
Test Flight
Now, build and run the application, and do the following:
- Tap the plus button (+) in the top right-hand corner.
- Enter any number, making sure to select Incoming in the segmented control, and tap Done.
- Lock the screen. This step is important since it’s the only way to access the rich, native in-call UI.
Within a few seconds, you’ll see the native incoming call UI:
It’s working!

However, as soon as you answer the call, you’ll notice that the UI remains stuck in the following state:
Or is it?
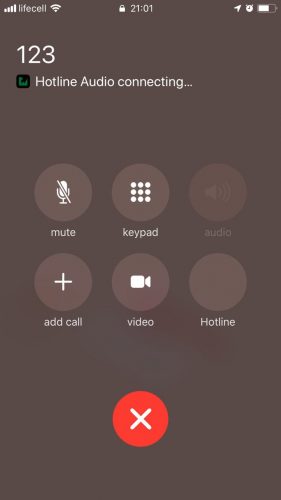
This is because you still have to implement the piece responsible for answering the call. Go back to Xcode, return to ProviderDelegate.swift, and add the following code to the class extension:
func provider(_ provider: CXProvider, perform action: CXAnswerCallAction) {
  // 1.
  guard let call = callManager.callWithUUID(uuid: action.callUUID) else {
    action.fail()
    return
  }

  // 2.
  configureAudioSession()
  // 3.
  call.answer()
  // 4.
  action.fulfill()
}

// 5.
func provider(_ provider: CXProvider, didActivate audioSession: AVAudioSession) {
  startAudio()
}
Here is the step-by-step breakdown:
- A reference comes from the call manager, corresponding to the UUID of the call to answer.
- The app configures the audio session for the call. The system activates the session at an elevated priority.
-
answer()indicates that the call is now active. - When processing an action, it’s important to either fail or fulfill it. Assuming no errors during the process, you can call
fulfill()to indicate success. - Once the system activates the provider’s audio session, the delegate is notified. This is your chance to begin processing the call’s audio.
Build and run the app, and start an incoming call again. When you answer the call, the system will successfully transition into an ongoing call state.
That’s more like it!
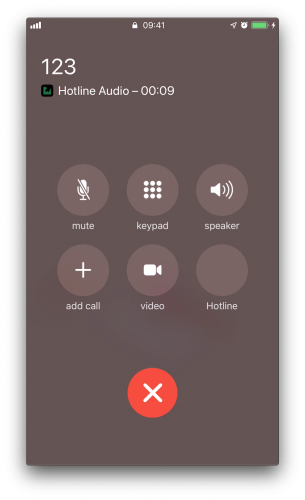
If you unlock your phone, you’ll notice that both iOS and the app now reflect the correct ongoing call state.
The ongoing call shown on the home screen, and the main screen of Hotline.

Ending the Call
Answering a call reveals a new problem: There’s currently no way to end a call. The app will support two ways of ending calls — from the native in-call screen and from within the app.
The diagram below shows what’s going on in both cases:

Notice the difference between steps 1a and 1b. When the user ends the call from the in-call screen (1a), the system automatically sends a CXEndCallAction to the provider. However, if you want to end a call using Hotline (1b), it’s your job to wrap the action into a transaction and request it from the system. Once the system processes the request, it will send the CXEndCallAction back to the provider.
CXProviderDelegate
However it supports ending calls, your app has to implement the necessary CXProviderDelegate method for it to work. Open ProviderDelegate.swift and add the following implementation to the class extension:
func provider(_ provider: CXProvider, perform action: CXEndCallAction) {
  // 1.
  guard let call = callManager.callWithUUID(uuid: action.callUUID) else {
    action.fail()
    return
  }

  // 2.
  stopAudio()
  // 3.
  call.end()
  // 4.
  action.fulfill()
  // 5.
  callManager.remove(call: call)
}
Here’s what’s going on:
- Start by getting a reference to the call from the call manager.
- As the call is about to end, it’s time to stop processing the call’s audio.
- Invoking
end()changes the status of the call, allowing other classes to react to the new state. - At this point, you’ll mark the action as fulfilled.
- Since you no longer need the call, the call manager can dispose of it.
This takes care of the in-call UI. In order to end calls from the app, you’ll need to extend CallManager.
Requesting Transactions
The call manager will communicate with CXCallController, so it needs a reference to an instance. Add the following property to CallManager.swift:
private let callController = CXCallController()
Now add the following methods to the class:
func end(call: Call) {
  // 1.
  let endCallAction = CXEndCallAction(call: call.uuid)
  // 2.
  let transaction = CXTransaction(action: endCallAction)

  requestTransaction(transaction)
}

// 3.
private func requestTransaction(_ transaction: CXTransaction) {
  callController.request(transaction) { error in
    if let error = error {
      print("Error requesting transaction: \(error)")
    } else {
      print("Requested transaction successfully")
    }
  }
}
Here’s what’s happening:
- Create an End call action. Pass in the call’s UUID to the initializer so it can be identified later.
- Wrap the action into a transaction so you can send it to the system.
- Invoke
request(_:completion:)from the call controller. The system will request that the provider perform this transaction, which will in turn invoke the delegate method you just implemented.
The final step is to hook up the action to the user interface. Open CallsViewController.swift and write the following call just below the tableView(_:cellForRowAt:) implementation:
override func tableView(
  _ tableView: UITableView,
  commit editingStyle: UITableViewCell.EditingStyle,
  forRowAt indexPath: IndexPath
) {
  let call = callManager.calls[indexPath.row]
  callManager.end(call: call)
}
When the user invokes swipe-to-delete on a row, the app will ask CallManager to end the corresponding call.
Build and run the project on your device, and perform the following steps:
- Tap the plus button (+) in the right-hand corner.
- Enter any number, making sure to select Incoming in the segmented control, and tap Done.
- Within a few seconds, you’ll get an incoming call. Once you answer, you should see it listed as active on the UI.
- Swipe left on the row representing the active call and tap End.
At this point, your call will end. Neither the lock and home screens nor the app will report any ongoing calls.
Hanging up now!
