PaintCode Tutorial for Developers: Custom Progress Bar
In this PaintCode tutorial for developers, you’ll learn how to create a custom animated progress bar. By Felipe Laso-Marsetti.
Adding Colors in StyleKits
Your progress bar is still a boring shade of gray. However, you can make it any color you like to fit the style of your app. If you decide to change the color, it’s easy to use StyleKit to adjust it and re-export.
You’ll create the color in the StyleKit Catalog; anything you create in the catalog will be available to you in your Xcode project.
In PaintCode, click on the StyleKit tab. Click Add Color and then Add New Color…. Choose any color you like for your progress bar and change the name of the color to something that better represents the color; I used PinkColor to represent a light pink:

Back in the tab for your progress bar, change the Fill color of Progress Active and the Stroke color of Progress Outline to your new color:

To re-export your changes to Xcode, simply press Cmd+R or choose File\Export Again from the top menu. PaintCode conveniently remembers where you previously saved the generated code and overwrites it.
Build and run your app again; the progress bar has been magically updated:
And you didn’t need to touch a single line of code! How cool. :]
Making a Dynamic Progress Bar
Okay, you were promised a dynamic progress bar: one that reacts to changes within the app. To get this working, you’ll add a computed property to the ProgressBar view to hold the progress of a song and call the PaintCode method using this value.
In ProgressBar.swift add these properties to the class:
private var innerProgress: CGFloat = 0.0
var progress : CGFloat {
  set (newProgress) {
    if newProgress > 1.0 {
      innerProgress = 1.0
    } else if newProgress < 0.0 {
      innerProgress = 0
    } else {
      innerProgress = newProgress
    }
    setNeedsDisplay()
  }
  get {
    return innerProgress * bounds.width
  }
}
progress looks like a lengthy computed property, but it’s simply checking the normalized newProgress value to make sure it’s not doing any drawing outside the bounds of the progress bar. The setter calls setNeedsDisplay() to redraw the progress bar while the getter returns the internal, normalized progress multiplied by the view's bound's width.
Change drawRect(_:) to the following:
override func drawRect(rect: CGRect) {
  PaintCodeTutorial.drawProgressBar(frame: bounds,
      progress: progress)
}
The first parameter is the bounds of the view subclass so that the progress bar will stretch appropriately. The second parameter is the song progress for the variable you set up in PaintCode.
And that’s it for the progress bar! You don't need to do any more work in this file. However, you need to hook the progress bar up to report the song's progress.
Connecting the Progress Bar to Music
Open ViewController.swift and locate the IBOutlet progressView. Change it from a UIView to be of type ProgressBar:
@IBOutlet var progressView: ProgressBar!
Scroll down to refresh() and add the following right before you call updatePlayerLabels(_:artist:album:) in the if section of the conditional:
if (mediaPlayer.currentPlaybackTime /
                currentSong.playbackDuration) .isNormal {
  progressView.progress = CGFloat(mediaPlayer.currentPlaybackTime /
                currentSong.playbackDuration)
} else {
  progressView.progress = 0.0
}
This code compares the current playback time versus the total duration of the song, checks that there isn't a division by zero and updates the progress property on the progress view. This should give you a normalized value between 0 and 1.0. When you set progress, the setter in ProgressBar will update the progress bar accordingly.
In the else section of the same conditional, add the following line before calling updatePlayerLabels(_:artist:album:):
progressView.progress = 0.0
This sets progress to 0, since no song is playing.
This is what the final refresh() looks like:
func refresh() {
  if let currentSong = mediaPlayer.nowPlayingItem {
    let title = currentSong.title ?? ""
    let artist = currentSong.artist ?? ""
    let album = currentSong.albumTitle ?? ""

    if (mediaPlayer.currentPlaybackTime /
               currentSong.playbackDuration) .isNormal {
      progressView.progress = CGFloat(mediaPlayer.currentPlaybackTime /
               currentSong.playbackDuration)
    } else {
      progressView.progress = 0.0
    }
    updatePlayerLabels(title, artist: artist, album: album)
  } else {
    progressView.progress = 0.0
    updatePlayerLabels("", artist: "", album: "")
  }
}
That's it; build and run your app and check out your progress bar! Remember that you'll need a physical device to play songs and see the progress bar update:

Changing PaintCode Generated Code
At the very beginning of the track, the progress bar fill bleeds outside the progress bar outline. You can fix this by clipping the fill to stay within the outline.
Open PaintCodeTutorial.swift and find the following line in drawProgressBar(frame:number:):
progressOutlinePath.stroke()
Add the following line immediately after the line above:
progressOutlinePath.addClip()
This adds a clipping path so progressActivePath won't bleed outside the outline any more. It’s a small visual fix, but goes a long way towards making things look polished.
Note: Instead of manually adding the clipping path. I wanted to show this so you know you can change things, play with the code and experiment with Core Graphics. However, remember that if you now go back to PaintCode and re-export the document, your code will be overwritten by the generated code.
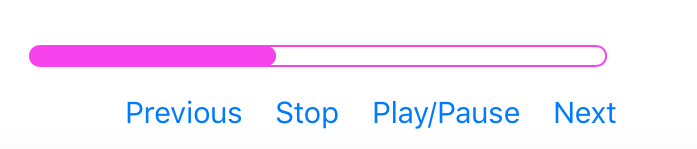
Build and run your project one final time and check out your pixel-perfect custom dynamic progress bar:

Where to Go From Here?
You can download the final PaintCode file here, and the final Xcode project file here.
In this tutorial, you created a robust element within PaintCode, set up StyleKits and Variables and exported all of that into an iOS project for your use.
With this knowledge, you could try creating other iOS elements such as buttons, spinners, segmented controls, switches, or even custom components you’ve always wanted to create but thought were too difficult to acheive in Core Graphics.
Questions? Feedback? Comments? Join the forum discussion below and share them with us!