SpriteKit and Inverse Kinematics with Swift
In this tutorial, learn how to use Sprite Kit’s inverse kinematics to make a ninja punch and kick dynamically! By Jorge Jordán.
What Is Inverse Kinematics?
Before you continue, it’s important to appreciate what inverse kinematics is all about, so the following is a quick primer to get you started.
Forward Kinematics

Fundamentally, kinematics is the study of the motion of an object through space and time.
For an animated character represented by a skeletal hierarchy, forward kinematics is about how the tip of the last bone in a joint hierarchy (called the end-effector) moves in space when you rotate each bone lying along the chain leading up to it.
Take the example of an arm. If I rotate my upper arm about the shoulder joint in combination with extending my lower arm from my elbow joint, I would be able to geometrically determine the new position of my hand by means of forward kinematics.
Note: End-effector is a term commonly used in robotics and character animation to describe the point at the end of a skeleton chain that interacts with the environment.
Inverse Kinematics

However, it’s often useful to look at the positioning of the joint hierarchy from the reverse point of view.
For example, given a desired goal position of the end-effector, in this case my hand, I would solve for all the joint angles along the chain leading up to the end-effector that would allow me to achieve the desired hand position.
This approach, as you might have guessed already, is known as inverse kinematics, and it’s particularly valuable for achieving goal-oriented actions such as touching, kicking or punching at various points in space. One of the most common uses of inverse kinematics in 3D games is to adjust a character’s limbs to position its feet properly when walking over uneven terrain.
In Sprite Kit, simply specifying a single end-effector goal position in 2D space allows you to position the entire joint hierarchy automatically, as opposed to the forward kinematics approach of fiddling with multiple joint angles.
For the purposes of this tutorial, that’s all the background you need to get started. If you’re interested in delving deeper into the mathematics of inverse kinematics, I highly recommend reading this and this.
In the meantime, let’s learn what you can do with Sprite Kit’s inverse kinematics feature!
Inverse Kinematics Actions
Let’s bring the ninja to life by making his front arm reach out to a position upon a tap event.
Add the following properties to the GameScene class:
var upperTorso: SKNode!
var upperArmFront: SKNode!
var lowerArmFront: SKNode!
These properties will hold references to the upper torso, upper arm and lower arm nodes, respectively.
Next, add the following code at the end of didMoveToView():
upperTorso = lowerTorso.childNode(withName: "torso_upper")
upperArmFront = upperTorso.childNode(withName: "arm_upper_front")
lowerArmFront = upperArmFront.childNode(withName: "arm_lower_front")
Here, you traverse down the parent-child hierarchy manually from the lower torso to the right lower arm, grabbing the appropriate child nodes by their node names and storing them in the variables you declared earlier.
Defining an Inverse Kinematics Action
Next, add the following methods to the GameScene class:
func punchAt(_ location: CGPoint) {
  // 1
  let punch = SKAction.reach(to: location, rootNode: upperArmFront, duration: 0.1)
  // 2
  lowerArmFront.run(punch)
}

// 3
override func touchesBegan(_ touches: Set<UITouch>, with event: UIEvent?) {
  for touch: AnyObject in touches {
    let location = touch.location(in: self)
    punchAt(location)
  }
}
There are a few important things going on here, so let’s run through them step by step:
It takes in three arguments: (1) the desired end position to reach; (2) the highest node of the hierarchy that you want to rotate; and (3) the duration of the animation.
In your case, you set your root node to the upper arm node, since you want to move the upper arm and its descendant nodes. The animation will last for 0.1 seconds.
Note: reach(to:rootNode:duration:) can take a maximum velocity as an argument instead of an animation duration. In addition, there is a variant method that takes in a node instead of a position. For more details, refer to the documentation.
-
reach(to:rootNode:duration:)is an action responsible for performing inverse kinematics actions for a joint hierarchy reaching out to a point in space. - Next, you run the action on the end node that is going to reach out to touch the end position in space, which in this case is the lower arm.
- Upon a touch event, you run the punch action with the tap location as the end position that you want the lower arm to reach.
Build and run the project. Tap on various locations near the ninja, and you’ll see the arm joints move in an attempt to reach to the tap position.
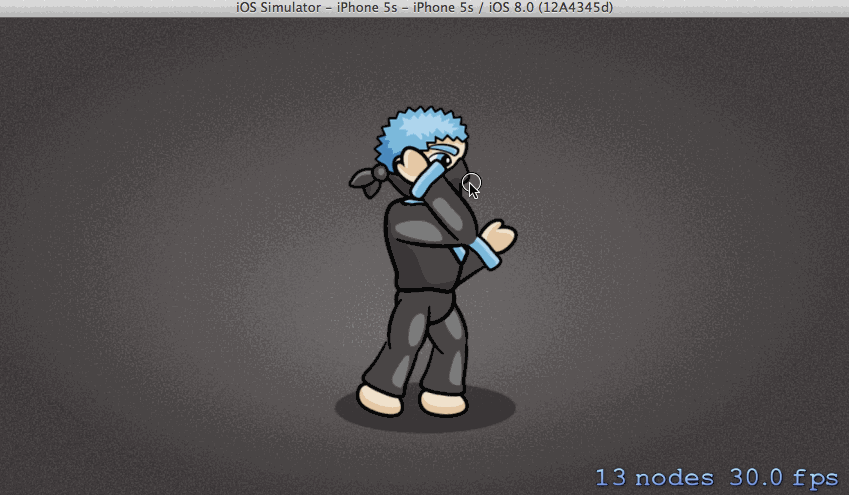
This ninja looks like he has some problems!
Setting Up an End-Effector
While the arm joints move following your taps at various locations, there is something fundamentally strange about the actions—it seems the elbow is reaching out to the desired point instead of the fist! Why would that be happening?
Recall that each bone node has an anchor point that has been adjusted with an offset so that it’s flush with one end of the node, enabling it to rotate about its parent.
In your case, when you set the inverse kinematics action to run on the lower arm node, Sprite Kit uses the anchor point as the node reference point or end-effector. The lower arm’s anchor point is the elbow, so this is why the elbow seems to be the point reaching out to the target position.
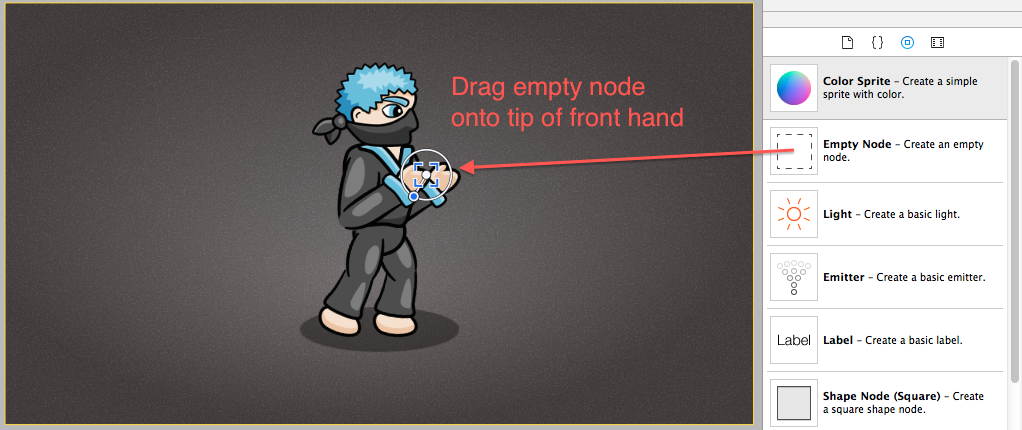
Let’s fix this by attaching a child end-effector “fist” node at the lower tip of the lower arm.
Since the fist is already visually included with the lower arm, this node will simply be a point node without a texture.
Switch to GameScene.sks. Select the Object Library at the bottom of the Utilities pane in Xcode. From the Object Library, drag an Empty Node onto the front lower arm in the scene. Make sure to align the node with the furthest tip of the hand, as shown below:
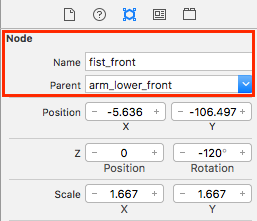
With the new node selected, set its name to fist_front and its Parent to arm_lower_front in the SKNode Inspector on the right.
Sprite Kit will add the fist as a child, as shown below:
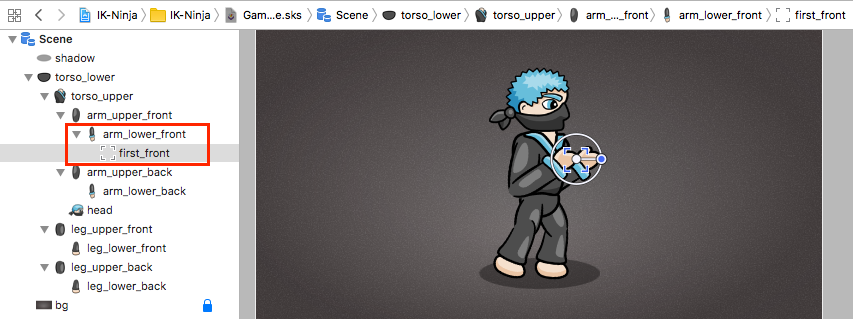
In terms of joint hierarchy, the entire front arm now looks like this: arm_upper_front (root) -> arm_lower_front -> fist_front (end-effector).
Switch back to GameScene.swift. Add the following line near the top of the GameScene class:
var fistFront: SKNode!
In addition, add the following line to the end of didMove(to:):
fistFront = lowerArmFront.childNode(withName: "fist_front")
Finally, replace the following line in punchAt(:):
lowerArmFront.run(punch)
With this:
fistFront.run(punch)
Now that you’ve switched the end-effector node to the fist node, build and run the project. Try tapping various locations again, and you’ll see your ninja reaching out with his fist instead of his elbow. It’s a karate chop!
