Introduction to Unity 2D
This introductory Unity tutorial will get you up and running with Unity 2D by creating a lunar landing game. By Ben MacKinnon.
Working on the Timeline
In the Project window, click the Sprites folder and expand the thruster-spritesheet.png sprite. Highlight the four sliced thruster sprites and drag them onto the ThrusterMain : Sprite timeline in the Animation editor.
The sprite frames end up bunched together on the timeline; you can fix that yourself. Start with the rightmost sprite; click the sprite, drag it over to the right and space it roughly 0:05 apart from its neighbor:

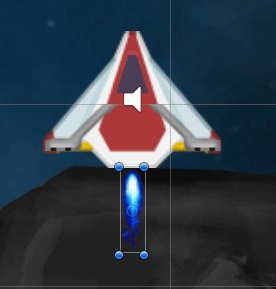
Select the last frame at the 1:00 mark, and press Delete to remove it.

Click Preview in the Animation window, followed by Play. Focus on the Lander ship in the scene view to see a preview of your work!
Thusters Ready Captain!
With ThrusterMain still selected, you can also see the Sprite changing in the Sprite Renderer component:
Ticking over nicely :]

Now it’s time to configure the animation controller.
Configuring the Animation Controller
The Lander.cs script currently sets animation parameters to true or false, depending on whether the player is firing the thrusters. The animation controller will evaluate these parameters and allow certain states to be entered or exited.
In the Project window, click the Animations subfolder. Then, double click ThrusterMain.controller. This opens the Animator editor, where you’ll see the controller Unity added for you when you created the animation clip on the ThrusterMain GameObject:

Right now, the thruster animation is running continuously. Logically, the thruster animation should only run if the player is currently firing the thruster.
Right-click the grid area of the Animator editor, and click Create State / Empty:

Use the Inspector to name the new state NoThrust. This is the default state for the animation when there’s no player input:

From Entry, the animator should flow directly to NoThrust and stay there until a Boolean parameter becomes true. For animation state changes to occur, you’ll need to add connections using transitions.
Right-click NoThrust and click Set As Layer Default State. NoThrust should now appear orange as below, with the arrow from Entry now pointing to No Thrust:

The orange color indicates that the state will be the first state run.
Using the Animator editor, click + in the Parameters tab to create a new parameter type Bool. Name it ApplyingThrust:

Right-click NoThrust, click Make Transition, then click ThrusterAnim. This creates a transition that allows a state change between the two states. Now perform the same set of steps, but this time create a transition from ThrusterAnim to NoThrust:

Click the NoThrust to ThrusterAnim transition line, then click + in the Inspector to add a Condition. This selects the only condition available: ApplyingThrust.
Ensure true is selected in the drop-down. This indicates ApplyingThrust must be true for the animation to move to the ThrusterAnim state.

Now edit the transition line from ThrusterAnim to NoThrust to use the same ApplyingThrust condition. However, this time you’re checking for the false condition:

You can tweak the animation playback speed in the Animator editor to suit. Click the ThrusterAnim state, and in the Inspector, change the Speed property to 1.5:

The thruster animation should react quickly to reflect the hairtrigger reactions from the player to appear responsive. Click both transition lines — the ones between NoThrust and ThrusterAnim — and use the Inspector to change the Transition-related settings to 0. Uncheck Has Exit Time and Fixed Duration as well:

Finally, apply the same animation and controller to the left and right thrusters. Select ThrusterLeft and ThrusterRight from the Hierarchy, then drag and drop ThrusterMain.controller from the Animations folder in the Project window to the Animator component’s Controller property:

Click Play to run the game; try out your new thrusters out with the WASD or arrow keys:

Houston, we have lift off! :]
Sprite Sorting and Layers
No 2D engine would be complete without sprite-sorting abilities. Unity lets you sort and order sprites using a system of Layers and Order in layers.
Click Play in the Editor to run the game once again; use your worst piloting abilities to crash the lander into a nearby rock. Take a look at the Scene view in the Editor when the Restart button appears. You may notice some of the rocks have disappeared behind the backdrop image:

It may even be that you opened the starter project and could only see the background image. If that’s the case, well done for making it this far!
The reason this happens is because the rendering engine can’t decide the layering order of the sprites. All sprites, except for the ship, are currently set to use the default sorting layer with a rendering order of -1. Your graphics card will have been given all the draw calls to make, but not told what order to draw them in!
To fix this, you can use a system of Layers and Order in Layers to separate sprites. Unity will render sprites on these layers in the defined order of the layers. And for each individual layer, Unity will use the Sprite’s Order in Layer numbering on each sprite to determine in which order it should render each sprite.
You can think of it as an ordered list:
- Layer A
- Order 0
- Order 1
- Layer B
- Order 0
- Order 1
Time to Add Some Layers
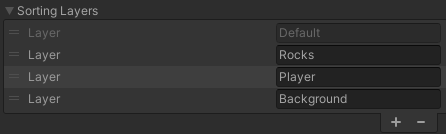
Click Edit ▸ Project Settings and choose Tags and Layers. Expand the Sorting Layers section.
Click + to add three new layers:
- Background
- Rocks
- Player
Click and drag the handles next to each layer to ensure they’re ordered as listed above. The ordering of your layers here determines the order in which Unity will render sprites on these layers:
Just like an onion, space is made of layers too!
Click Backdrop in the Hierarchy; on the Sprite Renderer component, click the Sorting Layer drop-down, and choose Background from the list:

Now the rocks will definitely be behind the backdrop, because they’re still on the Default layer!
Expand the Rocks GameObject and highlight all the child rock GameObjects. Use the Inspector to change the objects to use the Rocks Sorting Layer like so:

Since the rocks in your scene tend to overlap each other, they’re helpful for demonstrating how the Order in Layer property works for sprites on a specific Layer.
If you didn’t give each rock in the Rocks layer separate ordering values, you’d notice rocks randomly “popping” over others during gameplay. This is because Unity won’t consistently render the rocks in the same order, since they all have the same Order in Layer at the moment.
Look for overlapping rocks and assign the ones in the front a higher Order in Layer value than the rocks behind them:

Click Lander in the Hierarchy and change the Sorting Layer properties for it’s Sprite Renderer and all its child GameObject Sprite Renderer components to the Player Sorting Layer.
Do the same for the Fuel GameObjects under Pickups in the Hierarchy. This will ensure they’re rendered in front of everything.