TestFlight Essentials: Quickstart Guide for iOS Beta Testing
TestFlight Beta Testing is an Apple product that makes it easy to invite users to test your iOS, iPadOS, watchOS, and tvOS apps before you release them to the App Store. By Michael Katz.
Adding Internal Testers
To add an internal tester, head to the Users and Access section in App Store Connect. For this example, use your own email address. If you were adding other internal testers, you’d use their email addresses and they would carry out the steps of accepting an invitation.

Click the + button to add a new user. Then, fill in your new user information using an email address you have access to.
Now, assign a role for the new user. View the privileges for each role by clicking See Permissions and choosing the permissions level you want. You can also choose to either limit access to a single app via the Apps drop-down or leave the default All Apps access.

If you’re unsure which role to choose, use App Manager, which allows beta testing management and the ability to download apps. Once you’re done setting up your new user, click Invite. This sends an email to the new user. The user must accept the invitation before you can select that person as a tester.
![]()
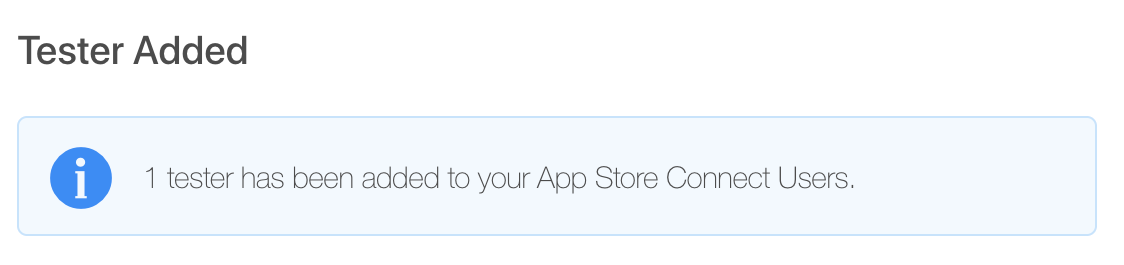
Go to the inbox for the new user’s email address, find the email titled You’ve been invited to App Store Connect and click Accept Invitation. Once you’re done with this process, the new user is eligible to be an internal tester.

Creating a new internal beta tester is only the first part of the process; the remaining step is to invite this particular person to test your latest build.
It’s time to enable testing on your app so the tester actually has something to test! :]
Starting Beta Testing
To start beta testing your app, go to the My Apps section on the App Store Connect home page and click your app:

Select the Activity tab. This is where you’ll find the build you uploaded earlier. If it’s still marked as Processing, go make yourself a cup of coffee and come back later. :]

Next, click the TestFlight tab. You may notice a yellow warning sign next to the build you’d like to send to internal testers. If this is the case, click the warning sign and complete the required steps.

Once you’re done, the build status will change to Ready to Test:

Next, click App Store Connect Users from the menu on the left. You’ll see a searchable list of your internal testers. Select the ones you’d like to add as internal testers for this build and click Add.
All selected testers will receive an email with a link to download and install this build via the TestFlight app. You’ll find detailed information on the testers’ point of view later in the tutorial.
But first, it’s time to learn how to add external testers.
Adding External Testers
First, click Test Information from the menu on the left and fill in the necessary information. This includes:
- Beta App Description
- Feedback Email
- Contact Information
Providing this information is necessary when submitting a build for external testing. Once completed, click Save.

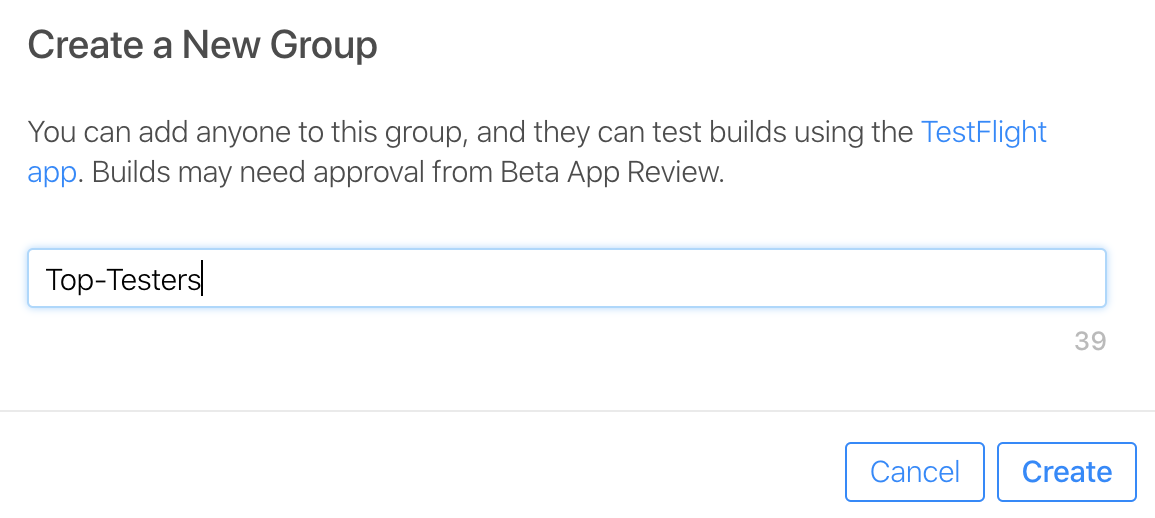
Now, click Add External Testers from the menu on the left. App Store Connect asks you to create a new testing group. It’s up to you how you choose to manage your groups. You can have one group for all your testers, different groups for different types of testers or different groups for different apps. For this tutorial, you’ll create one group called Top-Testers.
Once you’ve created the group, you can start adding external testers to it.
Click + next to Testers(0) under Top-Testers:

You can choose between adding new testers manually, adding existing testers (people already testing another one of your apps or builds) or importing testers from a CSV file. For this tutorial, you’ll add new testers manually. Choose Add New Testers and click Next.

Add the email addresses, first names, and last names of any external testers you want to add. Once you finish, click Add. You can always add more external testers by clicking the + button on the testing group page. Each person you add counts toward your limit of 10,000 external testers.


Selecting a Build
You now need to select a build for your external testers to test. On the Builds tab, click the + button:

Then, select your build and click Next:

For example, your internal testers might test your master build, while your external testers test your next release candidate. By making you select builds for internal and external testers independently, App Store Connect allows this kind of separation. You can also use this to select different builds for different testing groups.
App Store Connect might ask more questions, such as whether or the app requires a sign-in. Complete the remaining steps, including providing the testing information that’s displayed to your external testers.

Automatically notify testers is already checked. Uncheck this box if you want to manually notify testers when a build is available. Once complete, click Submit for Review.
App Store Connect adds your app to the review queue and changes its status to Waiting for Review. To get approval, your build must comply with the App Store Review Guidelines. Approval usually takes no more than 48 hours.
Once Apple approves your version of the app, subsequent builds won’t need a review until you change the version number.
When the app has passed Beta App Review, you’ll receive an email to confirm that your app can begin external testing. If you checked the Automatically notify testers checkbox, your external testers will receive notification emails at this point. Otherwise, you’ll have to go back to App Store Connect to start testing. Your external testers will then receive an invitation email.