Building iOS Apps with Xamarin and Visual Studio
Learn how to make your first iOS app using Xamarin and Visual Studio, by making a simple photo library viewer. By Bill Morefield.
Showing Photos
While blue squares are cool, you’ll next update the data source to actually retrieve photos from the device and display them on the collection view. You’ll use the Photos framework to access photo and video assets managed by the Photos app.
To start, you’ll add a view to display an image on the collection view cell. Open Main.storyboard again and select the collection view cell. On the Widget tab, scroll down and change the Background color back to the default.

Open the Toolbox, search for Image View, then drag an Image View onto the collection view Cell.

The image view will initially be much larger than the cell; to resize it, select the image view and go to the Properties \ Layout tab. Under the View section, set both the X and Y values to 0 and the Width and Height values to 100.

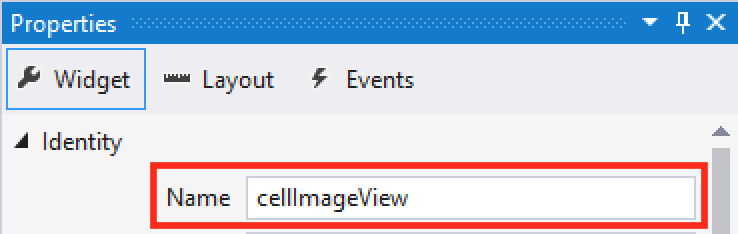
Switch to the Widget tab for the image view and set the Name as cellImageView. Visual Studio will automatically create a field named cellImageView for you.
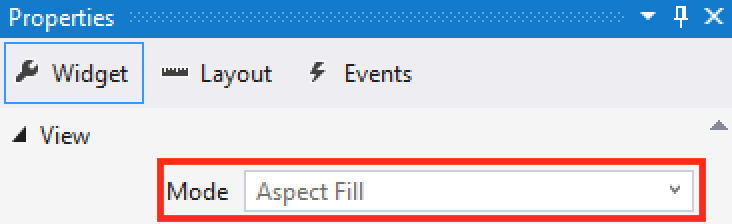
Scroll to the View section and change the Mode to Aspect Fill. This keeps the images from becoming stretched.
In the Solution Explorer, select the arrow to the left of PhotoCollectionImageCell.cs to expand the files. Open PhotoCollectionImageCell.designer.cs to see cellImageView declared there.

This file is automatically generated; do not not make any changes to it. If you do, they may be overwritten without warning or break links between the class and storyboard, resulting in runtime errors.
partial, which indicates that the field is in another file.
Since this field isn’t public, other classes cannot access it. Instead, you’ll need to provide a method to be able to set the image.
Open PhotoCollectionImageCell.cs and add the following method to the class:
public void SetImage(UIImage image)
{
    cellImageView.Image = image;
}
Now you’ll update PhotoCollectionDataSource to actually retrieve photos.
Add the following at the top of PhotoCollectionDataSource.cs:
using Photos;
Add the following fields to the PhotoCollectionDataSource:
private PHFetchResult imageFetchResult;
private PHImageManager imageManager;
The imageFetchResult field will hold an ordered list of photo entity objects, and you’ll get this photos list from the imageManager.
Right above GetCell(), add the following constructor:
public PhotoCollectionDataSource()
{
    imageFetchResult = PHAsset.FetchAssets(PHAssetMediaType.Image, null);
    imageManager = new PHImageManager();
}
This constructor gets a list of all image assets in the Photos app and stores the result in the imageFetchResult field. It then sets the imageManager, which the app will query for more information about each image.
Dispose of the imageManager object when the class finishes by adding this destructor below the constructor.
~PhotoCollectionDataSource()
{
    imageManager.Dispose();
}
To make the GetItemsCount and GetCell methods use these resources and return images instead of empty cells, change GetItemsCount() to the following:
public override nint GetItemsCount(UICollectionView collectionView, nint section)
{
    return imageFetchResult.Count;
}
Then replace GetCell with the following:
public override UICollectionViewCell GetCell(UICollectionView collectionView,
    NSIndexPath indexPath)
{
    var imageCell = collectionView.DequeueReusableCell(photoCellIdentifier, indexPath)
        as PhotoCollectionImageCell;

    // 1
    var imageAsset = imageFetchResult[indexPath.Item] as PHAsset;

    // 2
    imageManager.RequestImageForAsset(imageAsset,
        new CoreGraphics.CGSize(100.0, 100.0), PHImageContentMode.AspectFill,
        new PHImageRequestOptions(),
         // 3
         (UIImage image, NSDictionary info) =>
        {
           // 4
           imageCell.SetImage(image);
        });

    return imageCell;
}
Here’s a breakdown of the changes above:
- The
indexPathcontains a reference to which item in the collection view to return. TheItemproperty is a simple index. Here you get the asset at this index and cast it to aPHAsset. - You use
imageManagerto request the image for the asset with a desired size and content mode. - Many iOS framework methods use deferred execution for requests that can take time to complete, such as
RequestImageForAsset, and take a delegate to be called upon completion. When the request completes, the delegate will be called with the image and information about it. - Lastly, the image is set on the cell.
Build and run. You’ll see a prompt requesting permission access.

If you select OK, however, the app … doesn’t do anything. So disappointing!

iOS considers access to users’ photos to be sensitive information, and prompts the user for permission. However, the app must also register to be notified when the user has granted this permission, so it can reload its views. You’ll do this next.
Registering for Photo Permission Changes
First, you’ll add a method to the PhotoCollectionDataSource class to inform it to re-query for photo changes. Add the following to the end of the class:
public void ReloadPhotos()
{
    imageFetchResult = PHAsset.FetchAssets(PHAssetMediaType.Image, null);
}
Next, open ViewController.cs and add the following framework to the top of the file:
using Photos;
Then add this code to the end of ViewDidLoad():
// 1
PHPhotoLibrary.SharedPhotoLibrary.RegisterChangeObserver((changeObserver) =>
{
    //2
    InvokeOnMainThread(() =>
    {
        // 3
        photoDataSource.ReloadPhotos();
        collectionView.ReloadData();
    });
});
Here’s what this does:
- The app registers a delegate on the shared photo library to be called whenever the photo library changes.
-
InvokeOnMainThread()ensures that UI changes are always processed on the main thread; otherwise a crash may result. - You call
photoDataSource.ReloadPhotos()to reload the photos andcollectionView.ReloadData()to tell the collection view to redraw.
Finally, you’ll handle the initial case, in which the app has not yet been given access to photos, and request permission.
In ViewDidLoad(), add the following code right before setting photoDataSource:
if (PHPhotoLibrary.AuthorizationStatus == PHAuthorizationStatus.NotDetermined)
{
    PHPhotoLibrary.RequestAuthorization((PHAuthorizationStatus newStatus) =>
    { });
}
This checks the current authorization status, and if it’s NotDetermined, explicitly requests permission to access photos.
In order to trigger the photos permission prompt again, reset the iPhone simulator by going to Simulator \ Reset Content and Settings.
Build and run the app. You’ll be prompted for photo permission, and after you press Ok the app will show the collection view with thumbnails for all the device’s photos!

Where to Go From Here?
You can download the completed Visual Studio project from here.
In this tutorial, you learned a bit about how Xamarin works and how to use it to create iOS apps.
The Xamarin Guides Site provides several good resources to learn more about the Xamarin platform. To better understand building cross-platforms apps, view the Xamarin tutorials on building the same app for iOS and Android.
Microsoft’s purchase of Xamarin introduced many exciting changes. The announcements at Microsoft’s Build conference and Xamarin Evolve can give you guidance on Xamarin’s new direction. Xamarin also released videos of the sessions from the recent Evolve Conference that provide more information on working with Xamarin and the future direction of the product.
Do you think you’ll try Xamarin when building apps? If you have any questions or comments about this tutorial, please feel free to post in the comments section below.