Unreal Engine 4 Paint Filter Tutorial
In this Unreal Engine 4 tutorial, you will learn how to make your game look like a painting by implementing Kuwahara filtering. By Tommy Tran.
Sampling Pixels
First, you need to create the two for loops. Add the following inside GetKernelMeanAndVariance() (below the variables):
for (int x = Range.x; x <= Range.y; x++)
{
    for (int y = Range.z; y <= Range.w; y++)
    {

    }
}
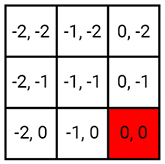
This will give you all the offsets for the kernel. For example, if you are sampling the top-left kernel and the filter has a radius of 2, the offsets will range from (0, 0) to (-2, -2).
Now you need to get the color for the sample pixel. Add the following inside the inner for loop:
float2 Offset = float2(x, y) * TexelSize;
float3 PixelColor = SceneTextureLookup(UV + Offset, 14, false).rgb;
The first line will get the sample pixel’s offset and convert it to UV space. The second line will use the offset to get the sample pixel’s color.
Next, you need to calculate the mean and variance.
Calculating Mean and Variance
Figuring out the mean is easy enough. You just accumulate all the colors and then divide by the number of samples. For variance, you use the formula below where x is the sample pixel’s color:

The first thing you need to do is calculate the sums. For the mean, this is just adding the color to the Mean variable. For variance, you need to square the color before adding it to Variance. Add the following below the previous code:
Mean += PixelColor;
Variance += PixelColor * PixelColor;
Samples++;
Next, add the following below the for loops:
Mean /= Samples;
Variance = Variance / Samples - Mean * Mean;
float TotalVariance = Variance.r + Variance.g + Variance.b;
return float4(Mean.r, Mean.g, Mean.b, TotalVariance);
The first two lines will calculate the mean and variance. However, there is a problem: the variance is spread across the RGB channels. To fix this, the third line sums the channels up to give you the total variance.
Finally, the function returns the mean and variance as a float4. The mean is in the RGB channels and variance is in the A channel.
Now that you have a function to calculate the mean and variance, you need to call it for each kernel. Go back to the Shaders folder and open Kuwahara.usf. First, you need to create a few variables. Replace the code inside with the following:
float2 UV = GetDefaultSceneTextureUV(Parameters, 14);
float4 MeanAndVariance[4];
float4 Range;
Here is what each variable is for:
- UV: UV coordinates for the current pixel
- MeanAndVariance: An array to hold the mean and variance for each kernel
-
Range: Used to hold the
forloop bounds for the current kernel
Now you need to call GetKernelMeanAndVariance() for each kernel. To do this, add the following:
Range = float4(-XRadius, 0, -YRadius, 0);
MeanAndVariance[0] = GetKernelMeanAndVariance(UV, Range);

Range = float4(0, XRadius, -YRadius, 0);
MeanAndVariance[1] = GetKernelMeanAndVariance(UV, Range);

Range = float4(-XRadius, 0, 0, YRadius);
MeanAndVariance[2] = GetKernelMeanAndVariance(UV, Range);

Range = float4(0, XRadius, 0, YRadius);
MeanAndVariance[3] = GetKernelMeanAndVariance(UV, Range);
This will get the mean and variance for each kernel in the following order: top-left, top-right, bottom-left and then bottom-right.
Next, you need to select the kernel with lowest variance and output its mean.
Selecting Kernel With Lowest Variance
To select the kernel with lowest variance, add the following:
// 1
float3 FinalColor = MeanAndVariance[0].rgb;
float MinimumVariance = MeanAndVariance[0].a;

// 2
for (int i = 1; i < 4; i++)
{
    if (MeanAndVariance[i].a < MinimumVariance)
    {
        FinalColor = MeanAndVariance[i].rgb;
        MinimumVariance = MeanAndVariance[i].a;
    }
}

return FinalColor;
Here is what each section does:
- Create two variables to hold the final color and minimum variance. Initialize both of these to the first kernel’s mean and variance.
- Loop over the remaining three kernels. If the current kernel’s variance is lower than the minimum, its mean and variance become the new FinalColor and MinimumVariance. After looping, the output is FinalColor which will be the mean of the lowest variance kernel.
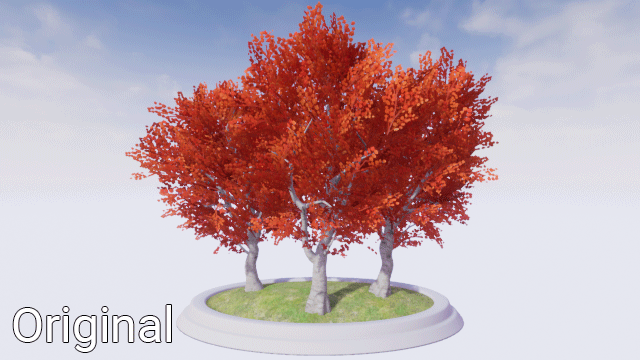
Go back to Unreal and navigate to Materials\PostProcess. Open PP_Kuwahara, make a dummy change and then click Apply. Go back to the main editor to see the results!
It looks pretty good but if you look closer, you can see that the image has these strange block-like areas. Here’s a few of them highlighted:
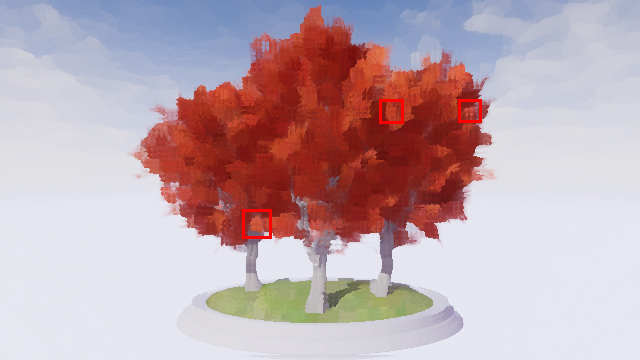
This is a side effect of using axis-aligned kernels. A way to reduce this is to use an improved version of the filter which I call the Directional Kuwahara filter.
Directional Kuwahara Filter
This filter is like the original except the kernels are now aligned with the pixel’s local orientation. Here is an example of a 3×5 kernel in the Directional Kuwahara filter:
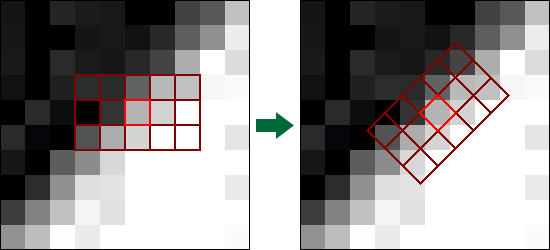
Here, the filter determines the pixel’s orientation to be along the edge. It then rotates the entire kernel accordingly.
To calculate the local orientation, the filter does a convolution pass using Sobel. If Sobel sounds familiar to you, it’s probably because it is a popular edge detection technique. But if it’s an edge detection technique, how can you use it to get local orientation? To answer that, let’s look at how Sobel works.
How Sobel Works
Instead of one kernel, Sobel uses two.
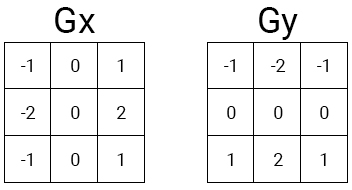
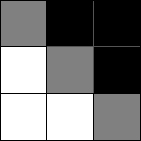
Gx will give you the gradient in the horizontal direction. Gy will give you the gradient in the vertical direction. Let’s use the following 3×3 grayscale image as an example:
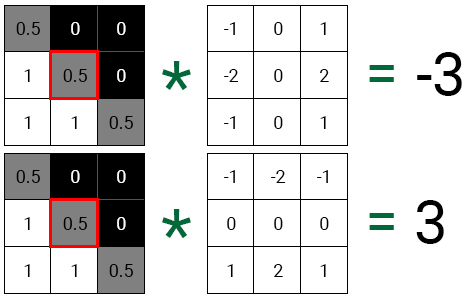
First, convolve the middle pixel with each kernel.
If you plot each value onto a 2D plane, you will see that the resulting vector points in the same direction as the edge.
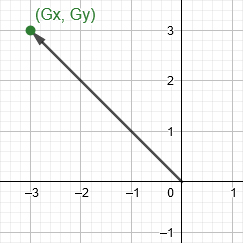
To find the angle between the vector and the X-axis, you plug the gradient values into an arc tangent (atan) function. You can then use the resulting angle to rotate the kernel.
And that’s how you can use Sobel to give you a pixel’s local orientation. Let’s try it out.
Finding Local Orientation
Open Global.usf and add the following inside GetPixelAngle():
float GradientX = 0;
float GradientY = 0;
float SobelX[9] = {-1, -2, -1, 0, 0, 0, 1, 2, 1};
float SobelY[9] = {-1, 0, 1, -2, 0, 2, -1, 0, 1};
int i = 0;
GetPixelAngle() is missing. This is intentional! Check out our Custom Shaders in HLSL tutorial to see why you need to do this.
Here’s what each variable is for:
- GradientX: Holds the gradient for the horizontal direction
- GradientY: Holds the gradient for the vertical direction
- SobelX: The horizontal Sobel kernel as an array
- SobelY: The vertical Sobel kernel as an array
- i: Used to access each element in SobelX and SobelY
Next, you need to perform convolution using the SobelX and SobelY kernels. Add the following:
for (int x = -1; x <= 1; x++)
{
    for (int y = -1; y <= 1; y++)
    {
        // 1
        float2 Offset = float2(x, y) * TexelSize;
        float3 PixelColor = SceneTextureLookup(UV + Offset, 14, false).rgb;
        float PixelValue = dot(PixelColor, float3(0.3,0.59,0.11));

        // 2
        GradientX += PixelValue * SobelX[i];
        GradientY += PixelValue * SobelY[i];
        i++;
    }
}
Here’s what each section does:
- The first two lines will get the sample pixel’s color. The third line will then desaturate the color to convert it into a single grayscale value. This makes it easier to calculate the gradients of the image as a whole instead of getting the gradients for each color channel.
- For both kernels, multiply the pixel’s grayscale value with the corresponding kernel element. Then add the result to the appropriate gradient variable. i will then increment to hold the index for the next kernel element.
To get the angle, you use the atan() function and plug in your gradient values. Add the following below the for loops:
return atan(GradientY / GradientX);
Now that you have a function to get a pixel’s angle, you need to somehow use it to rotate the kernel. A way to do this is to use a matrix.