Unreal Engine 4 Paint Filter Tutorial
In this Unreal Engine 4 tutorial, you will learn how to make your game look like a painting by implementing Kuwahara filtering. By Tommy Tran.
What is a Matrix?
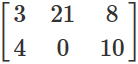
A matrix is a 2D array of numbers. For example, here is a 2×3 matrix (two rows and three columns):
By itself, a matrix doesn’t look very interesting. But the matrix’s true power reveals itself once you multiply a vector with a matrix. This will allow you to do things such as rotation and scaling (depending on the matrix). But how exactly do you create a matrix for rotation?
In a coordinate system, you will have a vector for every dimension. These are your basis vectors and they define the positive directions of your axes.
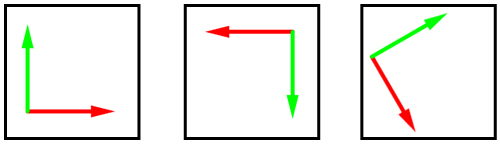
Below are a few examples of different basis vectors for a 2D coordinate system. The red arrow defines the positive X direction. The green arrow defines the positive Y direction.
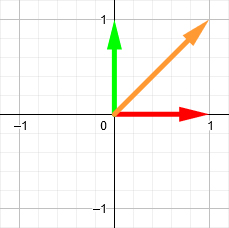
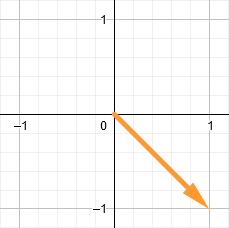
To rotate a vector, you can use these basis vectors to build a rotation matrix. This is simply a matrix containing the positions of the basis vectors after rotation. For example, imagine you have a vector (orange arrow) at (1, 1).
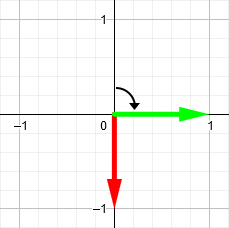
Let’s say you want to rotate it 90 degrees clockwise. First, you rotate the basis vectors by the same amount.
Then you construct a 2×2 matrix using the new positions of the basis vectors. The first column is the red arrow’s position and the second column is the green arrow’s position. This is your rotation matrix.
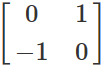
Finally, you perform matrix multiplication using the orange vector and rotation matrix. The result is the new position for the orange vector.
Isn’t that cool? What’s even better is that you can use the matrix above to rotate any 2D vector 90 degrees clockwise. For the filter, this means you only need to construct the rotation matrix once for each pixel and then you can use it for the entire kernel.
Now it’s time to rotate the kernel using a rotation matrix.
Rotating the Kernel
First, you need to modify GetKernelMeanAndVariance() to accept a 2×2 matrix. This is because you will construct a rotation matrix within Kuwahara.usf and pass it in. Change the signature for GetKernelMeanAndVariance() to:
float4 GetKernelMeanAndVariance(float2 UV, float4 Range, float2x2 RotationMatrix)
Next, change the first line in the inner for loop to:
float2 Offset = mul(float2(x, y) * TexelSize, RotationMatrix);
mul() will perform matrix multiplication using the offset and RotationMatrix. This will rotate the offset around the current pixel.
Next, you need to construct the rotation matrix.
Constructing the Rotation Matrix
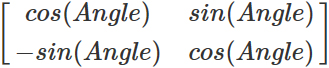
To construct a rotation matrix, you use the sine and cosine functions like so:
Close Global.usf and then open Kuwahara.usf. Afterwards, add the following at the bottom of the variable list:
float Angle = GetPixelAngle(UV);
float2x2 RotationMatrix = float2x2(cos(Angle), -sin(Angle), sin(Angle), cos(Angle));
The first line will calculate the angle for the current pixel. The second line will then create the rotation matrix using the angle.
Finally, you need to pass in the RotationMatrix for each kernel. Modify each call to GetKernelMeanAndVariance() like so:
GetKernelMeanAndVariance(UV, Range, RotationMatrix)
That’s all for the Directional Kuwahara! Close Kuwahara.usf and then go back to PP_Kuwahara. Make a dummy change, click Apply and then close it.
Below is a comparison between the original Kuwahara and Directional Kuwahara. Notice how the Directional Kuwahara does not have the blockiness of the original.
Where to Go From Here?
You can download the completed project using the link at the top or bottom of this tutorial.
If you’d like to learn more about the Kuwahara filter, check out the paper on Anisotropic Kuwahara filtering. The Directional Kuwahara is actually a simplified version of the filter presented in the paper.
Using your new-found love of matrices, I encourage you to experiment with them to make new effects. For example, you can use a combination of rotation matrices and blurring to create a radial or circular blur. If you’d like to learn more about matrices and how they work, check out 3Blue1Brown’s Essence of Linear Algebra series.
If there are any effects you’d like to me cover, let me know in the comments below!