macOS Controls Tutorial: Part 2/2
Learn how to use common macOS UI controls like NSSlider, NSImageView and more in the final part of this series — updated for Xcode 8.2 and Swift 3! By Ernesto García.
Hot Date Tonight — NSDatePicker
Date Picker is a macOS control that display date and time values, as well as providing a method for the user to edit those values. Date Pickers can be configured to display a date, a time or both a date and time. The control responsible for this on macOS is NSDatePicker.
Date Pickers can be displayed in one of two styles: textual, where the date and time information is shown in text fields, and graphical, where the date is represented by a calendar and the time by a clock. You can find examples of all these styles in macOS’ Date & Time preferences panel, as in the screenshot below:

The most common tasks you’ll perform with a date picker are getting and setting the date or time value, and setting the minimum and maximum date or time values that are permitted in your control. The properties to do this are set out below!
// getting & setting the date/time value
let myDate = myDatePicker.dateValue
myDatePicker.dateValue = myDate

// getting & setting the minimum date of the range
let theMinimumDate = myDatePicker.minDate
myDatePicker.minDate = theMinimumDate

// getting & setting the maximum date of the range
let theMaximumDate = myDatePicker.maxDate
myDatePicker.maxDate = theMaximumDate
Again — the controls have a very simple getter and setter style interface to update these values. Now it’s time (pardon the pun!) to put this control to work.
I’m Late for a Very Important Date
Following the usual procedure, add a new Label to your window. Change its title to Date: and its alignment to Right. Find the Date Picker control in the Object palette, and drag it onto the window, placing it to the right of the label. Resize the window and move the Go! button down if needed:

Create an outlet for the date picker, just as you’ve done for each of the previous macOS controls. In the popup window, name the property datePicker.
Just like the other macOS controls in your app, it’s nice to display a default value to the user when they first run your application. Picking today’s date as the default sounds like a good choice! :]
Open ViewController.swift and add the following code to the end of viewDidLoad():
// Set the date picker to display the current date
datePicker.dateValue = Date()
Build and run the app! You should see your shiny new date picker displaying current date, like in the screenshot below:

Video Killed the Radio…Button
Radio buttons are a special type of control that always appear in groups; they are typically displayed as a list of options with selectable buttons alongside. Their behavior is also somewhat unique; any button within the group can be selected, but selecting one button will deselect all other buttons in the group. Only a single button, within the same group, can be selected at one time.
A good example of radio buttons that are used to present a set of options is the iTunes Back Up options, as shown below:

Radio buttons are organized in radio groups.
When you click a radio button in a group, it is selected and the system automatically deselects the rest of the buttons within that group. You only need to worry about getting and setting the proper values. How convenient!
But how do you define a group? Quoting the documentation:
“Radio buttons automatically act as a group (selecting one button will unselect all other related buttons) when they have the same superview and -action method.”.
So, all you need to do is add the radio buttons to a view, create an action, and assign that action to all the buttons in the group.
Then you just need to change the state of one button (On / Off) and the system will take care of deselecting the others.
// Select a radio button
radioButton.state = NSOnState

// Deselect a radio button
radioButton.state = NSOffState

// Check if a radio button is selected.
let selected = (radioButton.state == NSOnState)
Once again, a complicated control is reduced to some very simple methods. Read on to see how to implement a radio button control in your app!
A Place to Call Home – Adding Radio Buttons
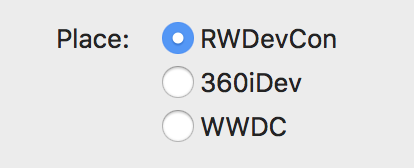
Add a new Label to your app (you should be getting pretty comfortable with this by now!), and change its title to Place:. Locate the Radio Button in the Object Library palette, and drag three onto the content view, just beside the label. Double click on the radio buttons to change their titles to: RWDevCon, 360iDev and WWDC respectively.

Now, you need to create a new outlet for every radio button — another action you should be quite familiar with by now! Open the Assistant Editor and Ctrl-Drag the first radio button into the ViewController.swift source file, just below the existing properties. Name the outlet rwDevConRadioButton. Repeat the process for the other two radio buttons, naming the outlets threeSixtyRadioButton and wwdcRadioButton respectively.
Build and run.

Click on the radio buttons, and you’ll immediately notice a problem. You can select all of them. They’re not behaving as a group. Why? Because there are two conditions for different radio buttons to act as a group: They must have the same superview (which is the case), and they need to have a common action. The second condition is not met in our app.
To solve that, you need to create a common action for those buttons.
You are already an expert creating actions using Interface Builder, right? So, to learn an alternative way to do it, you’re going to create the action in code and assign it to the radio buttons in Interface Builder.
Open ViewController.swift and add the following code inside the class implementation:
@IBAction func radioButtonChanged(_ sender: AnyObject) {

}
That’s a typical action method which includes the @IBAction annotation so that Interface Builder can find it and use it. Now, open Main.storyBoard to assign this action to the radio buttons.
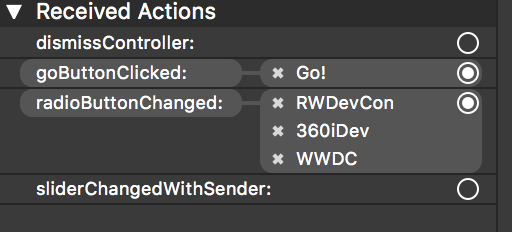
Go to the Document Outline and Control-Click (or right click) on the View Controller. Go to the Received Actions section in the popup window, and drag from the circle next to radioButtonChanged: onto the RWDevCon radio button. With that simple action you’ve just assigned the action to that radio button.

Repeat the process to assign the same action to the other two radio buttons. Your received actions section should look like this:
Build and run:

Now the radio buttons are behaving like a group.
Now you’ll need to to make the RWDevCon radio button the default when the app starts. You just need to set the radio button state to On, and then the other buttons will be automatically deselected.
Open ViewController.swift. Add the following code to the end of viewDidLoad():
// Set the radio group's initial selection
rwDevConRadioButton.state = NSOnState
Build and run the application. You should see the RWDevCon radio button selected when the app starts.
Radio buttons are one way to toggle values in your app, but there’s another class of macOS controls that perform a similar function — check boxes!