Metal Tutorial with Swift 3 Part 4: Lighting
In this fourth part of our Metal tutorial series, learn how to light 3D objects using the Phong lighting model. By Andrew Kharchyshyn.
Passing the Normal Data to the GPU
At this point your vertex structure includes normal data, but your shader isn’t expecting this data yet!
Therefore, the shader reads position data for next vertex where normal data from the previous vertex is stored. That’s why you end up with this weird glitch.
To fix this, open Shaders.metal. In VertexIn structure, add this below all the other components:
packed_float3 normal;
Build and run. Voilà — the cube looks just like expected.

Adding Diffuse Lighting Data
Right now, your Light structures don’t have all the data they need for diffuse lighting. You’ll have to add some.
In Shaders.metal, add two new values to the bottom of the Light structure:
packed_float3 direction;
float diffuseIntensity;
Now open Light.swift and add these properties below ambientIntensity:
var direction: (Float, Float, Float)
var diffuseIntensity: Float
Also modify both methods to look like the following:
static func size() -> Int {
  return MemoryLayout<Float>.size * 8
}

func raw() -> [Float] {
  let raw = [color.0, color.1, color.2, ambientIntensity, direction.0, direction.1, direction.2, diffuseIntensity]
  return raw
}
You’ve simply added two properties, used those properties when getting the raw float array and increased the size value.
Next open Node.swift and modify the light constant to match this:
let light = Light(color: (1.0,1.0,1.0), ambientIntensity: 0.2, direction: (0.0, 0.0, 1.0), diffuseIntensity: 0.8)
The direction that you pass (0.0, 0.0, 1.0) is a vector perpendicular to the screen. This mean that the light is pointing in the same direction as the camera. You also set the diffuse intensity to a large amount (0.8), because this is meant to represent a strong light shining on the cube.
Adding the Diffuse Lighting Calculation
Now you can actually use the normal data. Right now you have normal data in the vertex shader, but you need the interpolated normal for each fragment. So you need to pass the normal data to VertexOut.
To do this, open Shaders.metal and add the following below the other components inside VertexOut :
float3 normal;
In the vertex shader, find this line:
VertexOut.texCoord = VertexIn.texCoord;
…and add this immediately below:
VertexOut.normal = (mv_Matrix * float4(VertexIn.normal, 0.0)).xyz;
This way you will get the normal value for each fragment in a fragment shader.
Now in the fragment shader, add this right after the ambient color part:
//Diffuse
float diffuseFactor = max(0.0,dot(interpolated.normal, light.direction)); // 1
float4 diffuseColor = float4(light.color * light.diffuseIntensity * diffuseFactor ,1.0); // 2
Taking each numbered comment in turn:
- Here you calculate the diffuse factor. There is some math involved here. From right to left:
- You take the dot product of the fragment normal and the light direction.
- As discussed previously, this will return values from -1 to 1, depending on the angle between the two normals.
- You need this value to be capped from 0 to 1, so you use
maxto normalize any negative values to 0.
- To get the diffuse color, you multiply the light color with the diffuse intensity and the diffuse factor. You also set
alphato 0 and make it afloat4value.
- You take the dot product of the fragment normal and the light direction.
- As discussed previously, this will return values from -1 to 1, depending on the angle between the two normals.
- You need this value to be capped from 0 to 1, so you use
maxto normalize any negative values to 0.
You’re nearly done! Change the last line in the fragment shader from this:
return color * ambientColor;
…to this:
return color * (ambientColor + diffuseColor);
Build and run, and you’ll see the following:

Looking good, eh? For an even better look, find this line in Node.swift:
let light = Light(color: (1.0,1.0,1.0), ambientIntensity: 0.2, direction: (0.0, 0.0, 1.0), diffuseIntensity: 0.8)
And change the ambient intensity to 0.1:
let light = Light(color: (1.0,1.0,1.0), ambientIntensity: 0.1, direction: (0.0, 0.0, 1.0), diffuseIntensity: 0.8)
Build and run again, and there will be less ambient light, making the diffuse effect more noticeable:

As you can see, the more the face is pointed toward the light source, the brighter it becomes;

Specular Lighting Overview
Specular lighting is the third and final component of the Phong lighting model.
Remember, you can think of this component as the one that exposes the shininess of objects. Think of a shiny metallic object under a bright light: you can see a small, shiny spot.
You calculate the specular color in a similar way as the diffuse color:
SpecularColor = LightColor * SpecularIntensity * SpecularFactor
Just like diffuse and ambient intensity, you can modify the specular intensity to get the “perfect” look you’re going for.
But what is the specular factor? Take a look at the following picture:
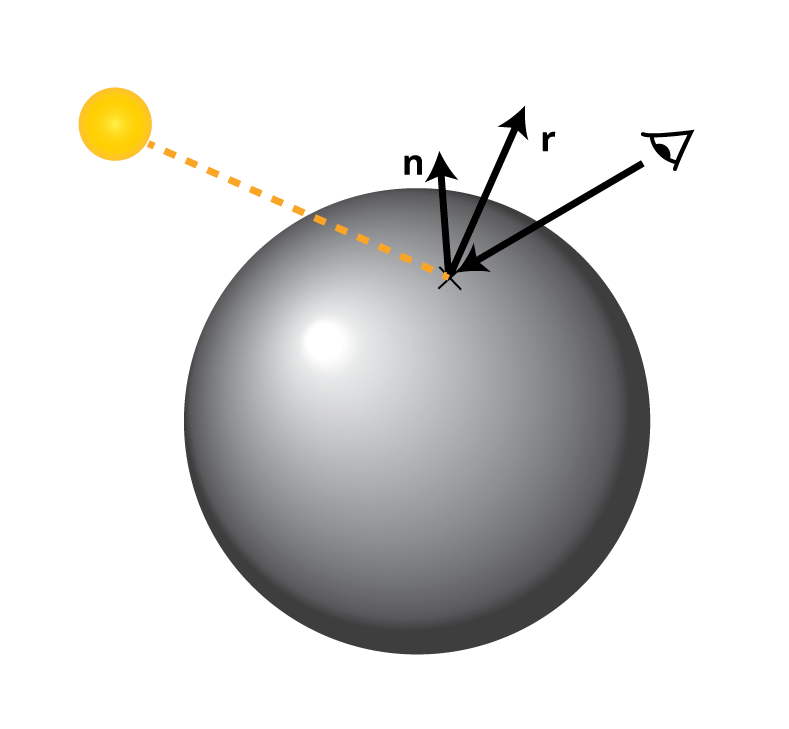
This illustration shows a light ray hitting a vertex. The vertex has a normal (n), and the light reflects off the vertex in a particular direction (r). The question is: how close is that reflection vector to the vector that points toward the camera?
- The more this reflected vector points towards the camera, the more shiny you want this point to be.
- The farther this vector is from the camera, the darker the fragment should become. Unlike diffuse lighting, you want this dropoff effect to happen fairly quickly, to get this cool metallic effect.
To calculate the specular factor, you use your good old buddy, the dot product:
SpecularFactor = - (r * eye)shininess
After you get the dot product of the reflected vector and the eye vector, you raise it to a new value – “shininess”. Shininess is a material parameter. For example, wooden objects will have less “shininess” than metallic objects.
Adding Specular Lighting
First things first: open Light.swift and add two properties below the others:
var shininess: Float
var specularIntensity: Float
As always, don’t forget to modify the methods to include the new values:
static func size() -> Int {
  return MemoryLayout<Float>.size * 10
}

func raw() -> [Float] {
  let raw = [color.0, color.1, color.2, ambientIntensity, direction.0, direction.1, direction.2, diffuseIntensity, shininess, specularIntensity]
  return raw
}
In Node.swift, change the light constant value to this:
let light = Light(color: (1.0,1.0,1.0), ambientIntensity: 0.1, direction: (0.0, 0.0, 1.0), diffuseIntensity: 0.8, shininess: 10, specularIntensity: 2)
Now open Shaders.metal and add this to its Light structure:
float shininess;
float specularIntensity;
Build and run…

Crash?! Time to dig in and figure out what went wrong.