Design Patterns on iOS using Swift – Part 1/2
In the first half of this two-part tutorial, you’ll learn about common design patterns when building iOS apps, and how to apply these patterns in your own apps. By Lorenzo Boaro.
How to Use the Facade Pattern
Currently you have PersistencyManager to save the album data locally and HTTPClient to handle the remote communication. The other classes in your project should not be aware of this logic, as they will be hiding behind the facade of LibraryAPI.
To implement this pattern, only LibraryAPI should hold instances of PersistencyManager and HTTPClient. Then, LibraryAPI will expose a simple API to access those services.
The design looks like the following:

LibraryAPI will be exposed to other code, but will hide the HTTPClient and PersistencyManager complexity from the rest of the app.
Open LibraryAPI.swift and add the following constant properties to the class:
private let persistencyManager = PersistencyManager()
private let httpClient = HTTPClient()
private let isOnline = false
isOnline determines if the server should be updated with any changes made to the albums list, such as added or deleted albums. The HTTP client doesn’t actually work with a real server and is only here to demonstrate the usage of the facade pattern, so isOnline will always be false.
Next, add the following three methods to LibraryAPI.swift:
func getAlbums() -> [Album] {
  return persistencyManager.getAlbums()
}

func addAlbum(_ album: Album, at index: Int) {
  persistencyManager.addAlbum(album, at: index)
  if isOnline {
    httpClient.postRequest("/api/addAlbum", body: album.description)
  }
}

func deleteAlbum(at index: Int) {
  persistencyManager.deleteAlbum(at: index)
  if isOnline {
    httpClient.postRequest("/api/deleteAlbum", body: "\(index)")
  }
}
Take a look at addAlbum(_:at:). The class first updates the data locally, and then if there’s an internet connection, it updates the remote server. This is the real strength of the Facade; when some class outside of your system adds a new album, it doesn’t know — and doesn’t need to know — of the complexity that lies underneath.
Build and run your app. You’ll see two empty views, and a toolbar. The top view will be used to display your album covers, and the bottom view will be used to display a table of information related to that album.

You’ll need something to display the album data on screen — which is a perfect use for your next design pattern: the Decorator.
The Decorator Design Pattern
The Decorator pattern dynamically adds behaviors and responsibilities to an object without modifying its code. It’s an alternative to subclassing where you modify a class’s behavior by wrapping it with another object.
In Swift there are two very common implementations of this pattern: Extensions and Delegation.
Extensions
Adding extensions is an extremely powerful mechanism that allows you to add new functionality to existing classes, structures or enumeration types without having to subclass. What’s also really awesome is you can extend code you don’t have access to, and enhance their functionality. That means you can add your own methods to Cocoa classes such as UIView and UIImage!
Swift extensions are slightly different from the classic definition of a decorator, because a extension doesn’t hold an instance of the class it extends.
How to Use Extensions
Imagine a situation in which you have an Album instance that you want to present inside a table view:
Where will the album titles come from? Album is a Model, so it doesn’t care how you present the data. You’ll need some external code to add this functionality to the Album struct.
You’ll create a extension of the Album struct; it will define a new method that returns a data structure which can be used easily with UITableView.
Go to Album.swift and add the following code at the end of the file:
typealias AlbumData = (title: String, value: String)
This typealias defines a tuple which contains all of the information that the table view needs to display a row of data. Now add the following extension to access this information:
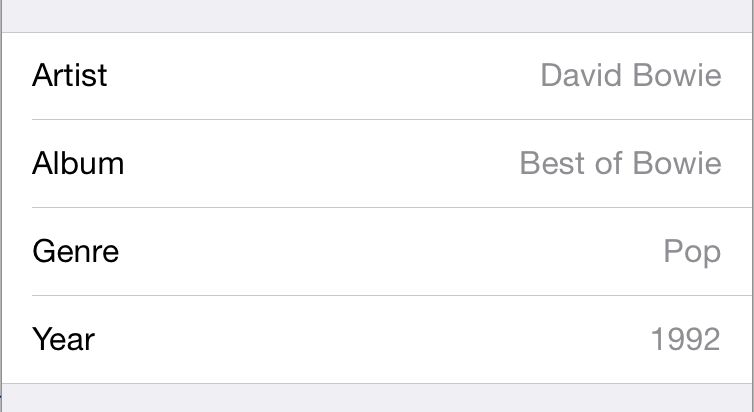
extension Album {
  var tableRepresentation: [AlbumData] {
    return [
      ("Artist", artist),
      ("Album", title),
      ("Genre", genre),
      ("Year", year)
    ]
  }
}
An array of AlbumData will be much easier to display in a table view!
Note: Classes can of course override a superclass’s method, but with extensions you can’t. Methods or properties in an extension cannot have the same name as methods or properties in the original class.
Consider for a moment how powerful this pattern can be:
- You’re using properties directly from
Album. - You have added to the
Albumstruct but you haven’t modified it. - This simple addition lets you return a
UITableView–ish representation of anAlbum.
Delegation
The other implementation of the Decorator design pattern, Delegation, is a mechanism in which one object acts on behalf of, or in coordination with, another object. UITableView is greedy – it has two delegate-type properties, one called a data source, and one called a delegate. They do slightly different things – for example, the table view asks its data source how many rows should be in a particular section, but it asks its delegate what to do when a row is selected.
You can’t expect the UITableView to know how many rows you want to have in each section, as this is application-specific. Therefore, the task of calculating the amount of rows in each section is passed on to the data source. This allows the UITableView class to be independent of the data it displays.
Here’s a pseudo-explanation of what goes on when you create a new UITableView:
Table: Here I am! All I want to do is SHOW CELLS. Hey, how many sections do I have?
Data source: One!
Table: OK, nice and easy! And how many cells in that first section?
Data source: Four!
Table: Thanks! Now, bear with me, this might get a bit repetitive. Can I have the cell at section 0, row 0?
Data source: Here you go!
Table: And now section 0, row 1?
…and so on.
The UITableView object does its job of displaying a table view. However, eventually it will need some information that it doesn’t have. Then, it turns to its delegate and data source and sends a message asking for additional information.
It might seem easier to just subclass an object and override the necessary methods, but consider that you can only subclass based on a single class. If you want an object to be the delegate of two or more other objects, you won’t be able to achieve this by subclassing.
Note: This is an important pattern. Apple uses this approach in most of the UIKit classes: UITableView, UITextView, UITextField, UIWebView, UICollectionView, UIPickerView, UIGestureRecognizer, UIScrollView. The list goes on and on.