Design Patterns on iOS using Swift – Part 1/2
In the first half of this two-part tutorial, you’ll learn about common design patterns when building iOS apps, and how to apply these patterns in your own apps. By Lorenzo Boaro.
The Singleton Pattern
The Singleton design pattern ensures that only one instance exists for a given class and that there’s a global access point to that instance. It usually uses lazy loading to create the single instance when it’s needed the first time.
Note: Apple uses this approach a lot. For example: UserDefaults.standard, UIApplication.shared, UIScreen.main, FileManager.default all return a Singleton object.
You’re likely wondering why you care if there’s more than one instance of a class floating around. Code and memory is cheap, right?
There are some cases in which it makes sense to have exactly one instance of a class. For example, there’s only one instance of your application and one main screen for the device, so you only want one instance of each. Or, take a global configuration handler class: it’s easier to implement a thread-safe access to a single shared resource, such as a configuration file, than to have many class modifying the configuration file possibly at the same time.
What Should You Be Careful About?
The singleton pattern is very easy to overuse.
If you encounter a situation where you’re tempted to use a singleton, first consider other ways to accomplish your task.
For example, singletons are not appropriate if you’re simply trying to pass information from one view controller to another. Instead, consider passing models via an initializer or property.
If you determine you actually do need a singleton, consider whether a singleton plus makes more sense.
Will having more than one instance cause problems? Will it ever be useful to have custom instances? Your answers will determine whether its better for you to use a true singleton or singleton plus.
The most common reason why singleton’s are problematic is testing. If you have state being stored in a global object like a singleton then order of tests can matter, and it can be painful to mock them. Both of these reasons make testing a pain.
Lastly, beware of “code smell”, indicating your use case isn’t appropriate as a singleton at all. For example, if you often need many custom instances, your use case may be better as a regular object.

How to Use the Singleton Pattern
To ensure there is only one instance of your singleton, you must make it impossible for anyone else to make an instance. Swift allows you to do this by marking the initializers as private. You can then add a static property for the shared instance, which is initialized inside the class.
You’ll implement this pattern by creating a singleton class to manage all the album data.
You’ll notice there’s a group called API in the project; this is where you’ll put all the classes that will provide services to your app. Create a new file inside this group by right-clicking the group and selecting New File. Select iOS > Swift File. Set the file name to LibraryAPI.swift and click Create.
Now go to LibraryAPI.swift and insert this code:
final class LibraryAPI {
  // 1
  static let shared = LibraryAPI()
  // 2
  private init() {

  }
}
Here’s the breakdown:
- The
sharedstatic constant approach gives other objects access to the singleton objectLibraryAPI. - The private initializer prevents creating new instances of
LibraryAPIfrom outside.
You now have a Singleton object as the entry point to manage the albums. Take it a step further and create a class to handle the persistence of your library data.
Now within the group API create a new file. Select iOS > Swift File. Set the class name to PersistencyManager.swift and click Create.
Open PersistencyManager.swift and add the following code.
final class PersistencyManager {

}
Inside the curly braces put this snippet:
private var albums = [Album]()
Here you declare a private property to hold album data. The array is mutable, so you can easily add and delete albums.
Now add the following initializer to the class:
init() {
  //Dummy list of albums
  let album1 = Album(title: "Best of Bowie",
                     artist: "David Bowie",
                     genre: "Pop",
                     coverUrl: "https://s3.amazonaws.com/CoverProject/album/album_david_bowie_best_of_bowie.png",
                     year: "1992")

  let album2 = Album(title: "It's My Life",
                     artist: "No Doubt",
                     genre: "Pop",
                     coverUrl: "https://s3.amazonaws.com/CoverProject/album/album_no_doubt_its_my_life_bathwater.png",
                     year: "2003")

  let album3 = Album(title: "Nothing Like The Sun",
                     artist: "Sting",
                     genre: "Pop",
                     coverUrl: "https://s3.amazonaws.com/CoverProject/album/album_sting_nothing_like_the_sun.png",
                     year: "1999")

  let album4 = Album(title: "Staring at the Sun",
                     artist: "U2",
                     genre: "Pop",
                     coverUrl: "https://s3.amazonaws.com/CoverProject/album/album_u2_staring_at_the_sun.png",
                     year: "2000")

  let album5 = Album(title: "American Pie",
                     artist: "Madonna",
                     genre: "Pop",
                     coverUrl: "https://s3.amazonaws.com/CoverProject/album/album_madonna_american_pie.png",
                     year: "2000")

  albums = [album1, album2, album3, album4, album5]
}
In the initializer, you’re populating the array with five sample albums. If the above albums aren’t to your liking, feel free to replace them with the music you enjoy. :]
Now add the following functions to the class:
func getAlbums() -> [Album] {
  return albums
}

func addAlbum(_ album: Album, at index: Int) {
  if (albums.count >= index) {
    albums.insert(album, at: index)
  } else {
    albums.append(album)
  }
}

func deleteAlbum(at index: Int) {
  albums.remove(at: index)
}
These methods allow you to get, add, and delete albums.
Build your project just to make sure everything still compiles correctly.
At this point, you might wonder where the PersistencyManager class comes in since it’s not a Singleton. You’ll see the relationship between LibraryAPI and PersistencyManager in the next section where you’ll look at the Facade design pattern.
The Facade Design Pattern

The Facade design pattern provides a single interface to a complex subsystem. Instead of exposing the user to a set of classes and their APIs, you only expose one simple unified API.
The following image explains this concept:
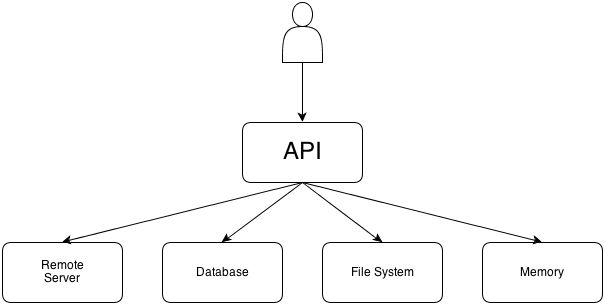
The user of the API is completely unaware of the complexity that lies beneath. This pattern is ideal when working with a large number of classes, particularly when they are complicated to use or difficult to understand.
The Facade pattern decouples the code that uses the system from the interface and implementation of the classes you’re hiding; it also reduces dependencies of outside code on the inner workings of your subsystem. This is also useful if the classes under the facade are likely to change, as the facade class can retain the same API while things change behind the scenes.
For example, if the day comes when you want to replace your backend service, you won’t have to change the code that uses your API, just the code inside your Facade.