Core Graphics Tutorial: Lines, Rectangles, and Gradients
In this tutorial, you’ll learn how to use Core Graphics to draw lines, rectangles, and gradients — starting by beautifying a table view! By Tom Elliott.
Showing Your New Cell
To see your new view in action, open MasterViewController.swift. In tableView(_:cellForRowAt:), add the following code immediately after dequeuing the cell in the first line of the method:
if !(cell.backgroundView is StarshipsListCellBackground) {
  cell.backgroundView = StarshipsListCellBackground()
}

if !(cell.selectedBackgroundView is StarshipsListCellBackground) {
  cell.selectedBackgroundView = StarshipsListCellBackground()
}
This code sets the cells’ background view to be that of your new view. Build and run the app, and you will see a lovely, if garish, red background in every cell.

Amazing! You can now draw with Core Graphics. And believe it or not, you’ve already learned a bunch of really important techniques: how to get a context to draw in, how to change the fill color and how to fill rectangles with a color. You can make some pretty nice UI with just that.
But you’re going to take it a step further and learn about one of the most useful techniques to make excellent UIs: gradients!
Creating New Colors
You’re going to use the same colors again and again in this project, so create an extension for UIColor to make these readily accessible. Go to File ▸ New ▸ File… and create a new Swift File called UIColorExtensions.swift. Replace the contents of the file with the following:
import UIKit

extension UIColor {
  public static let starwarsYellow =
    UIColor(red: 250/255, green: 202/255, blue: 56/255, alpha: 1.0)
  public static let starwarsSpaceBlue =
    UIColor(red: 5/255, green: 10/255, blue: 85/255, alpha: 1.0)
  public static let starwarsStarshipGrey =
    UIColor(red: 159/255, green: 150/255, blue: 135/255, alpha: 1.0)
}
This code defines three new colors, which you can access as static properties on UIColor.
Drawing Gradients
Next, since you’re going to draw a lot of gradients in this project, add a helper method for drawing gradients. This will simplify the project by keeping the gradient code in one place and avoid having to repeat yourself.
Select File ▸ New ▸ File… and create a new Swift File called CGContextExtensions.swift. Replace the contents of the file with the following:
import UIKit

extension CGContext {
  func drawLinearGradient(
    in rect: CGRect,
    startingWith startColor: CGColor,
    finishingWith endColor: CGColor
  ) {
    // 1
    let colorSpace = CGColorSpaceCreateDeviceRGB()

    // 2
    let locations = [0.0, 1.0] as [CGFloat]

    // 3
    let colors = [startColor, endColor] as CFArray

    // 4
    guard let gradient = CGGradient(
      colorsSpace: colorSpace,
      colors: colors,
      locations: locations
    ) else {
      return
    }
  }
}
There’s a lot to this method:
- First, you set up the correct color space. There’s a lot you can do with color spaces, but you almost always want to use a standard device-dependent RGB color space using
CGColorSpaceCreateDeviceRGB. - Next, you set up an array that tracks the location of each color within the range of the gradient. A value of 0 means the start of the gradient and 1 means the end of the gradient.
Note: You can have three or more colors in a gradient if you want and you can set where each color begins in the gradient in an array like this one. This is useful for certain effects.
- After that, you create an array with the colors that you passed into your method. Notice the use of
CFArray, rather thanArray, here as you are working with the lower level C APIs. - Then, you create your gradient by initializing a
CGGradientobject, passing in the color space, array of colors and locations you previously made. If, for whatever reason, the optional initializer fails, you return early.
You now have a gradient reference, but it hasn’t actually drawn anything yet — it’s just a pointer to the information you’ll use when actually drawing later. It’s nearly time to draw the gradient, but before you do, it’s time for a bit more theory.
The Graphics State Stack
Remember that Core Graphics Contexts are state machines. You have to be careful when setting state on a context, especially within functions that you pass a context or, as in this case, methods on the context itself, as you cannot know the state of the context before you modify it. Consider the following code in a UIView:
override func draw(_ rect: CGRect) {
  // ... get context

  context.setFillColor(UIColor.red.cgColor)
  drawBlueCircle(in: context)
  context.fill(someRect)
}

// ... many lines later

func drawBlueCircle(in context: CGContext) {
  context.setFillColor(UIColor.blue.cgColor)
  context.addEllipse(in: bounds)
  context.drawPath(using: .fill)
}
Glancing at this code, you may think that it would draw a red rectangle and a blue circle in the view, but you’d be wrong! Instead, this code draws a blue rectangle and a blue circle — but why?
Because drawBlueCircle(in:) sets a blue fill color on the context and, because a context is a state machine, this overrides the red fill color set previously.
This is where saveGState(), and its partner method restoreGState()), come in!
Each CGContext maintains a stack of the graphics state containing most, although not all, aspects of the current drawing environment. saveGState() pushes a copy of the current state onto the graphics state stack, and then you can use restoreGState() to restore the context to that state at a later date and remove the state from the stack in the process.
In the example above, you should modify drawBlueLines(in:) like this:
func drawBlueCircle(in context: CGContext) {
  context.saveGState()
  context.setFillColor(UIColor.blue.cgColor)
  context.addEllipse(in: bounds)
  context.drawPath(using: .fill)
  context.restoreGState()
}

You can test this out for yourself by opening RedBluePlayground.playground in the Download Materials button at the top or bottom of this tutorial.
Completing the Gradient
Armed with knowledge about the graphics state stack, it’s time to complete drawing the background gradient. Add the following to the end of drawLinearGradient(in:startingWith:finishingWith:):
// 5
let startPoint = CGPoint(x: rect.midX, y: rect.minY)
let endPoint = CGPoint(x: rect.midX, y: rect.maxY)

// 6
saveGState()

// 7
addRect(rect)
clip()
drawLinearGradient(
  gradient,
  start: startPoint,
  end: endPoint,
  options: CGGradientDrawingOptions()
)

restoreGState()
Clipping is an awesome feature in Core Graphics that lets you restrict drawing to an arbitrary shape. All you have to do is add the shape to the context but, then, instead of filling it like you usually would, you call clip() on the context, which then restricts all future drawing to that region.
So, in this case, you’ll set the provided rectangle on the context and clip before finally calling drawLinearGradient(_:start:end:options:) to draw the gradient.
- You start by calculating the start and end points for the gradient. You set this as a line from the top-middle to the bottom-middle of the rectangle. Helpfully,
CGRectcontains some instance variables likemidXandmaxYto make this really simple. - Next, since you’re about to modify the state of the context, you save its graphics state and end the method by restoring it.
- Finally, you draw the gradient in the provided rectangle.
drawLinearGradient(_:start:end:options:)is the method that actually draws the gradient but, unless told otherwise, it will fill the entire context, which is the entire view in your case, with the gradient. Here, you only want to fill the gradient in the supplied rectangle. To do this, you need to understand clipping.
Time to give this method a whirl! Open StarshipsListCellBackground.swift and, after getting the current UIGraphicsContext, replace the code with the following:
let backgroundRect = bounds
context.drawLinearGradient(
  in: backgroundRect,
  startingWith: UIColor.starwarsSpaceBlue.cgColor,
  finishingWith: UIColor.black.cgColor
)
Build and run the app.
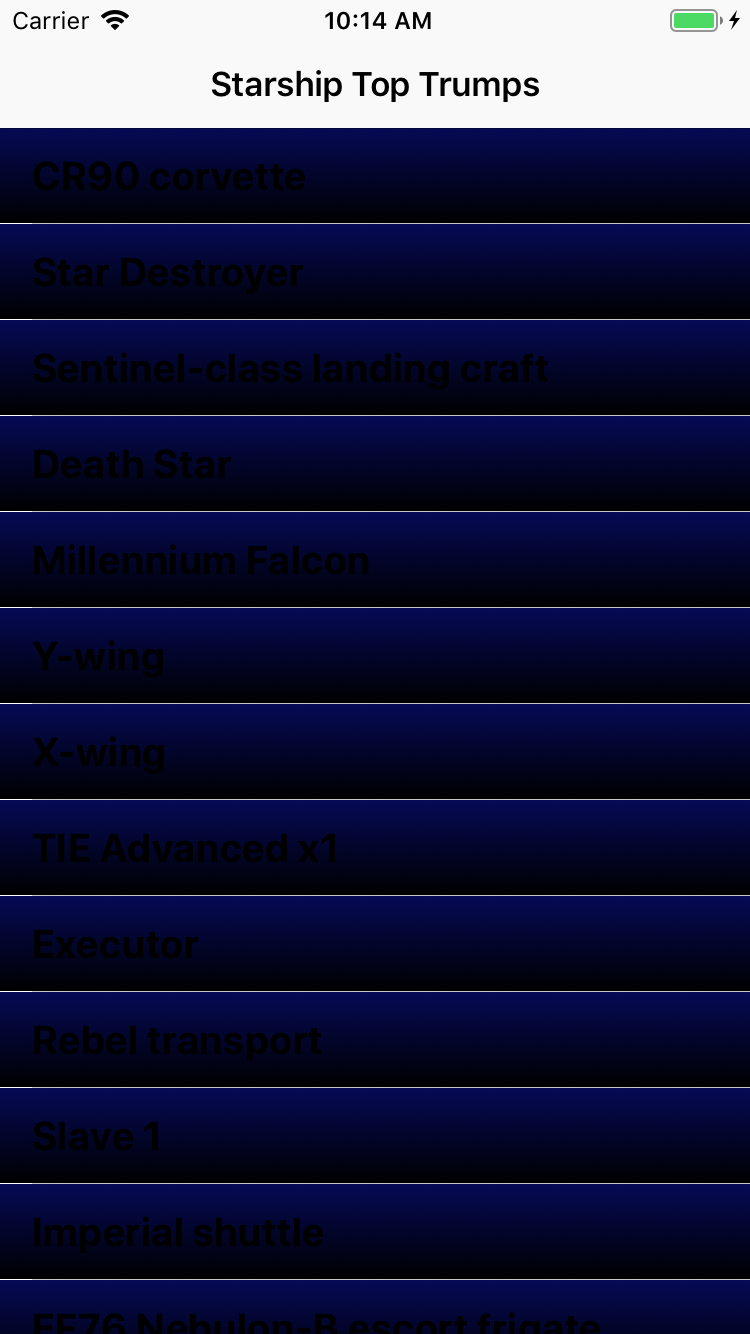
You have now successfully added a gradient background to your custom cell. Well done, young Padawan! However, it would be fair to say the finished product isn’t exactly looking great just now. Time to fix that with some standard UIKit theming.